If you’ve ever shot photos indoors, you know how tricky it can be. The lighting can be inadequate, and a decent backdrop can be hard to come by. If the nuances of shooting inside have you avoiding it altogether, today is the day that changes! Whether you’re wanting to capture candid shots of your family or gain the flexibility afforded to you when you have the ability to shoot sessions indoors, these are three easy tips for making your environment work for you when taking indoor photos!
Find the Best Light
The key to a great photo is knowing how to use light. Study where and how light flows into the space you have, and find ways to make it work for you. Look at spaces near windows or open doors where light can flow into the room. This image was taken in the corner of my dining room. Not exactly a glamorous set-up, but the north facing glass doors always let in the perfect amount of light.

The back corner of my dining room isn’t exactly photo studio central, but studying the available light will lead you to see possibilities in places you may have overlooked or hadn’t noticed before! Pay close attention to the areas near windows and exterior doors. In the image below, there was a window behind the rocking chair, and I stood on my tippy-toes pressed against the wall and window casing behind me to get the shot.
Additionally, when taking photos inside, there are often multiple light sources, which can make it difficult to achieve the proper white balance. Sticking to one type of light source (window light, lamp light, etc) when at all possible will help keep your white balance in line.
Consider Your Equipment
Using the right equipment can make a big difference when shooting indoors! There are certain types of lenses and other tools that can help set you up for success. Because light tends to be more limited indoors, you’ll want to use a “fast lens,” or a lens with a large maximum aperture. The large aperture will allow a lot of light into your camera’s sensor, enabling you to get the best shots even in limited light. If you’re still shooting with your kit lens, check out this article about why you might think about upgrading, especially if you’re shooting indoors.
The 50mm 1.8 is an excellent choice if you’re just upgrading from the kit lens and needing something with a wide aperture for indoor shots. If you’re interested in capturing lifestyle-type photos, and especially if you’re using a crop sensor camera, you might want to think about using the wider angle 35mm lens to help capture the whole scene.
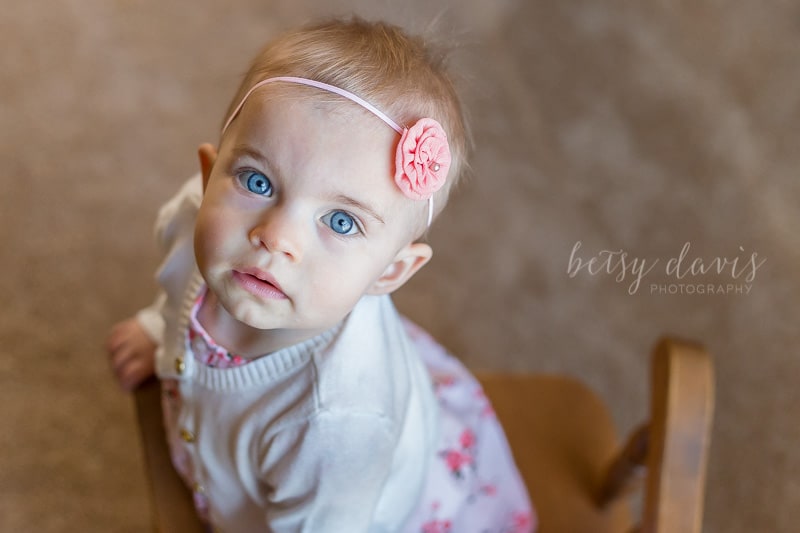
Reflectors are another excellent tool that can be used to help bounce light onto your subject. A reflector takes the available light and allows you to redirect it to a desired location. Look for things that can naturally bounce and spread light for you: this could be a neutral colored floor or wall, a mirror that bounces light around a room, or even a large white piece of foam board that you position to bounce light onto your subject. You can also purchase a variety of photography reflectors online. This image of my daughter was taken on my kitchen floor. The window is behind her, but out of the frame about 20 feet on camera right is our front door, which I opened during this shot. Opening the door not only flooded this space with light, but the floor served as a natural reflector to further bounce that light onto her face where there may otherwise have been shadows.

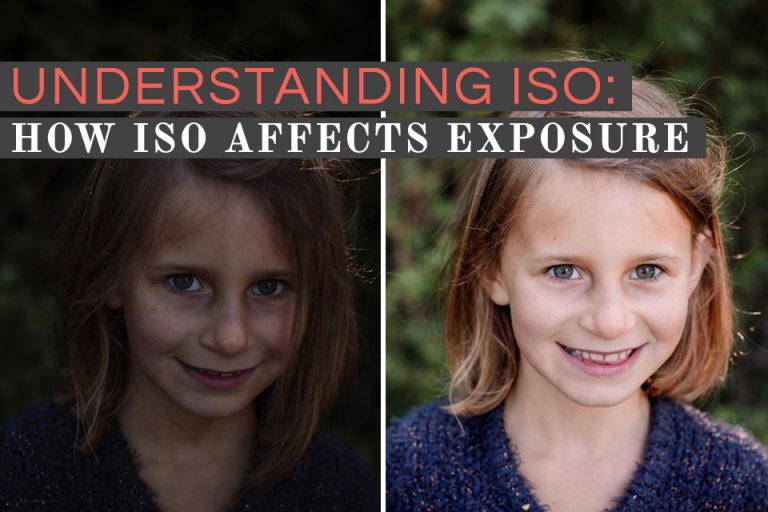
One last thing to consider when it comes to your equipment is your camera’s ISO capabilities. Often times, shooting indoors will require the use of a higher ISO to obtain the proper amount of light for a well-exposed shot. Most full-frame cameras will perform better at higher ISOs than a crop-sensor camera because of the larger sensor. This does not mean that you can’t take a quality image at a high ISO with a crop-sensor camera! In fact, you can read more about crop vs. full frame in this article.
Analyze Your Setting
After you have studied the light and selected your equipment, take a good look at the space you have to work with. Look for a clean, open space for your photos. Look for places with a blank or non-distracting backdrop. Don’t forget about the unexpected places, too. Here is one I took in my garage!

Even for candid shots, you may want to remove any clutter from the frame. You want your lifestyle photos to tell the story of the moment, but it can still be helpful to move away any distracting clutter that doesn’t add to the story. Before I took this shot of my kids, I moved two water cups and half-eaten apples off the table 🙂

And lastly, don’t be afraid to experiment with perspective! Let’s face it: shooting indoors can introduce a lot of obstacles if the setting isn’t ideal. Use unique perspectives to your advantage! Not only will this set your images apart, but when used wisely, you can control the representation of your environment as well. This photo tells one part of a fun story of making strawberry shortcake with my kids. What my perspective leaves out of the story is my messy kitchen! Now that’s a win!

Click here to read more on creative ways to use window light in your photos!
Don’t let yourself be limited by shooting indoors! Get bold and seek out the best light you have available, and use it! Find creative ways to make your setting work for you. And then let us know how it’s going in the comments! We love to hear from you!