Let me start by saying that I love aperture and I think YOU love aperture too, you just might not know it yet 😉
Looking to improve your photography? Just enter any questions you have about improving your photography below and hit send and get answers & feedback instantly - for FREE! Submit QuestionsYou know how sometimes you see photos that have a gorgeous blurred background and the subject just “pops” right off the screen like the photo below? Aperture helps you get that “blur” that most all of us love so much. Conversely, sometimes we don’t want the background blurred at all and we want everything in focus – aperture helps us do that too!


Aperture is one of the 3 key elements that work together to create an exposure and before you can expect to start getting the most out of your camera you must first gain an understanding for the basics of exposure and really have a good grasp on aperture. We’ll also talk about those other 2 elements, shutter-speed and ISO in another article.
Here’s exactly what you will discover today so we can ensure when you are done reading, you’ll have a deeper understanding of aperture.
- Understanding what is aperture in photography
- How aperture is measured
- How aperture relates to depth of field
- What should you set your aperture to?
- When should you use aperture priority mode?
- Suggested aperture settings for photographing people to maintain focus.
- Understanding aperture key takeaways
Step 1: Understanding What is Aperture in Photography?
In terms of actually understand aperture, aperture simply refers to how large or how little the opening is through the lens.
With that said, when you are using a wide aperture you are letting in more light than you are when using a narrow aperture. If you are taking photos with the same ISO and shutter speed but just changing aperture, you’ll be adjusting the exposure by simply controlling how much or how little light you allow in through the lens to hit your camera’s image sensor, or film.
Using lenses that have very wide apertures like fast primes, that let in a lot of light, are a necessity to get natural light shots such as below after 15-25min past the sunset. This window of time, often gives a nice ambient glow of lights that can be tough to capture and preserve otherwise. The photo below was taken with Nikon 28 1.8, at f/1.8, ISO 1000 and 1/60th
Lens aperture is what controls how much or how little light can pass through the lens and onto the camera’s sensor.

Step 2: How is Aperture Measured
Aperture is measured in “f-stops” and a lower f-stop number such as f/1.8 means a wider aperture (lets in more light), a high “f-stop” number like f/22, means a narrower aperture, letting in far less light. Each lens has its own aperture range in terms of how wide and narrow of an aperture it can be set at.
An “f-stop” is simply the metric used to describe how open or closed the aperture is.
The entire f-stop scale at 1 “full-stop” increment is: f/1.4, f/2, f/2.8, f/4, f/5.6, f/8, f/11, f/16, f/22.
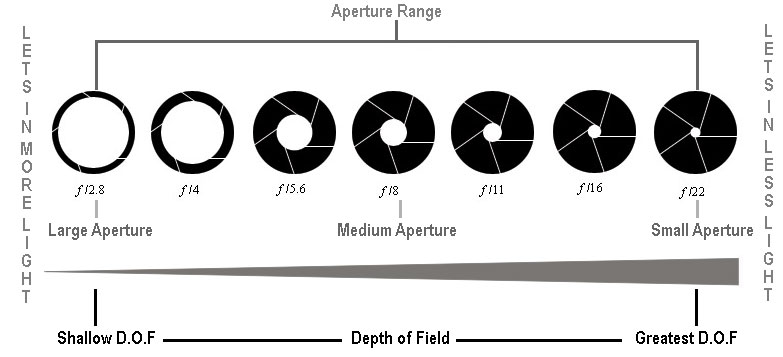
You should know that with each increase in aperture at 1 “full-stop” you are either doubling or halving the amount of light coming through the lens.
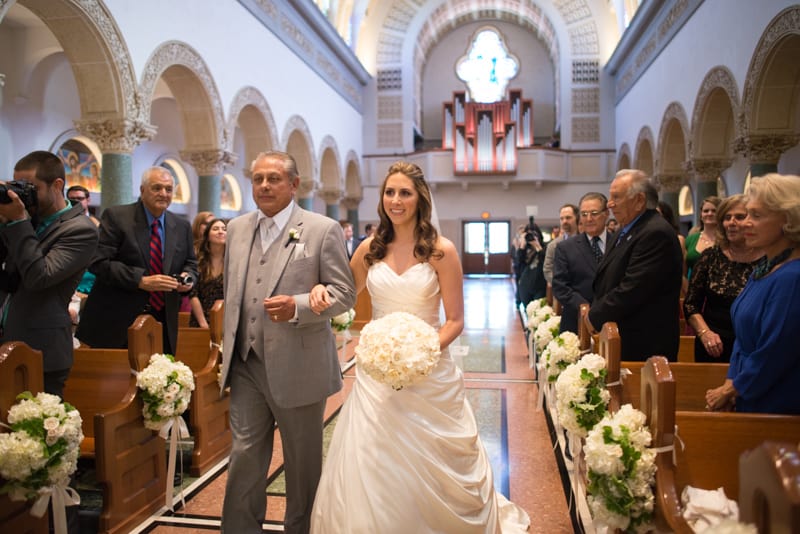
Let’s suppose you’re a wedding photographer shooting in very dimly lit church ceremonies frequently and you really need as much light as you can but the widest aperture lens you have is a f/2.8 lens. If you were to use a f/1.4 lens you will be able to get 4x the amount of light and thus use a 4x as fast shutter speed – which can be the difference between getting a sharp photo and a blurry photo.
Below: I had to shoot at f/1.8 to get a fast enough shutter speed of 1/160th, the freeze the motion and get a sharp photo using natural light only inside a somewhat dark church.
Still confused? This will help. Each f-stop on the scale above is 1 full-stop apart from each other, and each full-stop lets in either twice as much light or 1/2, if you are opening or closing the aperture. Going from f/2.8 to f/1.4 is a 2 full-stop difference therefore you are getting 4x as much light through the lens!
Now you can see why so many photographers love wide aperture lenses that can shoot at f/1.8 or f/1.4 – they can really save you when you’re working in low light conditions.
They also love wide aperture lenses because you have more control over depth of field.
Step 3 – How Aperture Relates to Depth of Field?
Although the primary function of aperture is simply controlling how much or how little light you want or need to let in through your lens it also plays a vital role in controlling depth of field which is simply, how much of a photograph is in sharp focus relative to the out of focus areas of the image.
Depth of field is the distance between the nearest and farthest objects in a scene that appears acceptable sharp in an image.
In other words, it’s how much of the photo that is in sharp focus relative the out of focus areas of the image.
Lens aperture as well and lens focal length play a significant role in how much depth of field there is in a respective photo. Wider apertures have less depth of field (less in focus), narrower apertures have greater depth of field (more in focus). Lenses with longer focal lengths offer greater compression to your images and have less depth of field while wider angle lenses and focal lengths give greater depth of field.
In terms of depth of field, they key to remember is this: the wider the aperture (lower f-stop), the more light you let in and also, the shallower the depth of field & the narrower the aperture (higher f-stop) the less light you let in and greater depth of field.
Here’s a photo taken with my Nikon 50 1.4 at f/1.4 – notice the background “blur”? This demonstrates shallow depth of field.

Here’s a photo taken with my Nikon 16-35 f/4 lens at f/7.1 – notice how both the foreground and background elements are in focus and sharp!

Common Questions Related to Understanding Aperture:
What should you set your aperture to?
What you choose to set your aperture to really depends on two objectives.
- How much depth of field do you want in your photo and
- How much light do you need to let through the lens
If you need a lot of depth of field, to get everything in the scene to be in focus than you’ll need to select a higher f/stop number. However, remember that while you will gain depth of field, you will lose light entering the camera and your shutter speed will slow.
If you want to shoot a portrait at a shallow depth of field to get a lot of background blur than you’ll want to use a wider aperture like f/1.8.
Lastly, if you are shooting in low light conditions you’ll need to use wider apertures to allow for more light as well since a narrower f-stop will cause for too slow of a shutter speed and cause blurry photos.
When should you use aperture priority mode?
I recommend using aperture priority mode when you’re in conditions where the lighting is changing fast and where capturing moments and candids are paramount. Aperture priority mode is a great option for weddings where you can easily make quick adjustments based on how much or how little depth of field you need in your image.

Suggested aperture settings for photographing people to ensure everyone is in focus.
Now that we know aperture controls depth of field, you likely want to know which aperture to use to make sure everyone is in focus. You can use the settings below as a guideline and then adjust from there.

Keep two things in mind:
- First, to keep groups in focus it’s always best to have them standing at the same distance to your camera (in a line), rather than scattered.
- Second, the apertures listed below are the widest / lowest f-stop recommended aperture settings, you can always use narrower apertures for even more depth of field and more of the photo in focus.
Does this chart help you? Please “pin it” on pinterest!

Understanding Aperture Key Takeaways
- Apertures role on controlling amount of light to enter the camera – the lower the f-stop number, the larger the lens opening and the more light you let in while the higher the f-stop number, the narrower the lens opening and thus the less light you let in.
- Effects how much or how little depth of field is in each photo – if you want to isolate your subject and have them pop off of the photograph, you want a shallower depth of field and to use larger apertures (lower f-stop). If you need a lot of the photo in focus, like a large group photo, you need to use narrower apertures (higher f-stop) to give yourself greater depth of field to ensure all are in focus.
That’s it! I told you it wasn’t hard. Now that you understand what aperture is, what it does and more importantly how it effects your photos you take, we now have to learn all about ISO and shutter speed and then ultimately understand how they all work together to create an actual exposure.
Here are some related articles that you should read next.
Depth of Field Explained
ISO Setting Like a Pro!
Understanding the Exposure Triangle
In fact, to see a fun and informative video tutorial explaining these three elements check out the videos below!