
When you want to add a soft focus to your crisp and clear image, you can use the blur layer option in Photoshop. For years, people have been using Photoshop to edit their photos to get their desired look. There are several blurring background effects that photogs can do to enhance the object in the foreground.
Once you learn the steps of getting a blurred background, you can add the blur effect to any part of any photo. For many users, adding the blur filter with a filter is easier than learning how to use f-stops, and it’s less expensive than buying special lenses. Our step-by-step guide will help you understand how to blur a layer mask in Photoshop.

When you use the app for blurring the background, you are technically changing the depth of field. It is always best to do this with the original shot, but the app gives users the option to do it by getting the subjects out of the photo, adjusting the background with filter blur, and adding the sharp subjects back into the shot.
Step 1: Open Your Imperfect Image in Photoshop
The first step is to open the image that you want to apply the blur filter. Then, you should use the Layers options. When you open that option, choose the background layer and duplicate it using the Duplicate Layer in the layers panel. To help yourself manage the many files you will create, name this layer “Blur.”
Keep in mind that you have options to click on when opening an image to blur. You can open it the traditional way by selecting an image from the menu. Or you can right click and drag the image from your desktop into the workspace.
Remember that you can zoom into the image with a click and drag to see a close-up version of everything you do as you blur. As you begin to paint the picture and add the blur, look closely as your paintbrush nears the part of the photo that you want clear.
Step 2: Blur the Duplicate
For this next step, you will work with the file you have labeled “Blur.” You aren’t doing anything fancy with this step, but instead, you are using a mask to blur the whole photo. There are two choices that you should use to get the blur effect you want. The first is the Blur, and the second is the Gaussian Blur.
You will need to set a Radius to get the degree of blur you want. A Gaussian blur radius of 70 is a good choice, but you can play with the degree to get the blur you want. Keep in mind that you are blurring the entire photo so that the foreground image will be just as blurred as the background.
What is Gaussian Blur?
The popular effect earned its name from the man who developed the mathematical function that gets the job done. German mathematician Carl Friedrich Gauss, considered one of the best mathematicians ever to walk the Earth, developed this technique in the 1800s. The result of his formula is a style that looks like a piece of vellum placed atop a photo.
This tool decreases the extreme outliers with pixels at its foundation, so they look smooth and soft.
When Should You Use Blur Gaussian?
Many photographers use this Photoshop filter too often. Ideally, photographers should edit photos with low light, because they have too much noise. This filter tool is also ideal to use when placing text above a picture. The blur filter makes the text look clean and crisp.
How Should I Use the Photoshop Effect?
The Gaussian blur will draw the eye to the area of the photo that is not smudged. The human eye just does this, so the tool is useful if you are taking pictures to sell a product. It is also helpful if you need to hide something, like a license plate or a child’s face.
The Photoshop effect can also fix issues with your photos. Because of the way cameras capture light, some images can have unintentional outlines around objects in the background. When you use the Gaussian blur, you can soften those unwanted outlines which often are made of bright pixels.

Some photogs choose it to make their photos look more artistic. You can play around with it and layer masks and see how it affects various areas of your image.
You can create a sense of movement or other-worldliness when you blur unexpected areas. Just remember to click OK when you are ready to keep the photo and each layer mask.
Step #3: Add the Blur on a Ghost Layer
To do this, choose the icon that looks like a half-moon. It is in the Layers panel in Photoshop. Once this layer opens, you should select Levels, but do not move the sliders for the layer mask in the layers panel. Use the default settings in Levels, because the layer mask in this option keeps things sharp or blurred.
If your Photoshop version allows this, you will need to use the Levels 1 layer in the layers panel. This will be under the Blur layer mask. With the Alt key pressed, use the left-click option of your mouse to move the Blur icon to the right in this layer mask.
You will need to see the double-circle before you can move the icon. This is a bit of a cheat move, but it makes working with each layer easier.
Step #4: Time to Paint the Blur on the Layer
This is where it gets fun because you get to use the paintbrush on the layer mask. While in the Levels layers panel, click on the white rectangle. Your original image will appear as the layer mask turns black. Use the soft-edged paintbrush. Then, choose your blur pixel size – bigger is better. So, many users end up picking 500.
Before you begin painting the layer mask, set the Opacity to 100% and the foreground to white. Then the fun starts. As you start to paint the layer mask, you will see the blur effect.
As you paint and blur the image on the layer mask, change the paintbrush size and the opacity. As you move the brush closer to the foreground, reduce the size of the brush. This will give you more control over the blur and keep the foreground image sharp.
As you paint the layer mask, pay close attention to the places where the backgrounds blurs join on the adjustment layer. They can be distracting and obvious if you do not cover them intentionally. As you get closer to the foreground image, begin subtly reducing the opacity to lower numbers. Finally, use the alt key to see the blur layer mask and find spots that you need to paint.
Are Other Blur Choices Available?
You can choose from several blur designs for the layer mask. You can use them to background blur photoshop images in each layer, or you can use them to blur something new, like an unexpected object.
With the lens blur, you can shrink the depth of field on a layer mask and make an adjustment layer that draw the eye to the object of your choice. You can also choose the iris blur to show off a focal point.
And, some people love using the motion blur to add a sense of drama to their photos. It is also possible to take out overly smooth areas by adding noise to the photo on another layer.
No matter what adjustment layer you use, do it on a new adjustment layer. Otherwise, you can permanently damage your original photo if you make blur mistakes when you do not use the layers panel.
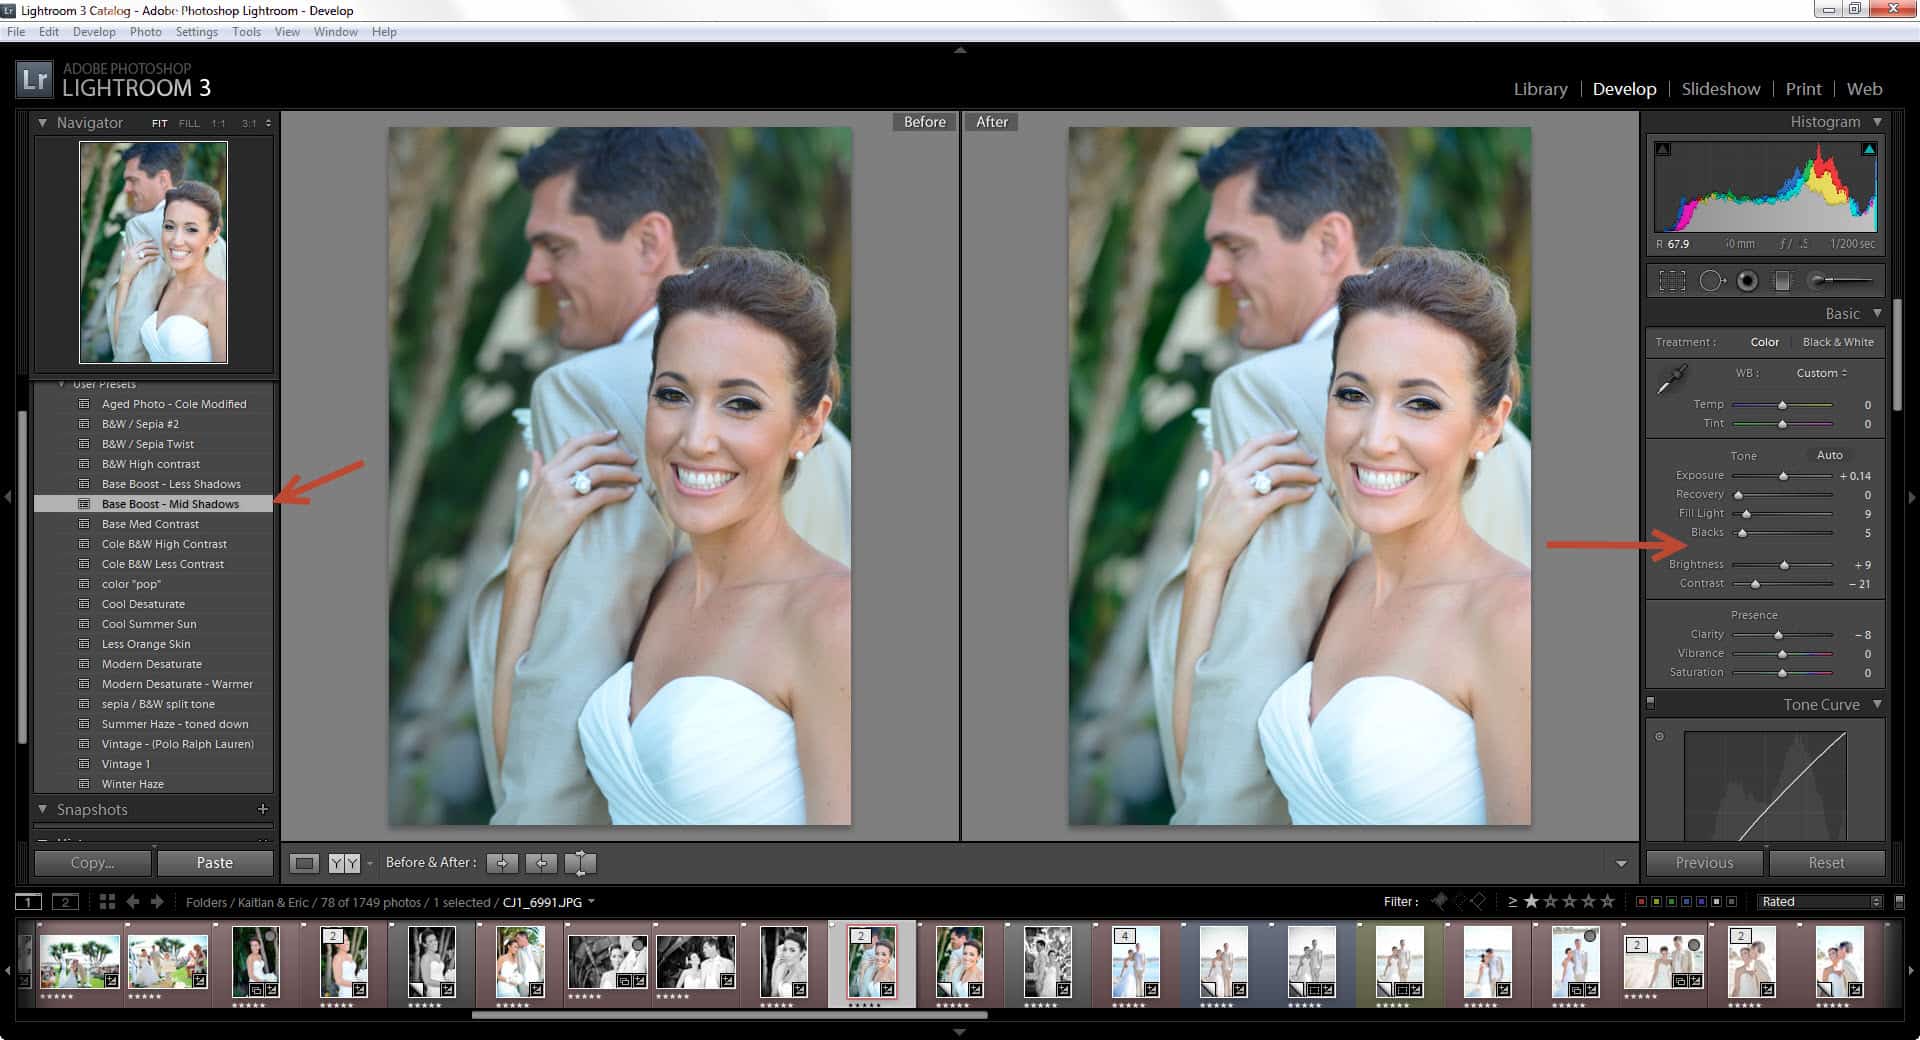
SPECIAL OFFER – Discover the secret to adding “wow factor” & retouching your photos, without having to use Photoshop, in only 3 clicks (…even if you’re brand new to editing your photos – guaranteed!)
Join the 54,000 other photographers using our Polished Lightroom Adjustment Brushes Presets Collection and get them here for 80% off!

How Is Blur Different From Smudge?
Blur is only one way to alter a photo. There are several blur tools you can select from the layers panel, and there is an option in the dialog box called smudge. These two work differently, despite the fact that they both work with pixels in designated layers. Try them with a new layer to see how they work.
The Blur tools work by removing the contrast that separates adjacent pixels on a new layer. The Smudge tool works by moving the pixels; it literally pushes pixels around the new layer.
How Do You Use the Blur Tool?
The blur steps are always the same. But, you can add a few in as you make your changes in each layer. The first step is to open the picture, create a new layer, and select the Blur tool.
Before you start working on the layer from the layers panel, you can choose the way you want to blur the pixels to blend by using the mode menu. Using the slider, you can set the intensity of the blur on the layer. Start blurring the layers by painting over the photo. When you are happy with the result, save the layer and the image.

What are the Steps to Blur with a Layer Mask?
This is a more complicated way of adding an attractive blur to a layer. After you click and drag your picture into the Photoshop workspace, you create a layer mask for the first layer of blur. You can do this by picking the layer mask option in the layers panel. Use the tool that has a rectangle with a circle in it – this is the layer mask.
The next step on the layer is to set the foreground of the photo as black. So, you should see “Layer 1” as being black. If this does not happen automatically, you can use the tool panel to choose the colors for the foreground and background for the layer. The top choice is the foreground, and the bottom choice is the background for that selected layer. You might find the default to be white, so change it if necessary for that layer.
This might sound strange, but the next step is to switch the foreground of the same layer to white. With the layer mask black, only some of the photo will be affected by the blurring. If you want to see how this works, use white paint around the subject on that layer you want to stay crisp. You should see a halo around your foreground subject with the blur in the background.
You can check your work by looking back at the original photo without the blur. If you hold the shift key and click on Layers 1 mask, you should be able to see the difference. You will also see a red X appear on the layer mask, which you can remove by using a click and shift on the Layer 1 mask.
After you have removed the red X, you can delete Layer 1 and see the art that you made.
Use the Pen Tool to Highlight the Foreground Subject
If you are trying to use a smart object, you must use the pen tool. Using this tool might test your patience and your cursor control, especially if the subject has several curves on it. The pen tool can help you customize the blur you want by turning it into a smart object
You can find the pen tool just to the left of the workspace. It looks like a fountain pen. You can also use a short-cut of P on the keyboard to select it quickly. Once you have the pen tool activated, you should pick a spot to start tracing the item that you want in the foreground. You click and drag the tool along the edges.
A tip for successful outlining is to stay just inside the subject in the foreground. If you do not do this, you will get background colors in the outline, and this is a distraction on the final product. Remember that you are eventually going to cut out the shape and place it on the background.
When you are outlining, be patient and stay in control. In the tight areas with little curves and detail, make your points closer together, as the pen will connect those when you are finished outlining. If you have larger curves or long lines, you can space your points farther apart.
When you outline, you will move the pen in one direction. But, there might be a time when you have to change direction. You do this by holding the ALT or OPTN key down, and an arrow will appear. You can then click and drag the point in the direction you want to go.
You can also move points on the outline after you are finished. You do this by hitting the CMD or CTRL key to drag the point where you want it.
Add the Selected Image to the Altered Background
If you have outlined your foreground image on a blurred layer, you duplicate the background layer with a drag and drop to the New Layer icon. You should see an option called Background appear. Put your mouse inside the outlined part of the photo, then right click.
Once you right click, you will see “Make Selection,” and you have to click and drag on some options. Select Anti-Alias and New Selection. Then, set the Feather Radius to .5 pixels or something close to that. Then, hit OK.
Finally, select the Background Layer and drag your cutout image to it. You will see two layers – the blurred one and the new one. Put the new one over the blurred, adjust it, and use the spot healing brush to soften the sharp spots. Convert the background layer to a smart object, brush the hair, and your image should be complete.