Get started understanding flash triggers and receivers and up your off-camera flash game!
Flash photography feels really intimidating at first. There are all these different settings and terminology. Taking your flash off-camera and shooting wirelessly? That seems even more overwhelming! Triggers, receivers, signals, groups…just argh! I know plenty of photographers who quit even trying to understand and never venture beyond natural light. But don’t quit…try reading this beginner’s guide to understanding flash triggers and receivers instead!
Looking to improve your photography? Just enter any questions you have about improving your photography below and hit send and get answers & feedback instantly - for FREE! Submit QuestionsIn this tutorial, I’m going to give you a basic rundown of one element of using off-camera flash…understanding flash triggers and receivers. You’ll learn what they are, how they work, what groups and channels mean and a few troubleshooting ideas for when you get stuck.
So let’s jump right in.
Why do you need flash triggers and receivers?
Sometimes our scene needs extra light, which we introduce through the use of flash. For the maximum control, flexibility and power, photographers use off-camera flash. Off-camera flash means the flash (either a speedlight or strobe) is located somewhere other than on top of your camera. That flash could be on a light stand three feet from you or held by an assistant 30 feet away from you. Either way, that’s off-camera flash.
But we need the flash to fire when the shutter fires on the camera. That’s what’s giving us that extra light after all. So we use a trigger on the camera to send a signal to the flash (FIRE!) and a receiver on the flash to interpret the signal (FIRE!). Thinks of them as sort of a walky-talky system for your camera and flash. And like walky-talkies, they use radio channels to communicate.
How your camera/trigger/flash communicate
The camera talks to the flash three different ways: via infrared signals (which are sent optically) or via radio signals. There’s also a hybrid method, but we aren’t going to get into that right now for simplicity purposes.
Infrared is less expensive and works great some of the time. But because it is an optical signal, the camera and flash have to actually see each other and have line of sight. Shooting outdoors in bright sunlight or indoors in weird lights (think DJ disco ball) affects the communication. And sometimes another flash firing in the room trips your flashes.
Many photographers, then, choose to use radio communication. Radio based devices don’t require line of sight, they are more reliable and won’t be set off by someone else’s flash. Their disadvantages include cost and the learning curve of setting them up. This tutorial talks about a radio-based trigger and receiver system to fire your flashes.
What are flash triggers? What do flash triggers do?
Flash triggers are the device the camera uses to talk to the flash. The trigger is connected to your flash via the hot-shoe (that little bracket that sits on the top of your camera). When you fire the shutter, the camera sends out a little electronic pulse to the trigger to activate it. The trigger takes over from there.
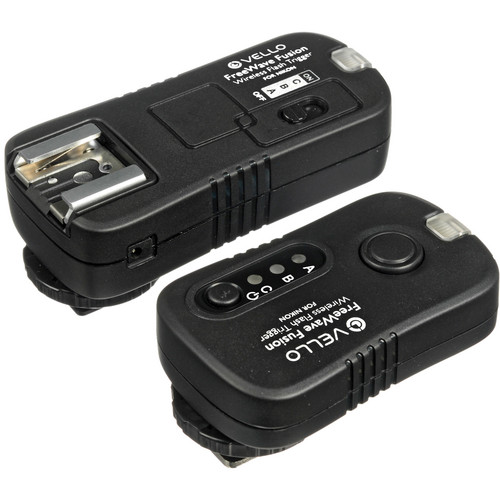
Triggers come in lots of different makes and models. But there are two basic styles of triggers. First, there are what we call manual or dummy triggers. These triggers control only what channel the signal is sent on. If you want to make other changes to the flash, though, you need to do that on the flash itself. Click here to see an example of “dummy” triggers.
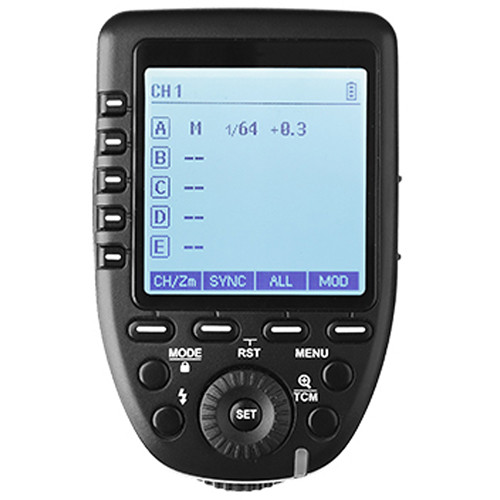
Other triggers are smarter. These triggers allow you to control more or even all the functions of the flash directly from your camera. A smart trigger, for example, might let you set flash power, change the mode of the flash from manual to TTL or change the zoom. If I want to change the power of the flash, I can do it from my “smart” trigger. If I wanted to change the flash with a manual-only dummy trigger, I’d have to physically walk over to the flash and change the power.
Smart triggers are handy because you control everything right from the trigger on the top of your camera vs. walking to each flash and changing it manually. Click here for an example of a “smart” trigger.
What do flash receivers do?
Flash receivers are the device that attaches to your flash and receives and acts on the signal from the trigger. Some flashes require an external trigger to operate. But lighting manufacturers, like Godox, are starting to make flashes with receives built into them.
Understanding flash triggers and receivers
Begin by putting your trigger on the camera and hooking up your receiver to the flash. Make sure both have fresh batteries. Some receivers connect to your flash via a cable. Check your receiver instruction manual to see the proper connection method. Seat the trigger and the receiver and turn them on BEFORE you turn on your camera or flash.
Next, turn on your flash and your camera. Then choose what channel you will be operating on. Set both the trigger and the receiver to the same channel. You can use any channel you want, just make sure it’s the same on both devices.
If your trigger/receivers/flash support multiple groups, ensure that the group set on the receiver/flash is enabled on your trigger.
Ensure your receiver can receive radio signals and that it’s in manual mode.
Now you’re ready to see if everything is hooked up correctly.
Check to make sure the trigger and receiver are talking to each other by using the “Pilot” or “Test” button. If the flash fires, the trigger, and receiver are communicating correctly. If the flash fails to fire, double-check steps 1 and 2 to ensure correct setup.
Next, adjust your camera settings as needed to enable flash. Then try taking a picture. Does the flash fire? If so, congratulations, you’ve got everything set up correctly and are ready to compose and set exposure.
Want help setting exposure with flash? Check out our tutorial on using a gray card!
If not, look for these items to troubleshoot.
- Is your trigger mounted correctly on your hot-shoe? Is it facing the correct way and fully seated on your camera?
- Ensure your receiver is connected to your camera correctly. Some require the use of a cord. Make sure it’s plugged into the correct spot.
- Is flash mode enabled on your camera?
- Are you using the sync speed? Most cameras have a maximum shutter speed they can attain and still have the flash fire fully. Any faster and the flash can’t finish firing before the shutter closes. Most cameras have a maximum sync speed around 1/160 or 1/200 of a second. Make sure your shutter speed falls below that!
Using multiple lights
You can also fire multiple lights with a single trigger on your camera. You simply need another flash with its own receiver built-in OR a second receiver that’s compatible with your trigger.
To fire a second light, connect the flash to the receiver and set it on the same channel/group as your first light. Firing your shutter should fire it as well!
Understanding flash channels
To talk to each other, your trigger and receiver need to be on the same channel. What channel doesn’t really matter, as long as they are both using the same channel.
So why switch channels?
First, someone else might be using a device in your area that’s causing interference. If your flashes aren’t firing consistently or are firing when you haven’t pushed the button, someone/something else might be interrupting. Move to a higher channel and see if that doesn’t help the situation.
Channels are also really helpful if you have multiple photographers with multiple lights in the same room. If each photographer sets their trigger/receiver/flash to a different channel, each can operate his own set of lights independently of all the others.
Need help understanding what all those functions on your flash our? Check out our meet-your-flash tutorial!
Understanding groups
Once you’ve got the basics down of connecting a single light to your camera via a trigger/receiver, it’s time to wrap your head around groups. Groups are a second important component of understanding flash triggers and receivers.
Groups on a trigger allow you to set different flashes to different exposure levels but fire them all at once. You assign every flash a group letter. Your trigger will then fire every flash with that group letter at the same power/mode as designated on the trigger. Groups also allow you to turn on and off different lights depending on what you might need at any given time.
Let’s work through a few scenarios where groups come in handy.
Scenario A
Say I’m shooting a set of school portraits. I want to use four lights, set up as follows: the main light for my subject, a fill light to fill-in shadows, a rim light to accentuate the hair and provide separation from the background and a light that illuminates the background. But each of these lights needs to be set at different powers. My main uses ¼ power, my fill uses 1/16, my rim light uses 1/32 and my background light uses 1/8 power.
If I’m using dummy triggers/receivers, I simply set my power for each flash on the unit itself. With a “smart” trigger, I need to assign each light a different group so it will fire at the correct power. All my flashes would be on channel 2 but each would be on a different group. So I could assign my main light as A, fill light as B, rim light as C and background light as D. My trigger fires all of them simultaneously but each at its own assigned power.
Scenario B
In this scenario, I’m shooting a wedding reception. I plan to use 4 speedlights to shoot the dance floor. Two speedlights will mount on light stands pointed straight up to bounce off the ceiling to fully illuminate the dance floor. I want to use two others to create some more dramatic portraits using backlighting. One will be on a light stand, the other I want mounted on my camera. The problem is, I don’t ever want all of them firing at once.
The solution is to use groups. I put my two bounce lights on a single group (Group A) because they will use the same power. Then my backlight and on-camera light can each use a different group (B and C respectively). Then as I progress through the reception I can turn each group of lights on or off as needed.
Learn what’s possible
“WAIT!” you’re shrieking. “I can’t even handle a single light off-camera yet and you’re talking 4 lights! Are you kidding me?”
You don’t need to have four or five lights. You don’t even need to have two as you start on your off-camera flash learning journey and begin understanding flash triggers and receivers. And you don’t have to understand why I’d set up my portraits/dance floor lights like that right now.
The important thing is to know is what groups are and that you use them to control different lights (or groups of lights) in different ways. That way, when you are ready to start shooting multiple lights, you have a basic understanding of the concept and what’s possible.

Troubleshooting Triggers and Receivers
If your flashes aren’t firing as they should, here are some troubleshooting items to check:
- Is everything turned on and plugged-in/connected correctly? As I said before, some receivers need a cord like the one above to talk to the flash.
- Do you have fresh batteries in your trigger/receiver/flashes (if you’re not shooting ones that need plugging in.)
- Is your camera enabled for flash?
- Are your triggers/receivers enabled for radio transmission?
- Are your triggers/receivers on the same channel?
- Did you check that your triggers/receivers are on the same group?
- Is your flash in the right mode (i.e. not set to slave mode?)
- Is your camera’s shutter speed set below your maximum sync speed?
- If you are using infrared or optical triggering, does your equipment have line of sight to the other device? Are there other light signals in the area that are causing interference?
How to Trigger An Off-Camera Flash with a Popup Trigger
No discussion on understanding flash triggers and receivers would be complete without a discussion about using a popup flash or on-camera flash to fire your other flashes. The light from the popup flash itself acts as a trigger.
There are a few ways you can do this. First, if your flash is compatible with your camera, you can put your camera’s pop-up flash into commander mode (Nikon) or easy wireless (Canon) and use it in lieu of a separate trigger.
The second way you can use your popup flash is as an optical trigger. You can also use a speedlight mounted on your camera’s hot shoe as an optical trigger. Your off-camera flashes need slave mode enabled and line-of-sight to your popup or hot shoe flash. Then as you hit the shutter, your on-camera flash fires which triggers the off-camera flashes.
This can be a great workaround if you don’t have a radio trigger/receiver for each flash you own. The drawback is that the light from your popup or on-camera flash is added to your scene. You also need line-of-sight communication. If the light from your pop-up flash isn’t reaching your off-camera flashes, they won’t fire. And as we discussed earlier, other light signals might trip your flashes when you don’t want them to.
Practice helps retention
Triggers and receivers and channels and groups can all feel overwhelming at first. The key is simply to practice. The more you get out your equipment, set it up, get it firing and tear it down, the quicker it becomes second nature.
As you start working through multiple-light setups, it might help to write it all down first. Think through how you’re going to set up your lights first. Write it down on a notecard. Then set up your lights referring to your notecard as needed. Soon, it will become second nature and you won’t need the notecard!
Easier than programming your television
Mastering triggers and receivers isn’t really any different than programming your television’s remote. It just seems complicated because of the pressure we put on ourselves. Take some time to learn your equipment and practice with it at home. Soon you’ll be channel surfing and group surfing and understanding flash triggers and receivers with enthusiasm!