
Before we jump into some great bird photography tips, I must warn you…this pastime is highly addictive. You might not know a red-tailed hawk from a red-breasted nuthatch right now, but after a few photo sessions with our feathered friends, you might just become hooked.
Soon, you’ll want to know ALL THE THINGS about all the birds because it’s just so fun and interesting. So don’t say I didn’t warn you…
That disclaimer aside, bird photography is really a lot of fun! It’s a great way to get outdoors and enjoy nature and it challenges you as a photographer.
Looking to improve your photography? Just enter any questions you have about improving your photography below and hit send and get answers & feedback instantly - for FREE! Submit QuestionsIf you already enjoy bird watching or bird hunting, photographing birds adds a fun new dimension to both of those activities as well. Grab that field guide and your camera and let’s get started with some great bird photography advice for beginners.
Bird Photography Tips – Getting Started
Use the Right Gear
Most birds are small, fast, and not inclined to sit in any one place for very long. If you want to take great bird photos, you need the equipment to match those conditions, including a camera with a fast auto-focus and shooting rate, and a lens that’s at least 200mm.
I cover more on the equipment below. But know this is one genre of photography where the wrong gear really will hold you back.
Great Photography Technique Trumps Expensive Equipment
Remember what I just said? I’m going to add a caveat to it. You don’t need thousands of dollars worth of equipment to get great bird shots. Great technique is more important than the latest and greatest gear every time.
Become a Bird Nerd
The more you know about birds, the better the photographer you’ll be. Research the species you’ll find in an area. That helps you know where you might find them. It also helps you know when to head out to shoot, both in terms of the time of day and the time of year.
For example, you won’t find any bug-eaters in the middle of a cold winter. This is especially helpful if you’re making a trip specifically to photograph certain species so you can make the most of your journey.
Invest in a Good Bird Identification Guide.
A good bird ID book helps identify species in your area. They are invaluable for identification, learning basic calls and seeing the range and taxonomic classifications.
We love our National Geographic Field Guide to Birds of North America. If you’re in a different part of the world, ask other birders for some recommendations.

Study Bird Behavior and Habits.
In addition to knowing what birds you’ll find in your area, knowing their general habits helps you be a better photographer. Know what they eat, where they nest, the habitats they prefer and when they are most active during the day.
If you want to photograph horned larks, for example, you’ll look for them in much different habitat than you would a robin or gold finch.
Listen and Learn
Birds are noisy. They chatter to one another constantly and learning their sounds helps you become a better photographer. We often hear a bird before we see it.
If it’s a song you recognize, use your new-found knowledge of that species to know where to look for it. Calls also tell us when animals are in distress, feeding, mating, etc. If you’re adventurous, you can learn to make or project bird calls yourself and try to call them to you!
Move Slowly
Our avian friends are flighty, if you’ll pardon the pun. Move calmly and quietly when you are in the field. Keep your voice low if you have to talk, and don’t make any sudden movements.
Different species and populations have a different threshold for “too close.” It’s tempting to get as close as possible, but there’s also a chance you stress the bird and it flies away.
Get Close
Birds are a relatively small subject. So to get those intimate, really detailed shots, you need to get close. A lens with a long focal length definitely helps, but you’ll want to position yourself as close as possible to the action.
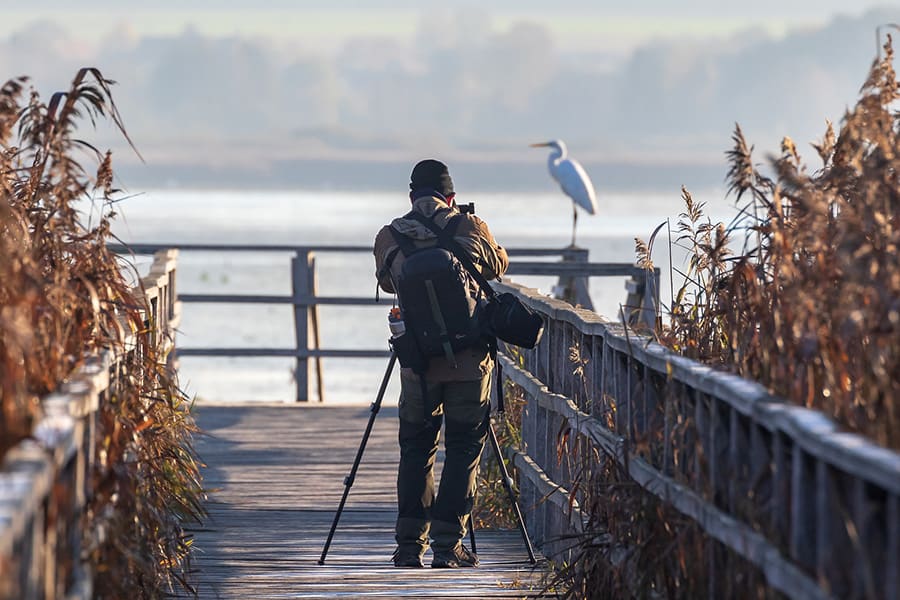
Use a Blind or Conceal Yourself
You’ll stand a much better chance of getting closer to your subject if you use a blind or otherwise conceal yourself. You can invest in a hunting or photography blind that’s made of fabric.
Build your own from natural materials like tree limbs and leaves. Or wear cammo clothes and blend in with the landscape. Trees and tall grass make excellent hiding spots and they don’t cost a dime.
One of your best photography blinds might actually be your own home! Do you have a window that offers you a great view of your yard? Use that and photograph from heated or air-conditioned splendor!
Scout Great Locations
Drive and hike around to find great locations to photograph birds. Water sources like ponds and marshes are great for bug and fish-eaters such as killdeer, willets, cranes, and ducks. Rivers, creeks, and even irrigation ditches are popular with ducks and herons.
Upland game species prefer open prairies with lots of cover and some trees for shelters. A little exploring might net you some great new places to photograph birds.

Don’t Forget About Urban Locations
Some of the best places to photograph birds are in the heart of a city. Parks, ponds, or canals can be found near you and offer the added benefit of individuals that are accustomed to the traffic of people.
My best goose photos are actually from the pond near our local zoo, not the large reservoir where I like to shoot. The geese are accustomed to the comings and goings of people, so I’m able to get close without the use of a blind or even a camo t-shirt.
Plan Your Shooting Spot
If you’re going to build a blind or find a spot to sit and shoot, plan it carefully. What does the background look like? Are you shooting into the sun and fighting haze? Are there lots of trees or leaves in the way? Do you have a wide field of view or are you hampered by things in your shooting lane? Give yourself the best chance to succeed.
Arrive Early
Professional wildlife bird photographers plan to arrive at their shooting location before daybreak and are ready to shoot at first light. If shooting at sunset, they arrive before the best light and are ready when the animals come in to feed, rest, or sleep.

Look for Nest Building Birds
Birds spend a lot of time coming and going as they build their nest. Not only will you get lots of chances to photograph them, you’ll have some interesting shots as they flit about packing twigs, leaves, grasses, reeds or other materials in their beaks.
Give Mamas Their Space
Shooting birds building nests is great. Shooting nesting birds… not so much. Be extremely cautious when shooting a female sitting on eggs or baby chicks in the nest.
If you get too close, the mama bird flies away, leaving her eggs or chicks vulnerable to predators. Owls, hawks, magpies and ravens will feed on eggs and chicks, as will snakes, racoons, opossums, etc. You also stress the mama and babies, which is hard on their systems.
So unless you have a vantage point that is completely obscured from the nest and can observe from a distance, leave those mamas alone.
Always Be Ready!
Get your camera ready before you even get out of your car! Dial in some basic settings, take the lens cap off and be ready to shoot the minute your feet hit the ground. Don’t miss out on an epic shot because you’re fumbling with gear.
Have a Birding Bag
Consider having a birding bag packed and ready to go when you need it. Outdoor photography and bird photography are different from portrait photography and you’ll find yourself wanting certain items.
My outdoor bird photography kit includes a rain cover for my camera and lens, a raincoat, a notebook, binoculars, my bird ID guide, a lens cloth, sunscreen, bug repellent, lip balm, and snacks.
When I’m ready to head out, I just grab that bag and my camera bag and I’ve got everything I need for a morning of bird photography.
Bird Photography Tips – Gear and Equipment
Use Fast Telephoto Lenses
Look for a telephoto lens that has a focal length of 200mm and has a wide maximum aperture like f/2.8 or f/4. These powerful telephoto lenses will let you shoot closer pictures of little birds and give you more light to work with.
When in doubt, choose the longest, fastest telephoto lens you own. Some great beginning bird photography tips on lenses include using the 200-500mm f 5.6, the 70-200mm f.2.8 zoom, or a 100-400mm f4.5- f5.6 lens.
Go for a Zoom Lens. A zoom lens will give you a variety of focal lengths in a single lens, allowing you to photograph individuals that come in closer to you.

Consider a Teleconverter
A teleconverter is a device that snaps between your lens and camera body and increases the focal length of your lens by a factor of 1.4, 1.7 or 2, depending on the size of your converter. It’s a great way to get some extra reach out of a lens without the cost of a really long lens.
For example, a 2.0 teleconverter on a 70-200mm f/2.8 lens makes it a 140-400mm lens. You will lose some light, usually 1-2 stops. But it’s a great way to get some extra reach out of a great lens you already own!
Get more amazing photography tips and join the most supportive photography site around! Your photographic success starts with a $1 trial membership to Cole’s Classroom!
Keep Your Shutter Speed High to Freeze Motion
Keep a high shutter speed to help you stop, or freeze, motion. Start with a shutter of 1/500 and adjust up from there depending on the type of birds you’re photographing.
Smaller faster birds will require a faster shutter, usually 1/1000 or faster. Larger, slower-moving, or stationary birds like turkeys, herons, hawks, and eagles can be photographed at 1/200 at rest up to 1/1000 if on the move.
Lower Your Shutter Speed to Create Motion Blur
If you want to convey motion, use slow shutter speeds, like 1/60 to 1/200. If you can hold it steady on the head, for example, you’ll create a picture of a bird in which the head and eye are in sharp focus but the wings are blurred. This conveys motion and adds artistic visual interest to your birds’ photographs.
You can also keep your shutter speed low and swing the camera in time with a flying bird to keep the bird in sharp focus and blur the background. This is called panning and is another technique that works well in bird photography.
Use a Tripod for Stationary Birds
Long lenses are heavy. Using a tripod or monopod helps stabilize your camera holding long lenses for long periods of time. Take extra care to conceal your monopod or tripod, however. Humans with sticks make even the most genial bird a little hinky.
Go Handheld for Action Shots
You can track the action and shoot flying birds from a really great tripod, but I find it’s a lot more difficult. Go for the handheld instead. Keep your shutter at least as fast as 1/focal length of your lens to prevent camera shake.

Know When to Use Image Stabilization
Image stabilization (also known as vibration reduction) allows you to shoot at slower speeds than you could othersiwse shoot hand-holding your camera. My 70-200mm f/2.8 lens offers about 2 stops of vibration reduction, so I can shoot stationary subjects at 1/100 or even 1/60 without seeing camera shake in my photographs.
But image stabilization doesn’t help stop motion, so don’t rely on it to stop the action of fast moving birds. Some lens manufacturers recommend turning it off when shooting with a tripod. Consult your lens’s manual to know when to use IS and when to turn it off.
Use the Viewfinder
Live View doesn’t work that great for birds. Use the viewfinder and improve your chances of nailing focus.
Show the Eye Keep the Eye Sharp
Unless obscuring the bird’s eye for deliberate artistic reasons, make sure the eye is showing in your image and that it’s the sharpest part of the scene. We connect with other animals through their eyes.

Shoot at Eye-Level Whenever Possible
An image shot at eye-level with the bird helps draw the viewer into the scene and makes us feel like we are part of the story and their world. We see things from the bird’s perspective instead of our typical human-centric perspective and the image is inherently more interesting.
Avoid shooting from directly below the bird. It’s not a very interesting angle and doesn’t draw your viewer in.
Capture Movement
Movement adds immediate visual interest and excitement to your image! Capturing birds in flight takes extra patience and practice. For a deep dive on photographing flying individuals, click here!
Don’t Forget Great Composition
It’s easy to get so caught up in spotting new bird species or nailing an action shot that we forget about good composition. Don’t! Using techniques like the rule of thirds, leading lines and good horizon placement will make a good bird photograph even better!
Shoot in Raw
RAW files give you more data than JPEGs. As a result, you have a better product to edit in post production should you need to!
Be Comfortable With Your Camera
If you have a great birding adventure planned and plan to rent or borrow a camera or lens, give yourself a few days with the equipment beforehand. It takes some practice to acclimate to a new camera and its buttons or even to learn how a lens handles.
The time to learn your gear isn’t when those puffins and terns are zipping in and out of your viewfinder on your once-in-a-lifetime trip to Alaska. Learn is at home when those shots don’t matter.

Take the Image
Not every shot you take is going to be a prize-winner. But don’t let that stop you from firing the shutter, even if you’re working at a distance disadvantage.
I think it’s just fun to have different species crossed off your must-photo birds list. And never underestimate the power of a story-telling image!
Tweak Images in Post-Production
Our goal is always to get things as close to perfect as we can in camera. But don’t be afraid to tweak your images in post-production. Edit so the image matches your style.
Clean up dust spots or clone out some unwanted distractions. How much and what you edit is a personal preference, but I say do what makes you happy with your images!
Use Keywords
If your editing software has a keyword function…use it! Keyword all your photos of birds as you upload them onto your drive. You’ll save yourself tons of hassle later searching 6 years worth of photos for that beautiful sandhill crane shot.
Recommended Settings for Bird Photography
Should you use an aperture of f8 or f5.6? What about the speed of your shutter? Here are a few camera setting tips to get you started on bird photography.
Aperture
As you begin photographing birds, keep your aperture in that f5.6 to f8 range. This gives you a more forgiving depth-of-field to work with, ensuring you’re more likely to have sharp images. It’s also where your lens and camera tend to be the sharpest.
As you hone your skill, you can start to open up your aperture and drop down from f5.6 to f2.8 if you’re a fan of bokeh. But work on technique and nailing focus first!

Shutter Speed
Birds at rest need a shutter of 1/200 to 1/500, depending on their habits and the environmental conditions. If you’re photographing birds in flight, you’ll want to raise that shutter speed to 1/1000 or more.
Generally, the smaller the bird the faster the shutter speed you’ll need to stop action and freeze the motion of their wings. Larger species like pheasants need a shutter speed of 1/1000. Hummingbirds, on the other hand, require a shutter speed of 1/2000 or more to freeze their wings in flight.
ISO
Of course we want to keep our ISO as low as possible to avoid noise, or grain, in our images. However, you’ll occasionally need a higher ISO to give you the shutter speed you want.
Most photographers I know like to keep their settings at around ISO 400, but I see images using ISO 100, ISO 400, ISO 100 and even ISO 3200. Know the limitations of your camera, but don’t panic if you have to raise your ISO to get the light you need. It’s not the end-all it used to be.
Auto-ISO can help when shooting in lighting conditions that are changing rapidly, such as when the sun is rising or setting.
Use Continuous Focus
Use continuous focus (Nikon) or Al-Servo (Canon). That means as long as you have the shutter pressed halfway down, the camera will keep the bird under the focal point in focus.
Focus and recompose doesn’t work well for shooting birds in flight. Focusing and recomposing also puts you at greater risk of missing focus on the bird due to a very shallow depth of field on their small field of focus.
Keep your camera ready to shoot in burst mode so you can fire off a series of three or so frames quickly when needed. Don’t constantly ride your trigger, but it’s helpful to be ready so if you need it, burst mode is enabled.

When is the Best Time to Photograph Birds?
The best time to photograph birds is when they are active and when you have great light. Many species are active during golden hour, the hour right before sunset and right after sunrise. But animals don’t care about beautiful light, so don’t limit yourself to those hours exactly.
The weather can also help you tell a story. Shooting in the snow or rain adds a layer of texture and a dimension to your image that a clear, calm morning might not. If your goal is an identification type of shot, stick with clear conditions. But if you want to tell a story, weather can definitely help add context!
Where Can I Practice Photographing Birds?
They are everywhere! My best advice for practice locations are places where they are abundant. Does your area have any bird sanctuaries or wildlife preserves? Does your neighbor hang lots of bird feeders? Look for wooded areas or near bodies of water. But don’t discount urban spots too. City parks, zoos, and even city streets can be bird havens.
These are general guidelines. But you’ll find the best spots simply by getting out and looking! Keep notes on when and where you see birds when you’re out enjoying your daily life, and come back to those spots with a camera when you can.
Keep a Lifetime List
My final piece of advice is to keep a lifetime list of species you see and identify. It’s not necessary to be a great bird photographer, but it does make the adventure more fun. Decide if you want to track species you see, species you photograph, or both!
Conclusion
Bird photography is a great genre because there are birds everywhere and you don’t need a contract to go shoot them! Use these tips to improve your skill and hone your technique, but don’t forget to just have fun. Enjoy a morning being out in nature and seeing some of the most amazing critters on the planet through your lens.