
You might already be familiar with landscape photography, but black and white landscape photography is an entirely new genre unto itself. Working without color might be a little more difficult than you think, and it can take a lot of practice before your photos begin turning out the way you want them too.
Looking to improve your photography? Just enter any questions you have about improving your photography below and hit send and get answers & feedback instantly - for FREE! Submit QuestionsHowever, with these black and white landscape tips below, you can start capturing stunning photos sooner than ever.
Quick and Easy Tips to Help You Take Amazing Black and White Landscape Photos
Landscape photography is one of the most difficult genres to try in a black and white color scheme. By trying out different camera settings, composition techniques, and post-processing methods, you can be on your way to achieving dreamy black and white landscapes.
Analyze the Foreground and Background
When shooting landscapes, it’s essential that the foreground stand out in brightness from the surroundings. For the background, it must contain a solid structure that won’t get drowned out by small color contrasts.
The tricky part comes when you include the sky in the frame. At sunrise, the colors of the cloud against the pastel sky may fade into the background and appear like a thin cloud in the middle of the day.
This is why landscape photographers use a filter to balance the exposure between the ground and the sky. The filter decreases the amount of light that hits the sensor from the sky in the landscape.
Consider the Original Color of Your Subject
When you work with traditional landscape photos, you can rely on the vibrant colors of your scene to make the landscape photos feel dramatic or interesting. Whether it’s the bright green vegetation of a forest, the soothing blues of the ocean, or the striking yellows of a sunset, color typically works to your advantage with this type of photography.
With black and white landscape pictures, the one thing you don’t have is color. As a result, not every scene seems great in monochrome so you’ll need to be creative. Something that might have caught your eye with colorful shades can suddenly feel dull or flat in black and white landscape photography.
Understand Composition
One of the first things you’ll need to learn is how to create strong compositions as well as which scenes look best in black and white. Be on the lookout for textures or shapes in your composition. Then, combine it with a contrast between dark and light.
Consider looking at the works of the best photographers who have worked with dark and light scenes. Study the black and white landscapes of photographer Ansel Adams. See how his precise compositions result in a focused depth of field and a broad tonal range.
What is it about the photos that make them appear so powerful or eye-catching? What type of scenes did they work with? What kind of lighting did they use? When you can answer those questions, you’ll be one step closer to mastering creative monochrome scenes.
Be Aware of the Time and Season
Aside from using proper composition, you can achieve balance by determining how light affects your scene. Try shooting in one location for a whole day. Observe how the variations between light and dark areas change throughout the day.
Each season also offers various effects on monochrome images. For instance, winter and autumn create clouds and low light that result in columns of dark and light. The moody scene adds a more dramatic aura to the shot. In some cases, you can even use the fog and mist to help diffuse the light.
Try to Shoot the Original Photo in Black and White
When you first start trying to work with black white photos, you’ll want to take the photo in black and white mode. It might seem more convenient shooting black and white images in color and then just editing them to be black white in post, but working with color can be distracting.
Your scene might seem great when you shoot it traditionally, but when you adjust the photo’s tone, it might fall flat in monochrome. Working in black white mode from the start can prevent this issue. Even before taking the shot, you’ll be able to tell what seems great and what doesn’t.

Keep in mind that you should probably try and set your camera to the Raw format. This way, you can always process the images regularly if you decide they seem better that way.
Learn About ND Filters and How They Help
ND filters, or neutral density filters, can be your secret weapon when spicing up an image. These glass filters prevent light from reaching the camera and change your exposure time. As a result, the filter will blur and smooth out some parts of the photo.
Neutral density filters break the rules of traditional images and can change how you process the pictures. Most of the time, photographers set their ISOs as low as possible with a shutter speed around 1/125 of a second.
ND filters could adjust your shutter speed to be as high as three minutes, and completely change the tone of your image. If you’re looking to exert control over your shutter speed or experiment with sharpness, a neutral density filter is a good way to do so.
Bring the Right Equipment
Wide-angle and zoom lenses are the most popular pick for photographing black and white landscapes. For example, a 16mm-35mm or 24mm-70mm lens work well on most full-frame DSLRs.
Moreover, there won’t be a huge amount of light coming through your camera sensor if you’re going to use a small aperture and low ISO. This will likely cause you to use longer shutter speed, so it would be helpful to mount your camera on a tripod.
Choose the Appropriate Camera Settings
For best image quality, it’s advisable to set the ISO as low as possible, or around 100 to 200. Keep in mind that a high ISO may result in digital noise. Partner this with an aperture ranging from f/11 to f/16 to make your shots look sharp. You can still experiment with the aperture if you want to blur certain parts of a photo.
While black and white landscapes allow longer shutter speeds, you must still consider the ambient light. If you want to freeze action, set the shutter speed that provides the necessary exposure, then coordinate it with a small aperture and low ISO.
Learn About the Zone System
Adams invented the zone system in the 1930s to exercise complete control over an image’s tones. He divided each scene into 10 zones, beginning at zero for pure black, five for middle gray, and ending on 10 for pure white.
By identifying the darkest zones in a shot, you can also determine if those shadows retain detail or highlights through proper exposure.
Even in today’s digital photography, this dynamic range helps photographers control a camera’s manual functions. In effect, you can save shadows while keeping the brightest parts of a photo intact.
Experiment with Tonal Contrast and Interesting Texture
Creative Black and white images are all about strong compositions. If you aren’t sure whether or not certain images will look their best in dark and light tones, consider looking for interesting textures and tonal contrast that you see in your scene.
You’re probably already familiar with tonal contrast, but if you aren’t, this term refers to how your brightness varies in different parts of your image. It’s important in any kind of creative photography, but it’s especially crucial in black and white landscapes.
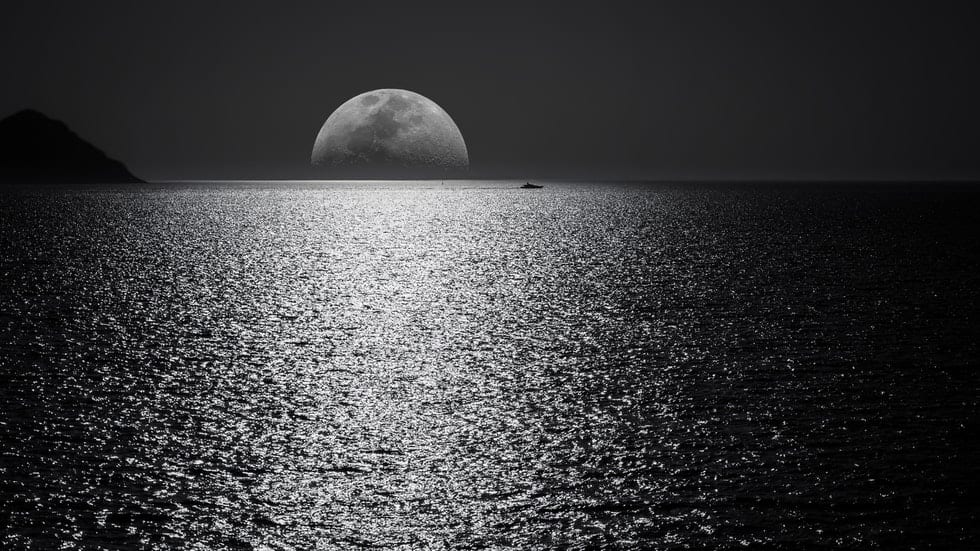
Consider the rights reserved photo above. Although it’s a black white photo, you can probably see that there’s a lot of tonal contrast between the lone figure in the water, the sand, the waves, and even the foggy sky. Incorporating tonal contrast is often what makes a black and white landscape photo stand out.
Texture is another essential element you should pay attention and see to in black white pictures. Whether it’s the peak of a mountain or the crest of a wave, a photo with texture stands out a lot more than one that doesn’t.
Be Unique
If you’re new to this genre of photography, your natural instinct might be to try and study the work of famous photographers like Edward Weston or Ansel Adams. Looking at someone else’s work can be like a double-edged sword.
Although it can help you learn what you like and what you don’t, it’ll be difficult to stand out if your photographs seem exactly like someone else’s. Even your editing process might feel similar to someone else’s.
Some professionals practice “photographic abstinence,” which means that they completely avoid looking at anyone else’s work. The idea is that they’ll be able to see the scene through their own lens rather than someone else’s.

The goal behind photographic abstinence is a good one, but it can be a bit extreme, especially if you’re new to the genre. There’s nothing wrong with browsing another professional’s work or even drawing inspiration from their photos, but you should always strive to put your own spin on it.
Even if you’re going to take photos of a well-photographed area, try to find a different perspective or small detail that will help your work stand out from the rest.
Get Out of Your Comfort Zone
Unless you’re lucky enough to live in an area that’s full of beaches, mountains, and interesting landmarks, you’ll probably need to do at least some traveling for your B&W landscape photos. Unfortunately, the most powerful photos aren’t usually hiding in your backyard.
Traveling can do two things for black and white photography landscape pictures. Along with adding a lot of depth to your portfolio, you’ll also expand your experience as a landscape photographer. If you’ve taken a lot of photos of beaches, it might be time to try something new and watch for locations that have mountains or other dramatic landmarks.
Convert Images to Black and White in Post-Processing
When turning an image into monochrome in Photoshop, you can use sliders to control the color tones. For example, you can modify the contrast or darken certain portions of a photo of the sky.
This is the reason why it’s ideal to choose RAW when shooting. In this way, the file retains all elements you need to convert into black and white. You can also do this in Lightroom, where you can use presets that produce the same effects of black and white films.
Conclusion
Shooting landscape photos in B&W mode is one of the most challenging things you can try and master as a landscape photographer. However, once you know what to watch for, you’ll be able to take distinct and dramatic photos that would catch anyone’s eye.