My 3 Step Guide to Capturing Lightning Photos
Lightning, it’s one of the most intense forms of power that Mother Nature can produce other than your tornadoes and hurricanes. It flashes the earth almost 1.4 billion times per year all over the world, and it is just waiting to be photographed! In this article I will tell you the best way that I have found to be able to shoot these magnificent scenes on a yearly basis with what is actually a very simple process. I will also go over some very general editing techniques within Lightroom that will make your shots stand out and get you the best possible result.

What will you need?
There a few pieces of equipment that you will need in order to capture the shot in the best possible way. Personally I use a Nikon D5200 for my shots, but any kind of SLR camera will be able to get shots like this. Either a cropped sensor or full frame sensor will both work, it does not have to be full framed. For the lens, you can use a number of different lengths, however I have found it that the wider the lens the better chance you have at getting the shot. For the majority of my shoots I use my fisheye 6.5mm lens, or one of my 18mm lenses, because lightning can span such a great length of the sky, you want to be able to capture it all, or most. Next is a tripod, this is probably one of the most important parts!
Due to the fact that most lightning photography is done during the night or in low light situations you want a good tripod to make sure your shots are stable and blur free. Lastly, something that is not needed but definitely will help is a remote trigger. I use the wired one with an extra-long cord because they are more reliable, and you don’t have to wait for the wireless ones to find the eye on the camera.
The reason for the remote is you will not have to worry about nudging the camera after you click the shutter release, causing your photo to blur. A large SD is definitely recommended when shooting lightning photography, you will take hundreds of pictures and most them you will probably get nothing, but all it takes is one, so make sure you have enough room to compensate for the duds. Lastly you might want to have a small rag or towel to keep your camera from getting wet, if you are shooting outdoors.

Setting up the shot!
There are a few very important settings within your camera that you need to make sure of that will allow you to capture lightning at its very best, and give you the least amount of editing. First off, go ahead and set your camera on the tripod and plug in the remote if needed. Aim your camera at the sky as much as possible, if there is nothing interesting on the horizon, like a tree line or building that’s ok, once the lightning gets started, you won’t need it.
Now since your camera will be pointed at a dark sky, you want to make sure you have manual mode on, this is by far the easiest way to get the shot. For your focus, you want to make sure it is on manual, because lightning is so fast, there is really no way for auto focus to catch it. Some lenses have the ability to go to infinity focus like seen above on the Opteka 6.5mm lens. For your aperture, you want it to be wide, because the lighting is so far in the distance, you want to have that shallow depth of field, unless there is something specific you’re trying to capture in the foreground. For the ISO, you want to have it set to a lower number; even though it is dark, lightning can become quite bright and light up a good portion of the surroundings. To ensure the image is not blown out the lower ISO will make sure of that.
Most of my images are set between 100 and 250 ISO. White balance I always have on Auto, there is never a need to change that. As for shutter speed, this is where you get to play around with it, generally I will set my shutter speed anywhere between 3-6 seconds. This allows for enough light to enter the camera to expose the sky as well as the lightning to start and finish in the same shot, since the average flash lasts 0.2 seconds and others are around 30 microseconds, but some are longer. You will also be able to get possibly multiple strikes in one image with the little bit longer shutter speed.
Once you check the image, if it is too bright and you cannot see the lightning, adjust the ISO and shutter speed down to compensate for the exposure of the picture. The nice part about using the trigger is the one I have allows you to lock the release button. This is equal to continually holding down the shutter release; and it is all based on the shutter speed you have set. If you set your camera shutter speed to 3 seconds, as soon as the shutter closes to process the picture, it will re-open just milliseconds after for the next shot. You also will not miss as much in-between shots if you have this on, you can just sit back and enjoy the show, as opposed to having to click the shutter release manually. Your fingers will start to feel it after a few hundred clicks, I usually take an average of 1500-2000 pictures per storm. So it definitely comes in handy!
Click here for our free tutorial on understanding ISO!


Editing your image!
Once you have completed getting your images together and going through all of the non-lightning ones, take a few minutes and just so some simple tweaks on the image to make the lightning stand out. There a few main edits I make with lightning, the first is the exposure / brightness. Some shots you get will be quite bright depending on how close the lightning gets to you, but that doesn’t mean it’s not good. What I do in Lightroom is go in and slightly adjust the brightness and exposure.
You want to bring it down to that the main lightning bolt is not blown out and you can see the different lightning branches, but not too much because that will also affect the bolt itself. Some however, might be too bright and there is no real way to lower it, like the example shown below.
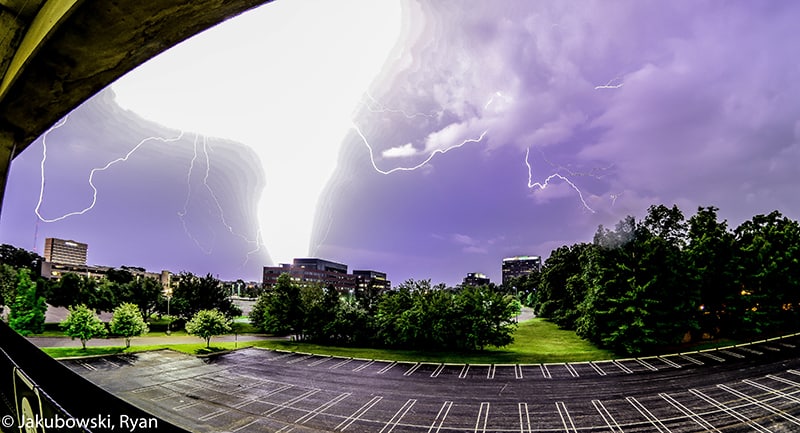
Example of image that cannot have the brightness taken down anymore. This struck about 500 yards away.
The other part you want to adjust is the contrast, this will help balance the two and make the lightning really pop! If you do have Cole’s Crisp and Clean Lightroom Presets and the Polished Lightroom presets adjustment brushes, these work great! Usually I will add detail and then choose one of the filters too give it that extra special look, and then to top it off, apply sharpening and noise reduction filter.
One other thing you can do within Photoshop is stack your images, using the techniques in the online course for masking. This is a great way to really get some nice multiple strike images, since most of them will probably be a single bolt, put them together and layer them to make an awesome stacked image as shown in the image below.

Example of stacked image, done using Photoshop masking. 6 separate images.
Thank you for allowing me to discuss this amazing process with you all, if you have any questions, please feel free to ask!
Ryan
![[Updated 2019] What Is Chromatic Aberration And How Can You Avoid It?](https://colesclassroom.com/wp-content/uploads/2017/08/Chromatic-Aberration-What-is-it-how-to-fix-it-768x512.jpg)