


If you regularly take hundreds (or even thousands of photos), you know all too well the frustration of sifting through the images. But what if we told you there was a way to make this task more manageable with a tool called Photo Mechanic?
Looking to improve your photography? Just enter any questions you have about improving your photography below and hit send and get answers & feedback instantly - for FREE! Submit QuestionsYou may be reluctant to add another photo application to your flow, but Photo Mechanic is, without a doubt, the one tool that can streamline your image processing workflow. Photo Mechanic can help you get a handle on unwieldy amounts of photos, where other photo editing apps like Lightroom fall short.
In this tutorial, we’re going to take a look at how it can make your life easier.
What is Photo Mechanic?
Photo Mechanic 6 is a third-party app produced by Camera Bits. It allows photographers an easy way to import, tag, and rate photos rapidly. After you ingest photos from multiple memory cards, you can use the software to add metadata, rename files, and captions. It also includes a handy way to rate your images using a star rating system.
What Photo Mechanic isn’t is a photo editor. It won’t replace programs like Photoshop or Lightroom, but it culls your photos quickly so that you can work more efficiently in post-production. It’s a niche program, but if you happen to be its target customer, the software can revolutionize your workflow.

Why You Should Use Photo Mechanic?
People like event professionals who take lots of photos in one session use Photo Mechanic to save time. Why? Because it accelerates the post-processing workflow, as it reduces the time you have to spend sifting through photos—which is typically the most tedious part of the process, notably in Lightroom.
You can use Photo Mechanic with Variables, a handy feature we’ll go over below, and it also automates specific sorting tasks. Getting through the culling stage faster allows you more time and freedom to focus on the more fun creative aspects of photography, aka shooting and editing.
It also comes with a thirty-day free trial for both Mac and Windows.
How to Use Photo Mechanic
Sound interesting? Let’s go over some essential functions in how to use Photo Mechanic.
Using Photo Mechanic—Variables
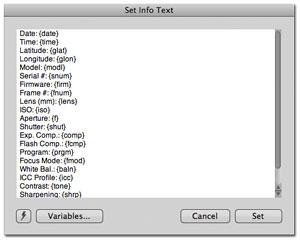
Variables are one of the features that make this app so useful. It essentially allows you to take a data set from one location and insert it somewhere else automatically. The data can come from pretty much anywhere: your camera and photos, your computer, or even from data that you entered in a field, such as a URL.
It’s straightforward to use, too. When using the app, open the Variable window, and you can see all the variables you have—which can be a lot. To put one in an input field, click on that field, and then double click the variable from the list, and you’re good to go.
Source: Camera Bits Wiki
The primary advantage of using Variables is that it allows you a systematic way of adding information to your photos. Otherwise, this task could take hours.
Sort, Organize and Cull Image Files with Photo Mechanic
The star feature in Photo Mechanic is its file importing capability, otherwise known as Ingest. This is how you begin to use the app, and you start by navigating to File>Ingest. You’ll want to set it to immediately Show Ingest Disks when you insert a memory card (under Edit>Preferences), and you’re ready to start the culling process.

Source: CameraBits Wiki
Here are several ways that Mechanic Photo organizes your images. It may seem like a lot to know, but it’s worth taking some time to learn what each feature does. Getting a grasp on them makes it much easier to classify images as you import them, saving you work in the long run when you export to Lightroom.
- Ingest disks. Click Ingest Disks and select your memory card or hard drive from the options. We recommend ingesting your entire SD card at once.
- Destination Folder Roots. Destination Folder Roots assigns locations to your images. To assign them, navigate to Primary Destination, where you can find folders to write your images to. There is also an option to add a Secondary location, which is useful if you want to add backups of your images to a hard drive, for example.
- Filter Files. If you’re shooting in JPEG+RAW, you may want to filter by Copy RAW Files Only, which saves you from doubling your photo count.
- Copy Photos. This tool allows you to keep your photos organized once you’ve culled them. We recommend setting Copy Photos to a dated folder and then the folder name, which makes finding your images later a breeze.
- Rename Imported Photos. You can check this box to rename your photos according to the capture date. Otherwise, Photo Mechanic renames them according to Variables.
- IPTC Stationary Pad. IPTC Stationary Pad lets you add relevant information to your photos. Input the information that you want, and then check Apply IPTC Stationary Pad to Photos. You’ll then be able to record all kinds of info, such as your name, contact information, and even headlines, keywords, etc.
How to Make Photo Mechanic Your Reviewing Tool
By now, hopefully, you’ve seen that there are lots of reasons to make Photo Mechanic your reviewing tool of choice.
Mainly, many photo-processing suites like Lightroom cannot manage an image library. Another reason to use it because of how fast it loads previews of your photos. Plus, Camera Bits has done an excellent job at helping it play well with other apps for photo retouching (which we’ll get to in a bit).
Here are some ways we recommend using it.
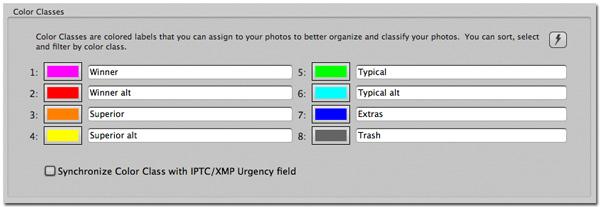
Using Mechanic Photos Star Ratings and Color Labels
Metadata is the best way to keep lots of images in check, and we recommend two methods of keeping your favorite photos easily accessible: star ratings and color labels. These two kinds of data make finding what you’re looking for a much simpler task.
To add them, go to Preferences and click the Accessibility tab. Next, Single Key Shortcuts should be changed to a 0-5 Sets Rating, which lets you rate images from one to five. Then you can use either Command on a Mac or Control on Windows to use the number keys and apply a color label.
Source: Camera Bits Wiki
Once your images have this criteria, it’s easy to filter according to it, and you can see the tags easily on the image thumbnail.
Sort Photos Through the Metadata
So how do you filter images based on metadata? By using the filtering controls in the lower right corner of the contact sheet view. Photo Mechanic’s filtering system removes rules from the filter, which means that any metadata button you click will hide photos that match that rule.
You can also filter only to see specific metadata, if you prefer. Press Alt, and click on the metadata. For example, if you clicked on the red color label, you would only see images with a red color label. You can also filter according to the star rating.
How to Use Photo Mechanic Picture Alongside Your Preferred Editor
This tutorial wouldn’t be complete without addressing another critical condition. How do you integrate Photo Mechanic with your preferred editor? As we’ve mentioned previously, the app works seamlessly with all kinds of photography software. You just have to tell it what to do.
When you want to connect to another editor, navigate to the Preferences menu, and then click on Launching on the dropdown menu. Here is where you tell Photo Mechanic which outside editor you want to assign it to. Click on the Assign box, and then Choose, where you’ll be prompted to set an editor. Select the one you want.
Now, you’re all set to easily edit photos in Lightroom or Photoshop—or whatever post-production software you’re using. When you’ve finished culling and organizing your photos, select the image/images you want to export. If you’re using Windows, right click them, and if you’re using a Mac, control-click. Select Edit Photos, and you’ll see the list of apps you’ve added.
Remember that the beauty of using Photo Mechanic is that it allows you to curate your image library. You should only be sending your best work to Lightroom or Photoshop.
Conclusion
As you can see, there are plenty of reasons to consider investing in Photo Mechanic, primarily if you process a significant number of images regularly. In our opinion, no other app streamlines the import process nearly as well, and Photo Mechanic more than beats Lightroom when it comes to this task.
The bottom line? If you want to save yourself hours of work, it’s well worth the price tag. Plus, you can access the thirty-day free trial that makes it easy to try it out with no strings attached.


