
Food photography is ubiquitous. It’s seen in TV commercials, magazines, blogs, cookbooks, billboards, social media posts and more.
When great food photography is done right, one photo will convince hundreds or thousands of people to try that food. So how do you get started in food photography, and what do you need to know? We’re going to discuss lenses, aperture, lighting, composition, and what to charge.
The Right Camera Settings for Food Photography

Aperture
There is no simple way to answer this question. Your aperture depends on the angle you’re shooting your food from and what aesthetic you’re going for. Are you shooting the photo to get the entire dish in sharp focus?
You’re going to need to set your aperture somewhere in the f14 range. If you want a specific part of your food dish to stand out, adjust your aperture to something larger like f5. Change your aperture to around f2.8 to blur out a potentially distracting background.
A large aperture won’t produce as noticeable a bokeh when shooting a bird’s eye angle versus eye level in food photography. This is because there needs to be distance between the food and your background to create bokeh.
Shutter Speed
The slower or longer the shutter speeds, the more light comes in, whereas the faster or shorter the shutter speed, the less light enters the sensor.
Faster shutter speeds are great for getting sharp images of a moving subject as you freeze action in food photography. For example, use a long shutter speed if you want to capture the flow of milk as it drops to a bowl of cereal.
On the other hand, slow shutter speeds means you can be creative with motion blur. This is perfect if you want to create a dramatic effect in your food photography when throwing flour or pouring beverages.
ISO
ISO is the measure of a sensor’s light sensitivity. How you set the ISO depends on the available light.
Remember:
Lower ISO = less sensitive to light = picture looks darker
Higher ISO = more sensitive to light = image looks paler
In general, it’s better to choose a lower ISO because a higher one can often result in ‘noise’ or grain in a photo. If the images still appear dark then you need to adjust the aperture or shutter speeds to get more light.
White Balance
If you want to save time during post-processing, you must be consistent with the settings, including the white balance. With a correct white balance, you can capture the colors you are shooting, making the food look natural and true to their actual colors.
As a food photographer, your goal is to get the color accurate, making the food appear delicious yet realistic. You must compensate in the white balance settings to obtain a neutral point where whites are truly white. Know that this depends on the color of light available.
Therefore, you need a warmer white balance if you’re shooting in cool, yellow light. In contrast, a cooler white balance is necessary for a warm, yellow light.
Best Lenses for Food Photography
There are so many lenses out there; each of them is versatile and can be used somehow in food photography. Until you know if this is the genre for you, don’t invest in too many lenses. You can do so much with just one or two lenses!
Prime Lens
A prime lens is popularly known as the “nifty fifty” because of its fixed focal range that provides a normal perspective and field of view, much like what you will see with your own eyes.
A staple lens for every photographer, you can utilize a 50mm f1.8 prime lens for a wider field of view of flat lays and table shots. Even if you shoot a wide scene, you can still crop and focus on the subject without distorting the image.
Zoom Lens
A zoom lens is every photographer’s ultimate buddy, especially for overhead shots. It can be a bit frustrating when you need to adjust the frame every time the focal length can’t cover the shot you want.
A 24-70mm f2.8 lens is going to be your most versatile lens. It will allow you to shoot at both a wide angle and cropped in, giving you a variety of looks.
Tilt-Shift Lens
A tilt-shift lens lets you precisely control the plane of focus, which represents the plane of the sharpest focus that lies in the depth of field. By changing the plane of focus, you can create beautiful blur shots.
You can use a 45mm f2.8 or an 85mm f2.8 tilt-shift lens to angle the focus in a way that highlights the food while keeping the surrounding props in a blur.
Macro
When taking pictures of food, you can utilize a lens’ macro capabilities to capture intricate and artistic details. With a macro lens, you can move back and shoot from a greater distance.
For instance, a 90mm or 100mm f2.8 macro lens is extremely useful for overhead close-up shots. The longer focal length compresses the background, allowing you to capture light without worrying about distortions. Try shooting at a 24 to a 45 degrees angle to include more elements to fill the frame.
Lighting for Food Photography

Food photography doesn’t require a complicated lighting configuration, you can get by with one diffused light source and still get beautiful results.
Experiment With Natural Light
Also, experiment with natural lighting in food photography. Many food photographers that use artificial lighting are trying to mimic the appearance of natural light. So find a window with soft diffused light coming through it.
If that’s not possible, a window with direct sunlight streaming through it will work too. When direct sunlight, use a thin white cloth, or even parchment paper taped to the window to diffuse the light. The white foam board will be used in the same way as it was for the light set up.
Many artificial and natural light food photographers use a black foam board to bring more depth to their shadows. The black board supplements the effect created by the white board. Again, make sure to turn off all your room lights while doing natural light food photography!
Don’t Be Afraid to Use Artificial Light
There will come a time when you can’t take advantage of natural lighting. The beauty of artificial light is that you can predict its outcome at any time and in any condition.
When you use flash for food pictures, you’ll know how the light looks and works with various scenes. In effect, you ensure consistency in the shots, making it easier and quicker to do the post-processing.
The same goes for a strobe, which provides a short burst of bright light. You can use this type of light to your advantage because it won’t get nearly as hot as continuous lights.
Modify the Natural Light
Most of the time, you’ll need to make some changes with natural or artificial lighting. As a photographer, it pays to acquire some basic tools to help you control the light and bring your food photography skills to the next level.
Softbox
One important factor to stress is that your light source needs to be diffused light, otherwise the shadows in your image will be very distinct, sharp-edged, and diverting.
A softbox is a popular diffuser choice. Don’t forget to turn off all other lights in the room except for your food photography light. The color cast from other light sources will affect how the food in your photo looks.
Light Box
A light box is a food photography accessory with a semi-transparent material for the sides to diffuse the light coming from several sources. While the shadows and lighting will change depending on how you move the food inside the box, a light box gives you a more controlled environment for illumination.
Black and White Cards
Next up on the essential tools for every photographer are black and white cards. You can make cards from foam core boards and cut them to the size you need.
Use the black cards to make the shadows stronger, and subsequently, get more contrast. You can also rely on black cards to block light from hitting areas that will compete with your subject. Meanwhile, the white cards bounce light into shadow areas, letting you accentuate more of a food’s details.
Reflector or Foam Board
A single source will create strong shadows on one side of your photo, which can be distracting. You can easily fill in those shadows with an inexpensive white foam board, or a reflector. Set the board or reflector opposite to the light source and it will bounce the light back onto your food.
Composition Tips for Food Photography

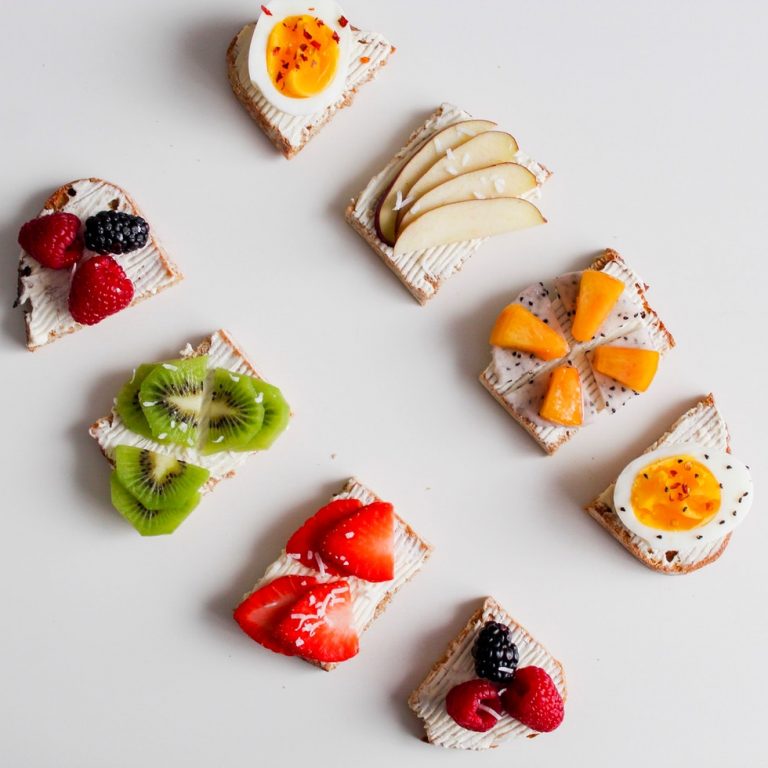
Here is where you get to let your creativity take over! Ultimately you’re taking food photos of a specific dish of food, but little elements or “props” will compliment your dish and make it look like a meal.
First and foremost, experiment with displaying the meal in different dishes. A white dish can give your food a clean and healthy feel and really make colors pop. Using a darker dish gives off a comfort food type of feel.
Consider adding a beverage in the background of your photo, and play around with the cutlery placement in your image. Sauces, syrups, and condiments, poured out into a pretty side dish puts the viewer in the mindset of what they could put on the main dish prior to eating.
Play with Different Angles
One of the most common angles when taking food photos involve shooting directly above the food. This composition allows you to show an aerial perspective of the placement setting or a closeup of the food.
Another option is to photograph at an angle from the side to include a background, foreground, or both. Thus, you need to consider the food’s shape, size, and height. Likewise, check if the camera’s position highlights the best qualities of the food.
Some dishes look better when shot from the top. For example, you want to highlight the spiraled and delicate toppings of cupcakes. Since you should also show the shape and size, you can make the cupcakes seem more scrumptious by shooting from right in front of the food.
Think About the Colors of the Dish
Color is really important in food photography, and sometimes you’ll want to help a dish along by adding a splash of color. Brightly colored fruits and vegetables are excellent for this. If your pasta dish is looking monotone, put a little parsley for color contrast.
When photographing for someone else, always discuss adding other ingredients to a dish prior to photographing. When you cannot add colorful ingredients to the dish, use it around the main dish in the background of your photo.
The raw ingredients in a dish can make a pretty compliment to your main dish as well. Think whole mushrooms, a few plump tomatoes, a dash of flour, or some orange peels. There are countless items you can use to compliment the food you are photographing!
Create Lines and Layers
The composition is a must-have skill for every photographer. Since you’ll most likely put ingredients and props in the frame, you need to learn how to arrange them in a clever yet visually appealing way.
Feel free to use props to form lines and layered effects that can make your food photos eye-catching. For instance, utensils or cutlery are good for creating lines that can direct the viewers’ eyes straight to the food.
Even when you’re shooting from above, there are still ways to form lines and layers. If you want to shoot the latte art from the top with props in the frame, you can line up coffee beans or some biscuits to create lines or frame the subject.
Form Texture
A textured background is another element when taking images of food. It enhances the quality of a shot by adding the perception of something tactile as if it’s something you can touch.
- Weathered Wood: A cutting board is the easiest to style with food. Depending on the size, it can serve as a layering piece or background.
- Paper: Paper looks great in baked goods and even meat. Food photographers usually use parchment, baking, or wrinkled paper as a base under pastries to add texture.
- Cardboard: Smooth, pressed, corrugated, or bumpy cardboard is also a favorite because it gives lots of options.
- Burlap Cloth: For a homey feel as if grandparents baked a pie, bring out some burlap cloth to accentuate earthy and rustic vibes.
- Linens: Having a variety of lines is necessary for every food photographer and stylist. Old napkins, fresh towels, or even worn-out tablecloths can also influence the tone of your images.
Put Levels
This one involves experimenting with height. Layers, lines, and texture can also produce visual differences or layers.
If there are a lot of subjects in a frame, use boxes to raise some on the scene. Another option is to place something on a cake stand. Also, use glasses or mugs in varying heights.
Add a Human Element
Adding a human element is another option to make your food photographs more visually appealing and realistic.
You can use your hands or somebody else’s. If you’re shooting inside a restaurant or production house, include how the kitchen staff or server prepares the food. Try stirring a pot, pouring a drink, or holding a basket of fruits.
However, be careful when you want to include hands in the frame. Make sure to give instructions to the person so that there will be no unnecessary movements.
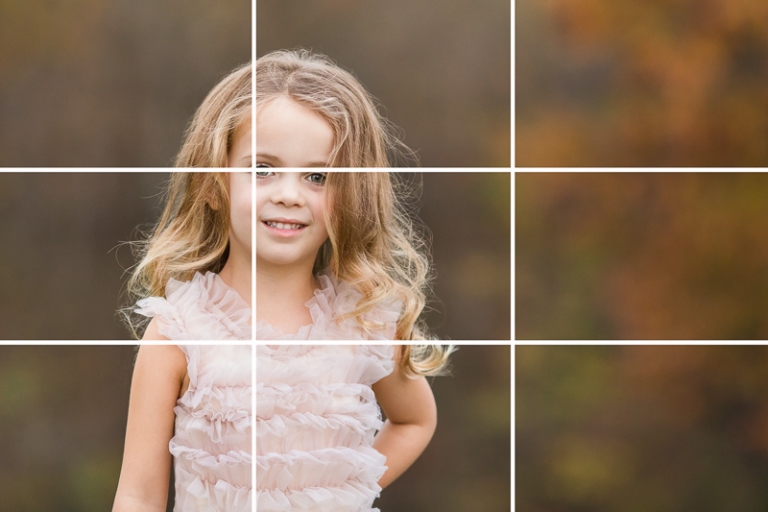
Appreciate Negative Space
Negative space is the space around the subject in your pictures. It’s not all about using a white or plain background; it also means adding patterns and textures that won’t distract the viewers from the main subject.
While props and textures enhance the composition, you can still give viewers room to breathe by providing negative space.
Aside from zooming in, embrace the negative space that can draw attention to the subject and deliver overall balance. Clients, and even graphic artists, will love you for allocating negative space because they can use that portion for texts or captions.
Styling Tips for Food Photographs
While there may be a food stylist, knowing how to style food for a photoshoot is also necessary for photographers. From using the right props to finding the perfect background, styling is the key to capturing delectable food photographs. These are a few things that can make that possible:
Invest in Signature Props
Props are your best friends when it comes to elevating the story and giving it depth. If you’re starting your prop collection, invest in things you usually see in the content of a meal like:
- Napkins and tablecloth
- Antique cutlery and modern silverware
- Cooking utensils
- Condiment holders
- Cooking pans, tins, jars
While props help improve the composition, you have to ensure that these elements complement rather than overshadow the main subject.
Lastly, remember that the food is the star of the show, so don’t overthink the styling. In some situations, less is more. Similarly, minimalistic yet complementary props work wonders.
Include Ingredients as Props
Shooting in front of the food gives you space to play with the foreground and background. Grab the viewers’ attention by surrounding the subject with props and ingredients that relate to it.
Even if you can’t show the actual process of the making of the dish, you can imply the recipe by using ingredients like sauces, oils, and herbs. Besides, ingredients can speak about the season or origin of the dish.
Think About the Colors of the Props
Consider the colors of the cutlery, props, and additional dishes that surround the main subject. When it comes to food photos, you can set colors as either complementary or contrasting.
Be cautious when using colorful props as they can grab the viewer’s attention, upstaging the food in the process. If you’re starting your prop collection, stick with accessories that come with a neutral palette. Also, go for those that will make the food stick out and go “pop”.
Learn How to Garnish and Decorate
Learning how to garnish is one of the best ways to make the food “pop” and become alive in pictures.
It’s not always about throwing in green herbs like chives, parsley, cilantro, and coriander. Garnishing covers anything you put on food and drinks that add textures and dimensions.
The most common are condiments like salt, pepper, and chili flakes, chopped fruits or nuts, grated cheese, coconut, or chocolate, as well as corn and seeds.
Choose Quality Backgrounds
While the background can transform the mood of the shot, make sure the food remains the star. Aside from the materials mentioned in the layers, lines, and texture tips, these are other things you can use as a background:
Porcelain Flooring Tile
Wipeable, which is great if you’re working with spills or drips. Ensure that the tile is not too shiny, otherwise it will produce unwanted glare or reflections. Instead, choose a neutral color like black, gray, white, or taupe.
Wooden Backdrops
Use thin plywood sheets, cut into smaller pieces, and paint them in colors that complement the food. Finish with a thin coat of matte, water-resistant sealer to prevent stain, as well as wear and tear.
Textured or Colored Paper
Inexpensive yet pretty background. Head on to your local craft supply store and buy every available color. You’ll be surprised how something so simple can be beneficial several times.
Vintage or Old Silverware
Who doesn’t love a bit of drama or flare in images? With antique silverware, you can showcase an element of time and elegance.
Finally, avoid using vinyl backgrounds as they can reflect natural light in an unappealing way. In some cases, they may even look fake.
More Tips and Tricks for Food Photography
Ask For Brand Guidelines
If you’re working with a business owner, it’s likely that they have some branding rules you need to follow. While some clients may not be strict with the guidelines, it pays to ask and clarify first before you do anything.
There are clients that will instruct you to follow a specific color palette or use a particular prop. In some cases, they will even provide the shot list.
Ensure there’s an email trail for you to keep track of all the specifics necessary to handle the photoshoot. From instructions to accompanying logistics, be sure you are on the same page with the client.
Search for Inspiration
If this is your first time doing a food photography shoot, don’t worry too much. There’s a lot of things that can help you accomplish the job.
Aside from reading articles like this, go over print materials like magazines that typically publish food photos. If you want something free, you can always head over Pinterest or subscribe to email newsletters for aesthetics inspiration. You can even create a mood board that will help you visualize the photoshoot.
Draw Your Setup
Creativity is one of the things you’ll love about preparing for a food photography shoot. Like a shot list, use sketches to plan out your ideas.
In this way, you can bring to life the mental image you had after knowing you have a scheduled shoot. When sketching, focus on the story you want to convey. Make notes about the lighting direction, think about the props to use, and visualize the color palette.
Always Bring a Tripod
Investing in a good tripod with an integrated arm can help you achieve beautiful overhead shots.
If your pictures are a bit blurry, a tripod and a remote can save you, especially if you need to use fast shutter speeds and low light. A tripod makes a huge difference in capturing sharp images and minimizing camera shake.
Shoot Tethered
Shooting tethered can be a real game-changer for photographers. By connecting your camera to a computer or hardware, you can see the output in real-time. In effect, you can immediately spot if you need to adjust the camera settings, lighting, or styling.
There are times when you won’t spot unwanted edges or a misplaced prop with a glance on the camera screen. Shooting tethered makes it easier to evaluate your shots on a bigger screen. Double-check for creases and smudges that will annoy you during post-processing.
Avoid Patterns on Plates
Designs or patterns on plates can be distracting. As much as possible, use solid yet plain colored plates that won’t outshine the food.
Keep Oil and Ice Handy
A shoot might take at least two hours. If food has been sitting around for that long, brush some oil on the dish to add shine. Meanwhile, sprinkle some icy water to herb garnishes to make them look fresher.
Leafy vegetables will seem greener after soaking it in ice-water a few minutes before the session. Make sure to leave some small water drops on the leaves.
Use an Anti-Glare Spray
Reflective surfaces like glistening glass, metallic silverware, and glossy ceramics can be a pain during a shoot. There’s a time when you’ll find it hard controlling natural light even with reflectors.
Anti-glare or dulling sprays reduce the glare on anything that can pick up intense flares of light. Aside from that, they can add instant matte to surfaces.
Make Things Stick With Corn Syrup and Toothpicks
If the sprinkles on cake pops keep on falling during the shoot, apply some corn syrup first to make sure things like that stay in place.
Additionally, toothpicks should be a staple in every food photography shoot. Toothpicks can hold dishes or garnishes in place so that they won’t slide or move into a weird spot. You can usually use this when photographing burgers, pancakes, fruits, and meat.
Editing and Turnover of Food Pictures
Now we come to the moment of truth. Post-processing allows you to make changes in the pictures while still keeping them as realistic as possible.
Colors Don’t Look Right
If the colors don’t turn out the way you want to, it’s possible that you used an incorrect white balance. Fortunately, you can correct this in Adobe Photoshop or Lightroom. If you shoot in RAW format, you can fix any color-related issues on the software.
If you think the pictures don’t “pop”, all you need to do is to tweak the temperature and tint levels. More so, you can boost the details by changing the sharpness and contrast.
While the editing may depend on your style or the client’s preference, what matters is that the images will make the viewers crave for the food.
Identify the Mode of Delivery
After editing, the next thing to do is to turn over the outputs. While this process may also depend on your workflow or the company’s operation, it’s good to provide several options for clients to receive their pictures.
Remember, the mode of sending and saving food photography can sometimes impact the quality of the photographs. Some photographers prefer email or cloud-based storage while others like using studio management software.
Whatever platform you choose, be sure that your clients can get everything in the best quality available for your food photography.
What to Charge for Food Photography?

Figuring out what to charge for food photography isn’t very different from figuring out what to charge for other types of photography. An excellent place to start is to see what the competition is charging for food photography.
Just remember that what the competition is charging is a reflection of their prior experience in food photography, their cost of doing business, and their skill.
Before you decide if you should charge what photographer X is charging, take a look at your expenses. What do your monthly expenses like mortgage, utilities, car payments, student debt repayments, and food total up to?
You should collectively charge more than this amount because a) you want to be prepared for unexpected expenses, b) you want to save for equipment upgrades, and c) you probably want to retire one day!
Now that you know what your expenses are, it’s time to decide how you want to charge your customers for your food photography. Will you charge per hour, per job, per dish of food shot, or final image purchased?
Depending on how much work each client you acquire needs, your invoice amounts will differ. Whatever you charge, make sure your incoming payments total more than your monthly expenses. Be realistic about what you’re charging too, especially if you’re a beginner.
That barely scratches the surface of food photography pricing, learn more about food photography pricing here!
Fodo Photography Bountiful Opportunities
Food is sold in the biggest cities and the tiniest remote villages. The industry is so widespread that its size is impossible to quantify. The best estimates roughly put this industry worth billions worldwide.
With that size in mind, you can imagine how many opportunities there could be for food photographers! If you think there’s no room for you in this food photography industry, you couldn’t be further from the truth!
You could talk to local bloggers who are new recipes are lacking nice photos or local restaurants with no images on their menus. You could talk to food producers to discuss doing food photography of recipes that include their product.
Don’t let the size of the food industry lull you into complacency. Getting those food photography jobs are still going to take hard work. The best advice we can give you is to get out the door and start talking to people about food photography! It’s through relationship building that you convince someone to give your food photography services a shot!
For great examples, check out Ella Olsson’s AMAZING food photography blog!