
One of the most important factors in a good photo is lighting. You can have the perfect settings, great exposure, and even knockout composition, but if you don’t have good lighting, your image will fall flat. In this new series, Finding the Light, we are going to be talking about how to find and work with all types of lighting. Our goal is to help you understand how to work with all kinds of light, and how to use the light you have to create powerful, standout images. This is Part 4 of our series, and today we are talking about shooting in harsh light. If you’re just joining us, you can follow along in our series here:
Part 1: Finding the Light
Part 2: Using Shadows for Dramatic Portraits
Part 3: Shooting the Golden Hour
Part 4: How to Shoot in Harsh Light
Part 5: 3 Ways to Use Window Light
Part 6: Creative Light Sources

You can recognize it by the squinty eyes, strong shadows, and blown highlights… Shooting in harsh light can be tricky, but it’s not impossible. Sometimes we find ourselves needing to shoot in less than ideal situations, and it’s our job as photographers to know and understand how to work with all kinds of light, even the harsh, mid-day sun. Today we are going to unpack a few simple tricks to getting great photos, even in harsh lighting.
Looking to improve your photography? Just enter any questions you have about improving your photography below and hit send and get answers & feedback instantly - for FREE! Submit QuestionsWhat is Harsh Light?
Harsh lighting is very bright, directional light, typically found during mid-day. It casts strong shadows with very defined lines onto your subjects. Without being positioned properly, you will find that your subjects may squint against the sun instead of having relaxed, natural expressions.
I much prefer to shoot during the golden hour, but there are times when that just isn’t possible! The thought of shooting in full sun used to give me great anxiety, until I learned a few tricks to making harsh light work.
Locate the Shadows
When you’re shooting in harsh light, take notice of the shadows on the ground. By paying attention to your subject’s shadows, you can understand the position of the sun, even when it is high in the sky. This will be key in positioning your clients so that the sun is not casting shadows across their face.

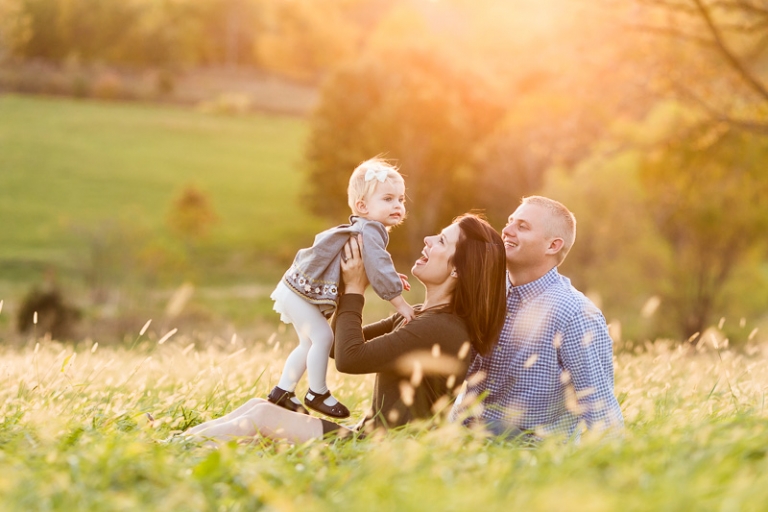
Sun Behind Your Subject
Once you’ve located the position of the sun, turn your subjects so that the sun is at their back. Not only will this keep the harsh shadows off of their faces, but it will give you nice rim lighting along their hair line as well. The image above was shot at 11:30 a.m. on a summer day, with no clouds in the sky. To my eye, it seemed the sun was directly overhead, but by watching the shadows on the ground, I was able to position the subjects to that the sun was to their back.
Natural Reflectors
A natural reflector can be any neutral colored object in your surroundings that can serve to bounce light back onto your subject. Common reflectors might be a sidewalk or pavement, or a large neutral colored building or structure. Take a look at the comparison below to see how natural reflectors work to your advantage when shooting in harsh light, and especially mid-day sun. The image on the left was taken on a sidewalk, with the sunlight being bounced back onto the subject’s face, giving her nice even lighting. When I had the subject take a few steps to my left onto the grass, notice the change in the light (or lack thereof) on her face. Her position to the sun had not changed, nor had she stepped into shade. This change is simply due to the difference between the use of a neutral natural reflector and standing on the grass. Not only did the grass not serve to reflect light onto her face, but it also cast a green tint onto her skin.

Block or Diffuse the Sunlight
Another alternative when shooting in harsh light is to block the sunlight in some way. This could be by using a nearby structure, or even surrounding trees, to block or filter out some of the harsh lighting.
Find Shade
Observe your surroundings for pockets of shade to shoot in. The image below was taken at 10 a.m. on a clear summer morning. I used a small area of shade that I found to guard my subject from the harsh sunlight, which can be seen in front of and behind him.

Expose for the Skin
When I’m shooting in harsh light, I use spot metering and expose for the skin on my subject’s face. This enables me to get proper exposure on my subject, and also helps to maintain proper skin tones.
Tools to Help
There are a few tools you can use to help you when shooting in harsh light to help even out the lighting on your subjects. By using a portable reflector, you can bounce light onto your subject. However, this can be difficult to do without an assistant, and can be nearly impossible if you are photographing moving subjects, like children. Some choose to use flash to compensate for the harsh light and shadows, called fill flash.
Shooting in harsh light or full sun does not have to be a deal-breaker. By following these simple tips, you can be confident shooting photos at any time of day, making you more well-rounded and giving you more flexibility as a photographer!
Have you loved these tips? Don’t forget to read along in the rest of our series here:
Part 1: Finding the Light
Part 2: Using Shadows for Dramatic PortraitsPart 3: Shooting the Golden Hour
Part 4: How to Shoot in Harsh Light
Part 5: 3 Ways to Use Window Light
Part 6: Creative Light Sources
And stay tuned for upcoming additions to this series on Finding the Light!