


Learn how and why to use Kelvin white balance to get perfect color in your images!
Have you ever taken a photo in a high school gym? The colors are just…wonky. Skin tones look sickly, white uniforms look green. Or maybe you’ve shot in the shade only to find really blue-gray skin tones when you start editing. What is up with that? You didn’t notice it when you were shooting! Argh! The problem is color temperature and one solution to achieve more true to life colors in your images is Kelvin white balance.
Looking to improve your photography? Just enter any questions you have about improving your photography below and hit send and get answers & feedback instantly - for FREE! Submit QuestionsSo let’s talk color until we’re NOT blue in the face. Learn what it means to white balance an image, how Kelvin white balance works and how to set it on your camera. Are you ready to take back the color? Let’s get started.
What is white balance?
All light has color. You might not see it with your eyes, but your camera’s sensor picks up on it. And that light’s color will affect the color of your scene, including skin tones, clothing, etc. Understanding and achieving the right white balance, then, is critical. You don’t want a bride to look orange from indoor lighting, nor do you want a handbag’s colors to be off in a product shoot. Setting a white balance means changing settings in the camera to adjust for the different color temperature of your light so your images look “normal.” White balance is something every single photographer needs to understand and know how to achieve in-camera and in post-production for true-to-life images.
What is Kelvin White balance?
According to Wikipedia, the Kelvin scale is “an absolute thermodynamic temperature scale using as its null point absolute zero, the temperature at which all thermal motion ceases in the classical description of thermodynamics.”
Helpful? Not really. Basically, Kelvin is the standard measurement of thermodynamic temperature. It’s named after a British enigneer, William Thomson, 1st Baron Kelvin, who wanted to invent and use an absolute temperature scale instead of the Celsius or Fahrenheit scales.
What does that have to do with photography? Well, during his research Lord Kelvin realized that the light emitted from a burning hunk of carbon changed as the temperature of the carbon increased or decreased. So a black body (the burning carbon) burning at temperatures below 4000 Kelvin (the aforementioned thermodynamic temperature scale) appear reddish, where black bodies above 7500 Kelvin appear bluish. That’s the Kelvin color temperature scale. When you use Kelvin white balance, you are adjusting the camera’s settings to match the color temperature in your scene. This helps you “white balance,” meaning you eliminate any color cast from the light and colors appear true to life. A pure white object in a correctly white balanced image, then, would, in fact, be perfectly white.
Want to know more about white balance? Check out the Ultimate Guide to Understanding White Balance tutorial!
How does Kelvin white balance work?
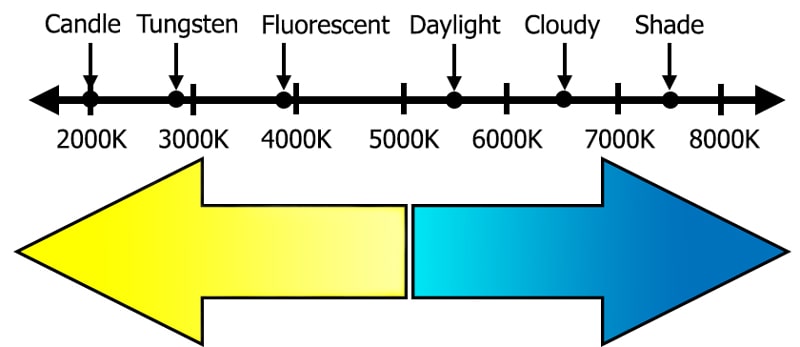
We know that certain types of light emit certain colors. If we know what those values are, we can set our camera’s white balance color to match that and achieve true to life colors. By committing a few light temperatures to memory, you can set your camera’s white balance to match those color values.
Candle Light= 2,000K
Sunrise or sunset= 2,000-3,000 K
Tungsten Light (house lightbulbs, for example)=2,500 K – 3,000 K
Flourescent Light (gym lights, for example)= 3,900 K
Daylight= 5,500 K
Flash= 5,500 K
Cloudy=6,500 K – 7,500 K
Shade= 7,500 K-8,500 K
These numbers aren’t absolutes. They are estimates of the color temperature of the light on a Kelvin scale. You might find you need to adjust up or down depending on the specific lightbulbs or conditions. You can also white balance to match your editing style. For example, I have one set of flashes that is more like 5,900 K so when I use them, I have to adjust my Kelvin white balance parameters accordingly. The lights in our local high school gym, which are fluorescent (and awful, I might add) are around 4,200 K.
Your camera already uses the Kelvin scale!
Your camera actually already uses the Kelvin scale, you just never knew it! For example, if you change your white balance setting to the “Shade” preset on your camera, the camera adjusts to a value of about 7,500 K. If you use the “Flash” setting, your camera will likely set a value of 5,500 K to match the above Kelvin scale.
But your camera doesn’t always get it right. That’s why understanding how to use and set a Kelvin white balance is important. You can tell the camera what the “right” white balance is! If you know the approximate color temperature of your scene, you dial in a matching Kelvin white balance color temperature in your camera’s settings and the camera makes the adjustments to your image, helping you achieve more true to life colors.
This shot, for example, was taken in our kitchen during my daughter’s first monopoly game. Everything is very yellow from the color cast from our kitchen’s tungsten bulbs.

But because I know that Tungsten bulbs have a Kelvin value of 2,500-3,500, I can adjust my white balance in camera to reflect more true to life colors. This is at 2,600 K, which I know from practice is about right for our kitchen lights.

In this image, I was taking pictures of some super cute Halloween treats. I forgot to adjust my Kelvin white balance, so it was set at 2,850K from a previous shoot. Not quite the look I was going for. That cutting board is white, not blue.

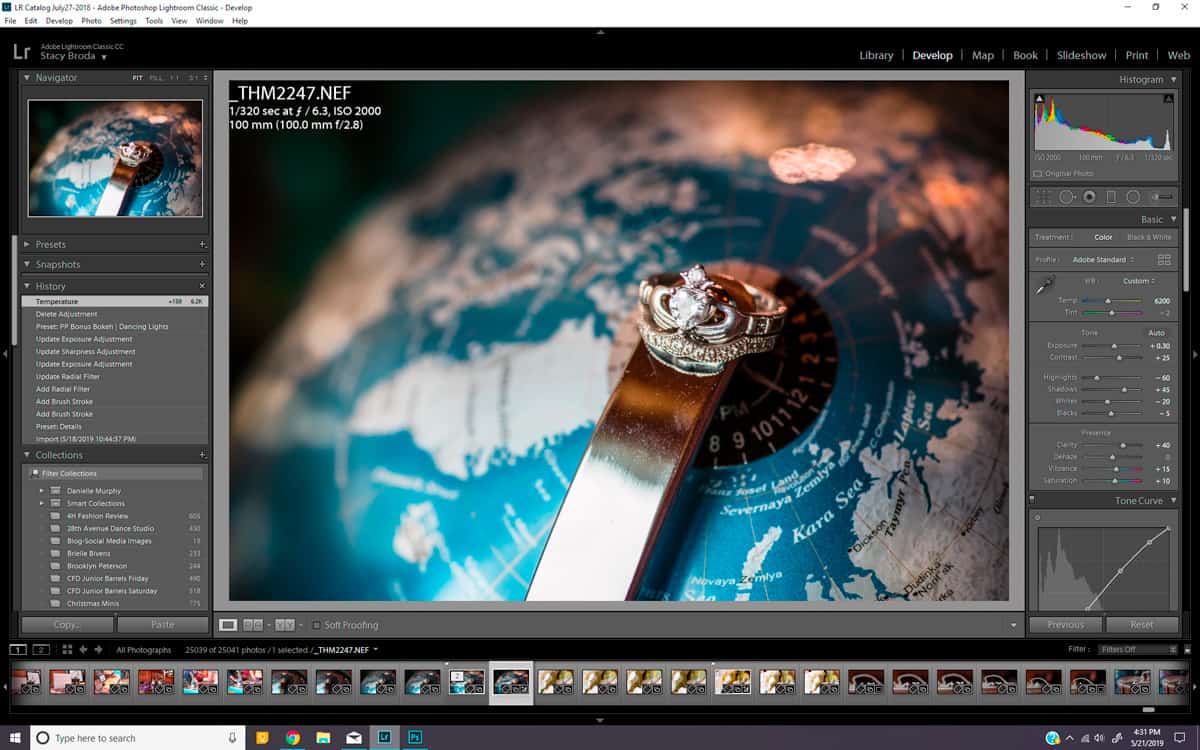
Simply by entering in the correct Kelvin white balance value in my camera, 6,200 (which is what I eventually settled on), I have more representative colors.

How do I set Kelvin white balance on my camera?
The hardest part of using the Kelvin white balance scale is memorizing the approximate color values. Setting a Kelvin white balance is easy!
For Nikon Users
- In your menu system, choose the Photo Shooting Menu.
- From the Photo Shooting Menu, choose White Balance.
- In the White Balance Menu, scroll down until you see an icon that looks like a “K” with a black box around it. That’s the Kelvin scale. Make sure that’s highlighted, then press the arrow over button to the right. Use the toggle switch to set the correct Kelvin color temperature to match your scene. You can set it as low as 2,500 or as high as 10,000 K. Know that you can adjust by 10, 100 or 1000 at a time.
- When you’ve set the correct color temperature, choose OK. Your Nikon is now set to your chosen Kelvin white balance temperature.
You can also set a Kelvin white balance using the WB (White Balance) shortcut button on the back of your camera. Check your manual to see if your camera offers it or to change another button to serve as your White Balance shortcut button.
For Canon Users
- In your menu system, scroll through until you find White Balance. Choose it by pressing the OK button.
- Scroll through the White Balance menu until you see the “K” icon. Choose it by pressing the OK button.
- Adjust the Kelvin value up or down by using your scroll wheel.
- You can also access the White Balance menu through your Quick menu by pressing the Q button on the back of your camera.
One helpful trick is to turn “Live View” on and adjust the Kelvin value. That way you can see in real time what the image will look like at the chosen value.
If you change lighting conditions, such as moving from indoors to outdoors, remember you’ll need to set a new Kelvin white balance temperature to account for the changing conditions.
And if you can’t remember the exact values, don’t worry. Just remember that if your images are too yellow, turn the temperature down. If they are too blue, turn the temperature up. Eventually you’ll find a setting to your liking!
Can I use Kelvin white balance in post-production?
Yes! If you forget to set a custom Kelvin value in camera, you can still use the Kelvin scale to help fix your white balance in post-production if you shot in RAW. In Lightroom, go to the Develop module and enter the desired Kelvin value in the Basic adjustment panel. Instead of using the Temp slider, use your keyboard to enter in your desired Kelvin value. You can also adjust it in Camera Raw
What other white balance methods are there?
Auto White Balance
With AWB, you let the camera adjust the white balance automatically, according to the colors it’s reading in the scene.
Camera presets
As mentioned earlier, most cameras have white balance presets. These include Incandescent, Fluorescent, Direct sunlight, flash, cloudy and shade. The camera sets the Kelvin color temperature based on your selection. But remember these are presets and might not accurately reflect the exact color temperature in your scene.
ExpoDisc
The Expo disc (and its generic counterparts) evaluate the light hitting your subject and help set a more accurate white balance. They are small discs placed over the lens and aimed at your light source to evaluate color. They are used in conjunction with the settings in your camera to set a more accurate white balance. Click here for our ExpoDisc tutorial!
Gray Card or White Balance Card
These cards have a known color value, either middle gray or pure white. By placing them in the scene and adjusting your white balance in-camera or in post-production to reflect those known values, you can pin down a more accurate white balance. Sometimes these tools are used in conjunction with software you install on your computer to create white balance color profiles. The combination can yield highly accurate white balance and color values, critical especially in product photography work.
Post-Production
If you shoot RAW and use software like Adobe Lightroom or Photoshop, you can adjust the white balance in post-production to your liking after the shoot.
Is Kelvin White Balance Better than Auto White Balance?
Ask anyone what their preferred white balance method is, and they’ll probably swear it’s the best one. I know pros who swear by Kelvin, using a white balance card, using an Expo Disc and using Auto White Balance. Others don’t pay in-camera white balance one lick of attention and do everything in post. So who’s right? The truth is, you need to find a system that consistently gives you the color and white balance you seek.
Kelvin white balance is a quick way to adjust the white balance settings in the camera. It also lets you dial in your white balance more accurately than using the camera presets. It takes some getting used to, but once you commit the scale to memory, it’s quick and easy to adjust for different lighting scenarios. Kelvin will also give you more consistency from shot to shot. This is especially important if you are bracketing exposures or taking multiple shots to use in a panorama.
And photographers that have committed to Kelvin really do love it. But you need to do what works for you.
Remember:
- For the most accurate exposure, get the most accurate white balance you can in-camera. Tonality and brightness can be affected as well as color when you color-correct in post-production.
- Accurate white balance might not be the look you are striving for. The Kelvin white balance method we’ve discussed is designed to neutralize color cast. You might not want that at all! Instead, you might want to use the scene’s natural colors to help create a mood or tell a story. That’s a creative choice, and it’s entirely up to you.
- All of us “see” color differently. What is a perfect white balance to you might be too warm or too cool for the photographer down the road. Neither of you is right. And neither is wrong.
Need help fixing an underexposed photo? We have you covered!
What color temperature is best for photography?
There is no best color temperature. It’s more about matching your settings in the camera to adjust for the color temperature of your scene to get more accurate colors!
Using Kelvin white balance is just one more tool you can use to make the vision in your head for an image match what’s on your screen. It’s fast and easy with a little practice, saving you time in the editing room. Give it a try today and see how fast you’re on on the way to correct white balance in camera, every time!
https://www.youtube.com/watch?v=48c02L_nHZc


![Personal Branding Photography Basics [Complete Guide]](https://colesclassroom.com/wp-content/uploads/2019/06/adorable-adult-beautiful-774095-768x512.jpg)