

Do the words “off camera flash” fill you with dread and terror? Many photographers, especially amateurs and those loyal to natural lighting, typically steer clear from flash photography of any sort due to its perceived complexities. However, once you start to learn the basics of controlling your electronic flash, you’ll quickly find that off-camera flash photography is an intuitive and simple way to expand on your skills and take them to the next level. Ready to get started?

What You Need
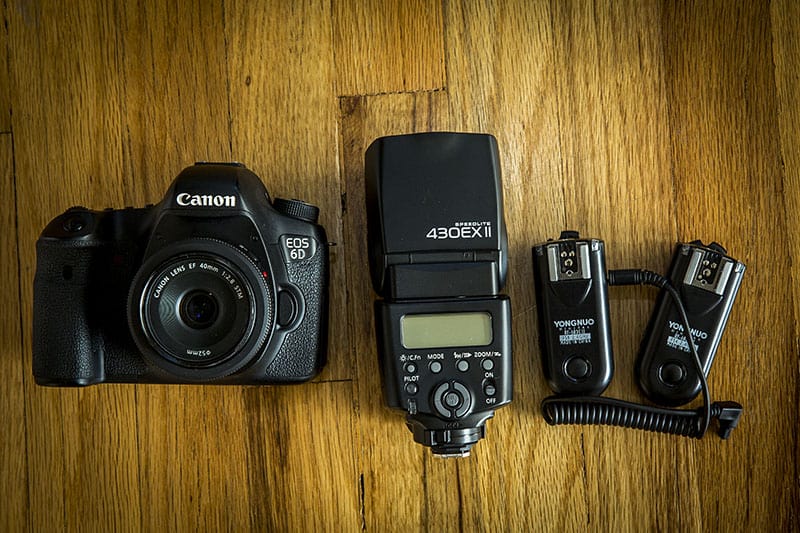
First off, let’s go over the necessary gear to get started with off-camera flash photography. Thanks to evolving camera technology, much of this gear can be acquired at a very low price, especially if you explore third-party options. This may be the way to go if you’re not fully committed to investing top dollar yet. At the very least, you need to have a flash unit that can function in manual mode, and a way to sync that flash with your camera. Personally, I use a Canon 430 EXII flash with my Canon 6D camera, and two Yongnuo RF-603 Wireless Flash Remote Triggers. These flash triggers are among the cheapest and are very high quality for the price, costing significantly less than the more reputable yet more expensive Pocket Wizard options. With just these three items, you can get started with off-camera flash without a hitch, but you may want to add two more things to give yourself even more flexibility.
Bare bulb flash can be incredibly harsh, even when used at the lowest setting. To help soften the light, a diffuser is recommended. There are tons of flash diffuser options out there, but the easiest to get started with is a simple umbrella, such as this Westcott 43-inch white satin umbrella. Along with the umbrella, you’ll need a lighting stand, such as the Manfrotto Nano Stand, and a swivel bracket for attaching the flash and umbrella to the lighting stand.
Looking to improve your photography? Just enter any questions you have about improving your photography below and hit send and get answers & feedback instantly - for FREE! Submit Questions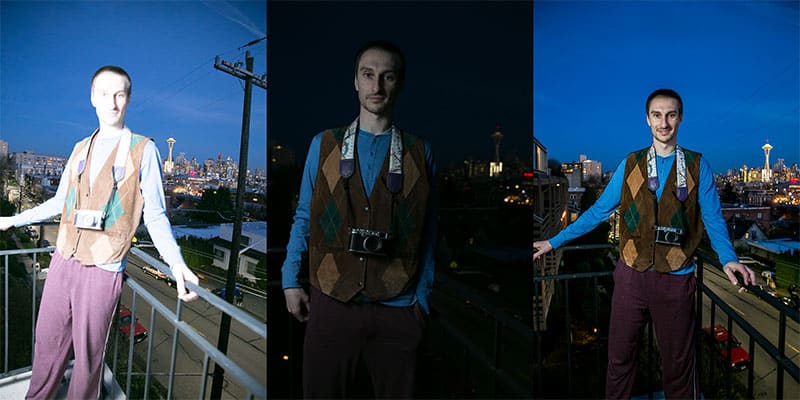
How to Get Started
After you’ve assembled your basic off-camera flash lighting kit, it’s time to learn how they all work together. The best way to learn is to shoot at extremes. Leave both your camera and flash on auto and fire a shot. In all likelihood, you’ll get a super overexposed photo like the photo to the far left below.
This is why you never ever want to shoot off-camera flash with auto settings. Think of it this way: when taking a photo with a flash unit, you are essentially taking two simultaneous photos. One is the photo your camera snaps with its settings, and the second photo is overlaid with your flash’s settings. The only way to get a perfectly exposed shot with off-camera flash is to set your camera and flash settings manually. This usually means having your camera settings be slightly underexposed and adjusting your flash to fill in according to the look you’re trying to achieve.
So how do you go about finding the right settings on your camera and flash? Many times it’s about trial and error, especially when you’re first starting out. As a rule of thumb, keep ISO as low as possible, and your shutter speed no higher than your camera’s maximum sync speed, which is typically 1/200 or 1/250th. If your shutter speed is higher than your max sync speed, it will be pretty obvious as your resulting image will have an ugly white line running through it. In terms of aperture, keep in mind that it has some influence over controlling your flash’s output, so you may need to have it set somewhere between f/4-f/8 unless you’re shooting in high speed sync mode, which is a more advanced feature to focus on later.
After you set up your camera settings, it’s time to fiddle with your flash. Again, don’t leave your flash on auto, or ETTL. Instead, make sure it is on manual setting, and adjust flash output until you get the look you desire. Manual flash settings are pretty straightforward: 1/1 is full power, and the lower the fractions from there, the lower the flash output. Some flashes such as the Canon 430 EXII have their lowest flash output at 1/64, while more advanced flashes like the Canon 580EXII can go as low as 1/128.
In Conclusion
Above all, off-camera flash photography is all about trial and error and using the tools and techniques that work the best for you to achieve the look you’re going after. This is just a very brief summary and introduction to off-camera flash photography, and there is plenty more material and strategies to discuss, but I hope this gets you off on the right foot to begin experimenting!


![Getting Started with Light Painting [Beginners Guide]](https://colesclassroom.com/wp-content/uploads/2020/05/asphalt-blur-car-city-290470-768x512.jpg)