Photographers talk about light. A lot. In fact, we talk about it ALL.THE.TIME. But we hash out the nuances of it for a very good reason…it is the heart of photography and affects our pictures in so many different ways.
Two common terms you’ll hear associated with photography are soft and hard light. But what do those two terms mean?
Today, we’ll discuss hard light against soft light, learn about the differences between the two, and show you examples of each. You’ll also learn how to create and use both types to your advantage.
What’s the difference between hard light and soft light? Shadows!
When it comes to lighting a scene in photography, most of the time we’re actually talking about the shadows! The well-lit, properly exposed parts of an image don’t actually change between hard light and soft light. What does change is the quality of the shadows and the transition between bright and dark.
As you examine an image that appeals to you, don’t focus so much on the bright areas. Instead, pay attention to the shadows. How distinct are the shadows? Do they taper gradually from bright to dark or is the transition more abrupt? Do the shadows have tonality or are they simply all black?
Simply put, soft light is characterized by subtle shadows and the image transitions more slowly from bright to dark. Hard light has distinct shadow and the shadows lack tonality.
What creates hard and soft light?
Size of the Light Source
The only real difference between hard and soft light is the size of your light source. The quality of the light (and shadows!) is affected by the size of the light source relative to the subject. So the main concept to remember from this article is this:
The bigger the light source, the softer the light.
As you increase the light size, you “soften” it. So really big sources of light produce softer lighting; a smaller light source produces harder lighting. A large light “wraps a subject in illumination, filling in shadows and reducing contrast.
Let’s look at a few common light sources which will illustrate my point. (My usual assistant is back in school so I had to find a stand-in. She works very cheaply and is great about keeping a smile on her face as I shoot). Look to see how the shadows (especially the one under her chin) change as I change from a popup flash to an external flash and modifier. Note that I’ve adjusted my exposure using a gray card, so the overall brightness of my image doesn’t change, just the shadows. See how the shadows affect the overall feel of an image!
Pop-Up Flash
Your camera’s pop up flash is a really small light. It’s less than an inch long and about half-an-inch tall. Compared to the average subject, it’s really pretty teeny. That’s the main reason a pop-up flash can’t give you soft, flowy images. It’s simply too small relative to your subject. (It’s also very directional and blasts your subject right in the face but that’s a different concept).
The shadows here are very distinct and don’t have a lot of tonality to them. Overall, it’s not very flattering or interesting.

External Flash
A bare external flash is bigger than a pop-up flash, around 2-3 times the size of your camera’s on-board flash. It will be slightly softer than a pop-up flash, but still a bit overwhelming.

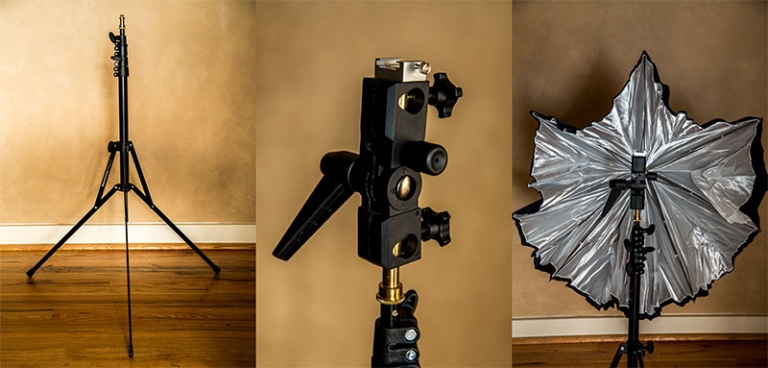
External Flash with 22” Umbrella
When we put a modifier on a flash unit, our intent is really to make a small light…bigger. The flash hits the modifier and spreads the light out, making it a bigger source relative to the subject. The shadows are much less defined and go from light to dark more gradually. The hotspot on her chin is much less noticeable and she doesn’t look near as shiny.

External Flash Bounced
One trick photographer’s use to adjust their lighting is to bounce the flash off of a wall or ceiling. The reason this works is that you are making the light source bigger. The flash lighting hits the ceiling and bounces back to the subject in a bigger area. You’ve increased the size of your lighting!
The shadows here are very gradual with a lot of gradients. We’ve lost some tonality in her hair, but that’s from the direction of the flash (overhead) instead of the quality. She looks a little lifeless (ha!) because she’s missing that pretty catchlight in her eyes.

Windows
Most photographers love window light. Why? Because of it’s soft and gorgeous with very gradual shadows. Below you can see that the shadows are very subtle as they move from bright to dark. We’ve got some split lighting going on because of the position of the window, but you get an idea of what it looks like compared to pop up flash.

Hard Light or Soft Light
Now that you’ve seen some examples, let’s dive a little deeper into each type of light source and discuss its pros and cons and talk about when you’d want to use one over the other.
Hard Light

Hard light has distinct differences between light and dark and generally has a larger gap between the very darkest and very brightest parts of the image (high contrast). Shadows and highlights lack tonality.
Pros
- Gives images an edgy, dramatic feel
- Very easy to create
- Exaggerates textures
- Adds dimension and depth
Cons
- Exaggerates wrinkles, acne and other skin imperfections
- Creates hotspots, or small highlights that are so bright they’ve lost any tonality.
- Can make skin look shiny or oily
Tips for Using Hard Light
Use a hard light source anytime you want to create a dramatic, edgy look or create distinct differences between bright and dark.
- Be strategic in placing your lights or subjects. Make sure the shadows don’t obscure critical elements of your subject (the eyes or face, for example).
- Be careful of living subjects that squint. If you have to face a subject into hard, continuous lighting, have them close their eyes, count to three, then open them for a brief moment to avoid squinting.
Soft Light

Soft light is characterized by gradual, subtle shadows. The transition from bright to dark is less noticeable and there may be less contrast overall.
Pros
- Flattering to most people
- Adds a warm, more inviting feeling to an image
- Makes wrinkles, acne or blemishes less noticeable
Cons
- Lacks drama
- Makes textures less noticeable
- Can become flat and uninteresting if used too directionally
Use softy light for flattering portraits that make the subject appear welcoming and open.
How to Change Hard Light to Soft Light
To change hard light to soft light, you have a few options: make your source bigger or fill in the shadows.
Most of the time, we can’t physically get a bigger light. Instead, we put physics to work to help us! You can:
- Make your light bigger by bringing it closer to the subject (thus making it bigger compared to their size) and turning down the power if needed.
- Use a modifier like umbrellas, softboxes, or scrims.
- Bounce flash off a surface and onto your subject.
There’s not really anything wrong with the light itself in an image with harsh lighting. What most of us don’t like is the shadows. So make your light softer by filling in those shadows!
- Use a reflector to bounce light back toward the subject and fill in shadows
- Use another flash as a “fill” and fill in shadows.
Is Sun Light Hard or Soft Light?
The sun is a hard light source. I know, I know, that feels counterintuitive. “But…but…” you sputter. “The sun is HUGE! Isn’t it basically just one ginormous lighting source?”
The sun is a really big light. But it’s so far away, that it becomes small relative to earth. So using the sun as a light source is hard and creates strong, distinct shadows and highlights, as shown below.

But clouds can act like a softbox, diffusing the sunlight and making it a bigger light by spreading the sunlight out more.

Mixing Hard Light and Soft Light in the Same Shot
You can mix hard and soft light sources in the same image, but it requires knowing how and why to create both. We discussed the how above. But why would you want to mix different qualities?
It comes down to creativity and personal preference. You might want soft light on your subject but use a hard light source (the sun) as backlight to outline the subject and separate her from the background.
Or you might want to mimic sunlight or artificial lighting in your image for some reason but still have soft lighting on your subject. There are no rules saying you have to use only hard light OR soft light. You can do both!
Which is better, hard light or soft light?
Asking that is like asking which is better, hammers or saws? Both are helpful tools when used for different purposes. Which is better depends on your goals for your image. The key is knowing the look you want to achieve and understand how to use lighting effectively.
Conclusion
Being a great photographer is about understanding light and knowing how to use it to your advantage. So study soft light and hard light and know when and how to use both to create the art you want!