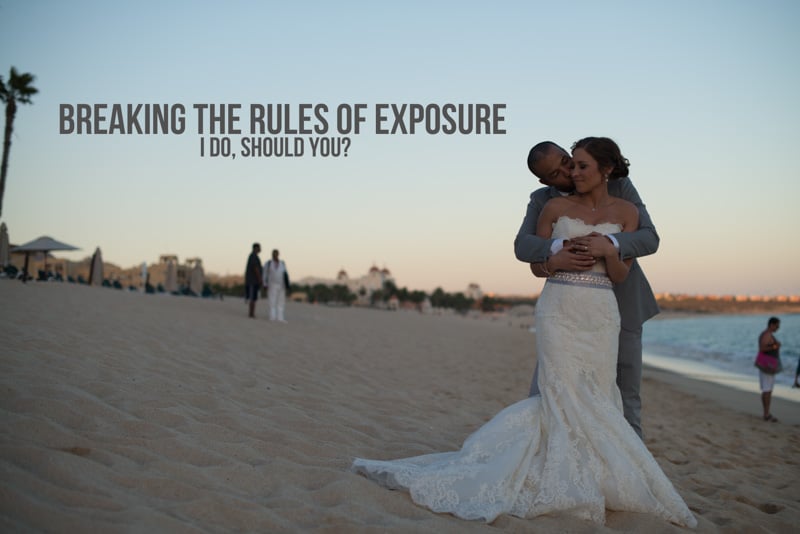

Understanding Your DSLR Basics Made as Easy as 1-2-3!
Getting your very first DSLR Camera, is one of the most exciting times as a photographer and for most of us, the beginning of our journey into the amazing world of photography. But let’s face it friends, getting to know your DSLR basics can be really overwhelming when you don’t know where to begin.
Looking to improve your photography? Just enter any questions you have about improving your photography below and hit send and get answers & feedback instantly - for FREE! Submit QuestionsCan you really say that you knew what Av Mode and Tv Mode meant when you first started playing with your camera? Or what ISO meant or stood for? Well, maybe a few of you did. If you’re like most of us, chances are you had a little bit of a struggle to start off with.
If you are just starting out in photography, this article is perfect for you! We’re going to take a look at your ‘Must Know’ DSLR Basics, so you can be well equipped when it comes to your brand new camera. Congratulations! You’re already on your way to getting ahead and becoming a better photographer.
[ad id=’5′]
Shooting Modes: What Are They? What Do They Do?
How many times have you been at a family gathering and sweet auntie Helen wants a picture? Out comes the point and shoot and FLASH! Seems simple enough right? Chances are, her camera is set to an Automatic mode that does all the work for her so that she can do just that. Point, and shoot. Let’s talk about this one for a bit and what it does and doesn’t do.
Auto Mode
Your camera is in the drivers seat on this one. From the moment you press the shutter button, from open to close, the camera will decide everything to do with your exposure. This includes your shutter speed, and your aperture value. This mode is perfect for the enthusiast not looking to go beyond the point and shoot capabilities of the camera.
What you sacrifice here, is the control offered by the other modes of the camera, which we will consider here.
Aperture Priority (Canon/Av, Nikon/A)
This mode is great as a ‘semi-automatic’ mode for photographers. In this mode, you will set what you want the aperture value to be. Say your DSLR came with an 18-55mm f/3.5-5.6 lens to start out with. As an example, let’s say you are looking at creating that ‘blurry background’ or ‘bokeh’ effect.
To start with, you would want your aperture on this particular lens to be set to f/3.5, or at it’s widest opening possible. Not quite sure what aperture means or how it works?
Once you have set your aperture to the desired speed, the camera will then control your shutter speed based on the light available and your aperture value. The lower the aperture number, the more light will be let in through the lens. Here’s a quick ‘cheat sheet’ guide on aperture to understand what I am referring to.
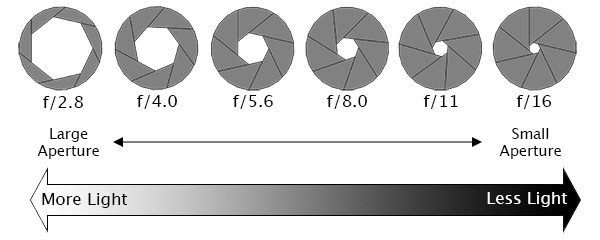
Aperture is important to understand. It controls your ‘Depth Of Field’ in large part; that is to say, the portion of the image that will be in sharp focus. While distance and other factors also affect this, we won’t get too carried away here. For a deeper understanding on Depth of Field, check out this fabulous article.
Time Value/Shutter Priority (Canon/Tv Nikon/S)
Just like the Aperture mode, this mode on your DSLR behaves in a semi-automatic fashion as well. The difference is, with this mode, you set the shutter speed, and your camera will look after the rest, such as the aperture setting, depending on how fast a shutter speed you have set. Think of it this way: Your Aperture, will control the amount of light let in. Your Shutter, will control motion and the LENGTH of time the shutter will stay open to allow light in.
Let’s say that you wanted to capture a fast moving object and freeze it, such as a live performer mid jump, or perhaps a bird in flight. You would then want to use a higher shutter speed to do this. On the other hand, if you wanted to catch a waterfall with that cool milky looking texture, you would then want your shutter speed to be a lower shutter value to get the motion.
Time Value mode is great because you only have to worry about getting the right shutter speed, while the camera figures out the rest of the work to achieve the proper exposure.
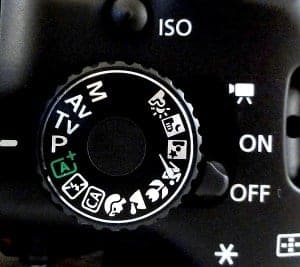
Program Mode (Canon/P Nikon/P)
I like to refer to this mode as the ‘Half Way There’ to full Manual mode. In Program mode, you can set either the Aperture, or Shutter speed, and your DSLR will then adjust the other according to the setting you have selected for either one.
To clarify, if I set my aperture to f/4.0, then the camera will look after my shutter speed. If I set my shutter speed to 1/800 SEC, the camera will then adjust my aperture. Candidly, it’s not a mode that is widely used over other more manual friendly modes, however it is still good to get acquainted with this mode as part of your DSLR basics knowledge.
Manual Mode (Canon/M Nikon/M)
No guess work here friends. You are in full control over what the camera does and take over control over getting the right exposure down. You will have your exposure meter to understand if your photo will be underexposed or overexposed depending on what your settings are in this mode. Keep in mind once again, you have full control over the camera’s ability to take a properly exposed photo. The mistake that is sometimes made, is the illusion that it’s the ‘gear’ that you have that will make all the difference, but that’s just simply not true. Manual mode is a widely preferred mode amongst professional photographers, based on their knowledge of how to use their camera, and take shot in various different lighting conditions.
** A Note About Manual Mode **
Do not be afraid to experiment with other modes to understand the relationship with other settings on your DSLR. Once you have a clear grasp on these other settings, shooting in Manual will not feel as overwhelming as you start out.
Get to Know Your ISO
Your ISO, is your camera’s sensitivity to light. The higher the number, the more sensitive the camera’s sensor will be to the available light. ISO is a subject all it’s own, so if you want a more ISO heavy explanation, check out this article.
Light Metering
What exactly is light metering? Basically, light metering is how your camera decides what your exposure settings should be based on the amount of light that is hitting your image sensor. This is one of the ways that you can also tell if your photo will be achieve the correct exposure once you take the shot. You can see the light meter in action if you take a look through your viewfinder before fully depressing the shutter. There is an indicator that you will see that, depending on where your light meter is reading light from, will either be centred, or on the left, to indicate underexposure, or on the right, indicating that the photo will be overexposed. Here’s a little diagram so you can see what we’re talking about here.
Metering Modes
Evaluative/Matrix Metering
Generally the default setting on many DSLR’s, this mode will assess the light from corner to corner of the sensor and read for the different zones for light and dark tones. In this mode, the camera will consider ALL of the available light to suggest the proper exposure on the whole frame.
Spot Metering
Exactly that. The light meter will read ONLY from a designated spot in the frame and ignore everything else. This mode is especially helpful when you are shooting into a lighter or darker background than that your subject. This ensure that your subject, and not the background are properly exposed.
Centre Weighted Metering
This mode considers a large area in the centre of your frame to suggest the proper setting for exposure, but not the whole frame as you would get in the evaluative/matrix mode.
Focus: Auto and Manual
Auto focus on your DSLR, will actually come with more than one setting. To learn about them more, read this article. For the sake of this article, we are going to give you the DSLR basic crash course.
Looking at your lens, there will be a switch on the side that will control whether your focus will be done automatically, or if it will be manual. In manual, you will need to be in control of the lens focus ring as opposed to the camera. Be careful of soft focus photos in manual mode however.
Both Auto and Manual focus rely on what we call your ‘focus point’ to know which part of the image needs to be tack sharp and in focus.
Image File Types (In Camera)
You will have the option of changing the size of the image files that get written onto your memory card. If you are hoping to make edits afterwards in either photoshop or perhaps lightroom, make sure that you select the RAW setting. RAW files are not compressed and contain a lot of image data that can then be used to edit the image post processing. A jpeg is a compressed file type, that is automatically processed by the camera. These images are smaller in size when written to your memory card, so you can fit more onto the card as well.
White Balance
This controls the accuracy of the colors as best as possible in our photos. In short, it helps to make the colors in the photo look normal. Your white balance, can be set to different settings depending on the scenario. You can also set your white balance to read the scenario and make an automatic adjustment on the white balance based on the light sources available.
There you have it! A quick understanding of your DSLR Basics.
Until Next Time!
Jay