Even if you’re not familiar with the term, you’ve likely seen vignettes in many photos. They’re an effect that darkens the edges of the photo. These shadows help naturally draw the viewer’s eyes towards the center, emphasizing the subject.
In the early days of photography, photographers usually tried their best to avoid the vignette effect. However, today this classic look is a popular trend. It’s commonly used in portraits, selfies, and other photos of people.
If you want to learn how to add a vignette in Photoshop, you’re in luck. Adding vignette in Photoshop is possible in several different ways, and all of them are quick and easy to learn. Here’s a closer look at how to create a vignette in Photoshop.
Use the Lens Correction Filter
The first Photoshop vignette technique you’ll want to learn is how to use the Lens Correction Filter. It’s probably the easiest way to use a vignette in Photoshop.
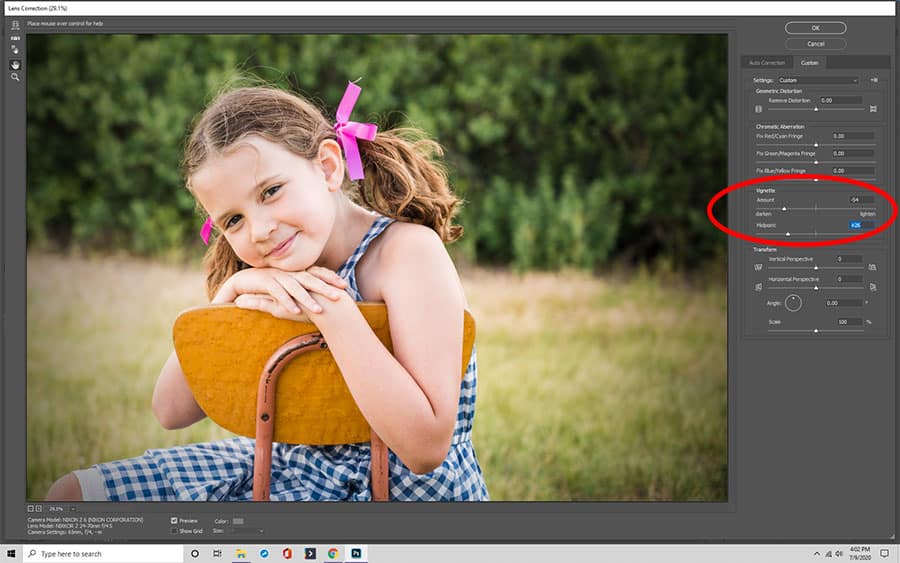
First, open the image. Click on the Filter menu. Then select the designated option.
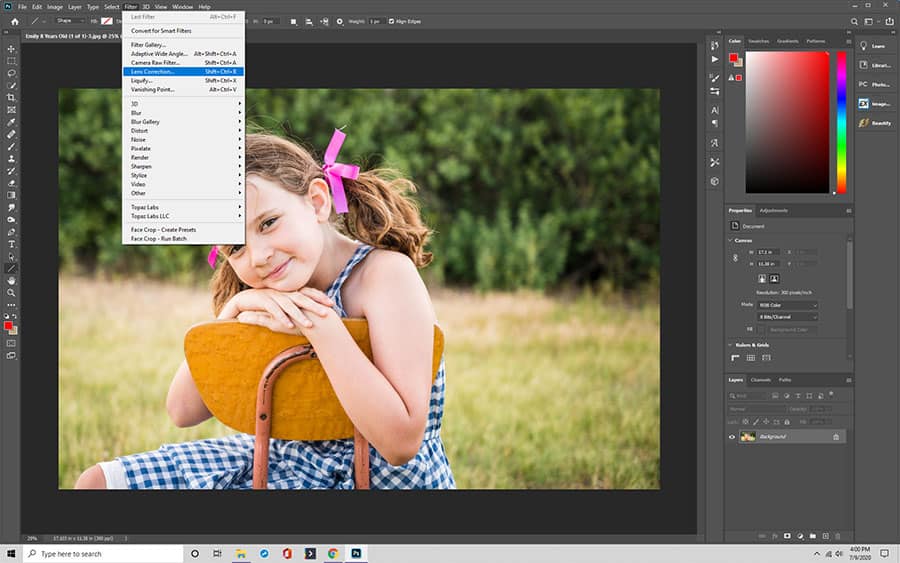
In the Lens Correction area, you’ll find a Custom tab. The two sliders allow you to control the vignette appearance. One slider adjusts the number of vignette effects while the other controls the midpoint where the effect appears.
While it’s fast and easy, this method doesn’t allow for much customization.
Use the Ellipse
Finally, you can use the ellipse tool. Use the Marquee Tool to create an elliptical marquee tool that surrounds your entire image. You want the image to sit in the center of the ellipse.
Next, select Path Selection. Under Path Operations, you’ll find Subtract Front Shape. The ellipse works in reverse to reveal the image in the center.
Use a Solid Color Layer
Another option for how to add a vignette with Photoshop is by using a solid layer of color. Start by selecting Solid Color from the Create a New Fill or Adjustment Layer icon. You want to choose black.
You want 30% opacity. Next, change the blending mode to Multiply. You can also use other colors. For example, light brown helps make a vintage look. When using a lighter color, select the Lighten option in the blending mode.
Use Inner Glow
The Inner Glow effect is another effective tool for creating a vignette using Photoshop. Create a new Adjustment layer on your image. Fill it with black.
Set the Fill to 0%. Then turn on the Inner Glow effect. In most cases, you’ll want to add some noise to the image after you add the Inner Glow. You don’t need much; a noise level between 2% to 4% should result in a subtle vintage effect.
Use a Levels Layer
Another way to create a vignette Photoshop effect is with the Levels Layer. You’ll find the Levels panel when you click on the “Create New Fill or Adjustment Layer” and then when you click on select Levels.
Pulling the grey triangle to the right darkens the image. Pull the white triangle to the left to intensify the shadow vignette effect.
After creating the Adjustment Layer, you need to layer mask the image. Select the Paint Brush tool. Set the color to black. Select the Curves layer.
Use a large brush to paint over your photo. You’re working backward with the Layer Mask. Using the brush removes the black sections from the Layer Mask to reveal the original image underneath.
Using the Level Layer method provides you with easy customization for the vignette effect. You can make a circle, oval, or even a custom shape.

Use Gradient Overlay
The Gradient Overlay tool is similar to the Color Overlap function. As with many of the other processes, you first make a new layer and fill it with black. Then go into the Layers panel and set the Fill to 0%.
After using the Layers panel, you want to turn on Gradient Overlay. It allows you to color the objects while also including a gradient effect. You can move the layer to adjust the vignette’s center of focus.
Use Gaussian Blur
Gaussian Blue makes a soft look. Use a blur between 400 and 500 pixels. Blend with soft light. Reduce the opacity as desired.
A Gaussian blur creates a unique effect not found with the other methods. It creates a distinct effect that resembles a thick screen. It’s also an excellent option if you need to cover up a grainy image.
A Summary of Vignettes in Photoshop
You can add a vignette on Photoshop in a variety of ways. The method you choose to add a vignette depends on what effect you want to achieve. You can add a simple one or even create a custom look.
Learning how to vignette using Photoshop is easy. All of the techniques above work for practically all versions of the image editing software, including CC, cs6, 7, and others.
Essentially, all the processes use layers to obscure your photo. Then you remove the shadow to reveal the center of your photo, moving outward to create the desired effect.
Although you can use any design software, even apps on your smartphone, to create a vignette, Photoshop usually looks the best. Photoshop gives you the move control over the finished product, allowing you to add a gradient, colors, and more.