
Any aspiring photographer, at some point or another, will run across the term “color space.” Typically, this moment happens when you’re setting up a new camera, or when you’re fiddling around with your camera’s settings. You notice that there are two color spaces, RGB and sRGB, and an obvious question arises: which one should I use?
Looking to improve your photography? Just enter any questions you have about improving your photography below and hit send and get answers & feedback instantly - for FREE! Submit QuestionsAlthough these two color spaces are the most used in photography, knowing which one to pick can be confusing. Should you just use the default color and forget about it? This strategy may seem easiest, but it’s not without its pros and cons.
Today we’re going to do an in-depth discussion of SRGB vs adobe RGB to help you decide when to use each one and which is best for you. Let’s get started.
First Step: Understanding Color Space
Before we dive into the sRGB vs Adobe RGB debate, we need to understand what color space is. Having a basic understanding of this concept is critical for photographers, even if this technical aspect of photo taking is less fun than the artistic side. Plus, without a grasp on color space, it’s impossible to understand the difference between Adobe RGB and sRGB.
The clearest, most straightforward definition of color space is that it refers to a specific, measurable, and defined range of colors. It describes how well a camera or a display device can replicate color information that we see in the real world. And when we’re talking about photography, color space refers to the range of colors that a photograph can display.

The most commonly used color spaces in the digital world are RGB or Red Green and Blue, which use infinite combinations of these three to create all the color options. Some have wider or narrower color ranges, which we’ll get into shortly, but for now, know that the wider the color range, the more faithful the color is to what your eye sees.
The color spaces you’ll hear about over and over again are sRGB and Adobe RGB, and to a lesser extent PhotoPro RGB (we’ll discuss Photo Pro RGB a bit at the end of this article). Knowing which color space to use can significantly impact the quality of your work, but this is not always a straightforward matter. Let’s look at each one in more detail.
Default Setting: sRGB
Pick up a camera, and more likely than not, the default color space setting is sRGB. These initials stand for standard Red Green Blue, and it dates back to 1996 when HP and Microsoft joined forces to create it. RGB color was the first color space used, and it set the standard for the images we see on screens. Indeed, it’s the most frequently used color space.
Computers default to sRGB color, and the vast majority of computing software uses it as a focal point. Any picture you post online will always use sRGB. It’s an excellent option for the vast majority of people, so using it is a safe bet. One interesting thing to note, however, is that your monitor may have difficulty rendering all the colors in sRGB one hundred percent.
How Does Adobe RGB Differ?
Not to be outdone by Microsoft and HP, Adobe Systems created its own color space in 1998. It’s the other most-common color space, and the second of two options you’ll find in your camera settings. The main difference between Adobe and sRGB color is that Adobe has a wider gamut. Adobe created it intending to be compatible with CMYK printers.
CYMK in the CMYK printers refers to the Cyan Magenta Yellow and Black color space, which commercial printers use to produce vibrant images. This larger color space allows for more saturated colors, and it’s ideal for printing work.
We mentioned in the previous section that monitors have difficulty rendering one hundred percent of the colors in sRGB. The same is true for Adobe RGB, which displays even less of the colors that this space is capable of capturing—around seventy to eighty percent.
Looking at the Differences
So now you understand what a color space is, and you know that you can choose from two in your camera’s settings. How do you decide which one to use? Does it even matter? The difference may seem insignificant, but the short answer is yes—it matters a lot.
If you want to become a better photographer, understanding the variance between each color space can result in dramatically different results. While it’s true that you can convert from one type to another in post-processing (though there are some limitations in doing so), it’s best to choose one knowing why you are choosing it.
The most significant difference between these two color spaces lies in the fact that Adobe RGB has a wider color gamut. It is able to represent roughly thirty-five percent more color ranges than sRGB, which are mostly more greens and blues.
To be clear, we’re still talking about the same number of colors in each color space. Both Adobe and sRGB have 256 reds, 256 blues, and 256 greens. But in Adobe, the differences between the colors are more defined, more distinct. The images it produces are truer to what our eyes, which are skilled at capturing color, see in everyday life.

Benefits and Drawbacks of Adobe RGB
Based on the discussion of Adobe RGB and sRGB up to this point, it may seem like using Adobe RGB is the obvious choice. But not so fast. A bigger (or a wider) color range does not always mean better. Or, in this case, it doesn’t always mean higher quality images, which is because the digital world revolves around sRGB in a way that it doesn’t for AdobeRGB.
To help you understand a bit further why a photographer might prefer one to the other, here are a few pros and cons of Adobe RGB.
Pros:
- It displays a wider color gamut
- It’s beneficial for professional photographers who want to do more with their pictures besides posting them online
- It has the option to convert to sRGB afterward, which is more challenging to do than the other way around
Cons:
- The world is best equipped for sRGB, and your photos will display incorrectly without conversion
- Using Adobe RGB generally adds steps to your workflow
- Few monitors can display Adobe RGB properly
Choosing the Best Color Space: Is There a Winner?
Having taken a look at both color spaces, we can now say that the one that is best for you depends entirely on your needs and, to a lesser extent, your preferences.
Will you be printing your photos often? Do you want images with colors that pop? If print work is your primary objective, you should use Adobe RGB—although you will have to convert your photos later if you want to use them on the web.
Conversely, if you plan to use your images primarily on the web, or if you just prefer to simplify your workflow, sRGB is a fine option. Your photos will be viewed excellently on the internet, and they’ll also look good in print.
A quick note about viewing images on the web: how well the color displays is dependent on your monitor. Color gamut varies significantly from monitor to monitor, so if you’re noticing that your sRGB photos seem dull, it may be because your monitor is not correctly calibrated.
Consider Your Options
You may still be feeling unsure of where you stand in the RGB or sRGB debate and wondering what all this discussion means on a practical level.
When it comes to deciding which color space to work with, photographers utilize one of three strategies. There are reasons to try each of these strategies, but there is no right or wrong answer. Our advice is to pick the one that appeals most to you, that best fits your needs, and that you’ll be able to execute relatively easily.

Option 1 – sRGB
Our first option is to go the “simpler” route and use sRGB color space exclusively.
Though it may seem like you’re missing out on the benefits of Adobe RGB by doing so, many photographers choose to work this way. It’s an excellent choice—it’s safe, it’s practical, and you won’t experience any issues with color compression. Plus, you’ll have no worries about converting files later.
And if you’re concerned that your images will be lackluster in print, be aware that that’s not the case. Sure, Adobe RGB does have an edge here, but sRGB is by no means awful in print. There’s a reason this color space has stood the test of time, and that’s because it does an excellent all-around job.
Option 2 – Try to Use Both
Trying to use both color spaces at the same time is the most problematic option of the three, but it’s something that someone doing a lot of both web and print work might consider.
The idea is simple enough. You change the setting according to what kind of shooting you’re doing, either print or web. But this practice becomes problematic because, in photography, things change. Sometimes what you do with the image depends on how it turns out, not on what your intention was when you took it–which may be very different.
For example, you may start with the intention of printing it, but later decide to use the image on the web, too. In this case, you’d have to convert the file to sRGB color space, which would mean that you are mainly employing the same option as setting your camera to Adobe RGB in the first place. For this reason, we find option two the least viable strategy for most people.
Option 3 – Adobe RGB
The final option is to use Adobe RGB exclusively. Doing so is the best work method for anyone who often prints, seeing as how anything you shoot will have the widest color gamut possible. The one downside is that you have to convert your photos to sRGB if you want to post them to the web.
For some people, completing this extra step is not an issue, and the price of having the option to work with a wider color space. But if you’d rather not have to worry about this step, you should stick with sRGB.
Color Space During the Editing Process
Just as you can choose color space in your camera’s settings, you can also assign it to your images in post-processing, which many photographers do. The caveat here is that to choose the color space in post-processing, you must shoot in RAW format.
When you use this setting, the camera assigns no default color space; it merely captures as many colors as it can. Once you’re ready to edit the image, you use Lightroom or Photoshop to assign a color space.
Experienced photographers find shooting in RAW advantageous, as it provides them the most considerable amount of flexibility. Their access to sophisticated monitors and printing devices means that they will get better use out of a wider color range if they choose to use Adobe in post-processing.
If this sounds like something you’re interested in, we’re now going to address your next question: how do you choose the color space in post-processing?
Adobe Photoshop
Setting the color space of an image in Photoshop is a straightforward process. You’ll need to go to the Edit drop-down menu and click on Color Settings. Doing so will open a pop-up box with a lot of technical-sounding options. Before you start to worry about what you’ve gotten yourself into, know that you’ll only be changing one thing.
Locate the Working Spaces section, which should be near the top left-hand side. There you’ll find the RGB setting, and you can set it to whichever color space you prefer. Photoshop will then use sRGB or Adobe RGB to save your images in the file format of your choice.
Adobe Lightroom
The process for setting the color space of an image in Lightroom looks quite different than it does in Photoshop. The standard color space for Lightroom is ProPhoto RGB. We mentioned it briefly at the beginning of this article, but what we didn’t tell you is that essentially it’s an even larger color space than Adobe RGB. (See below for more discussion about ProPhoto RGB.)
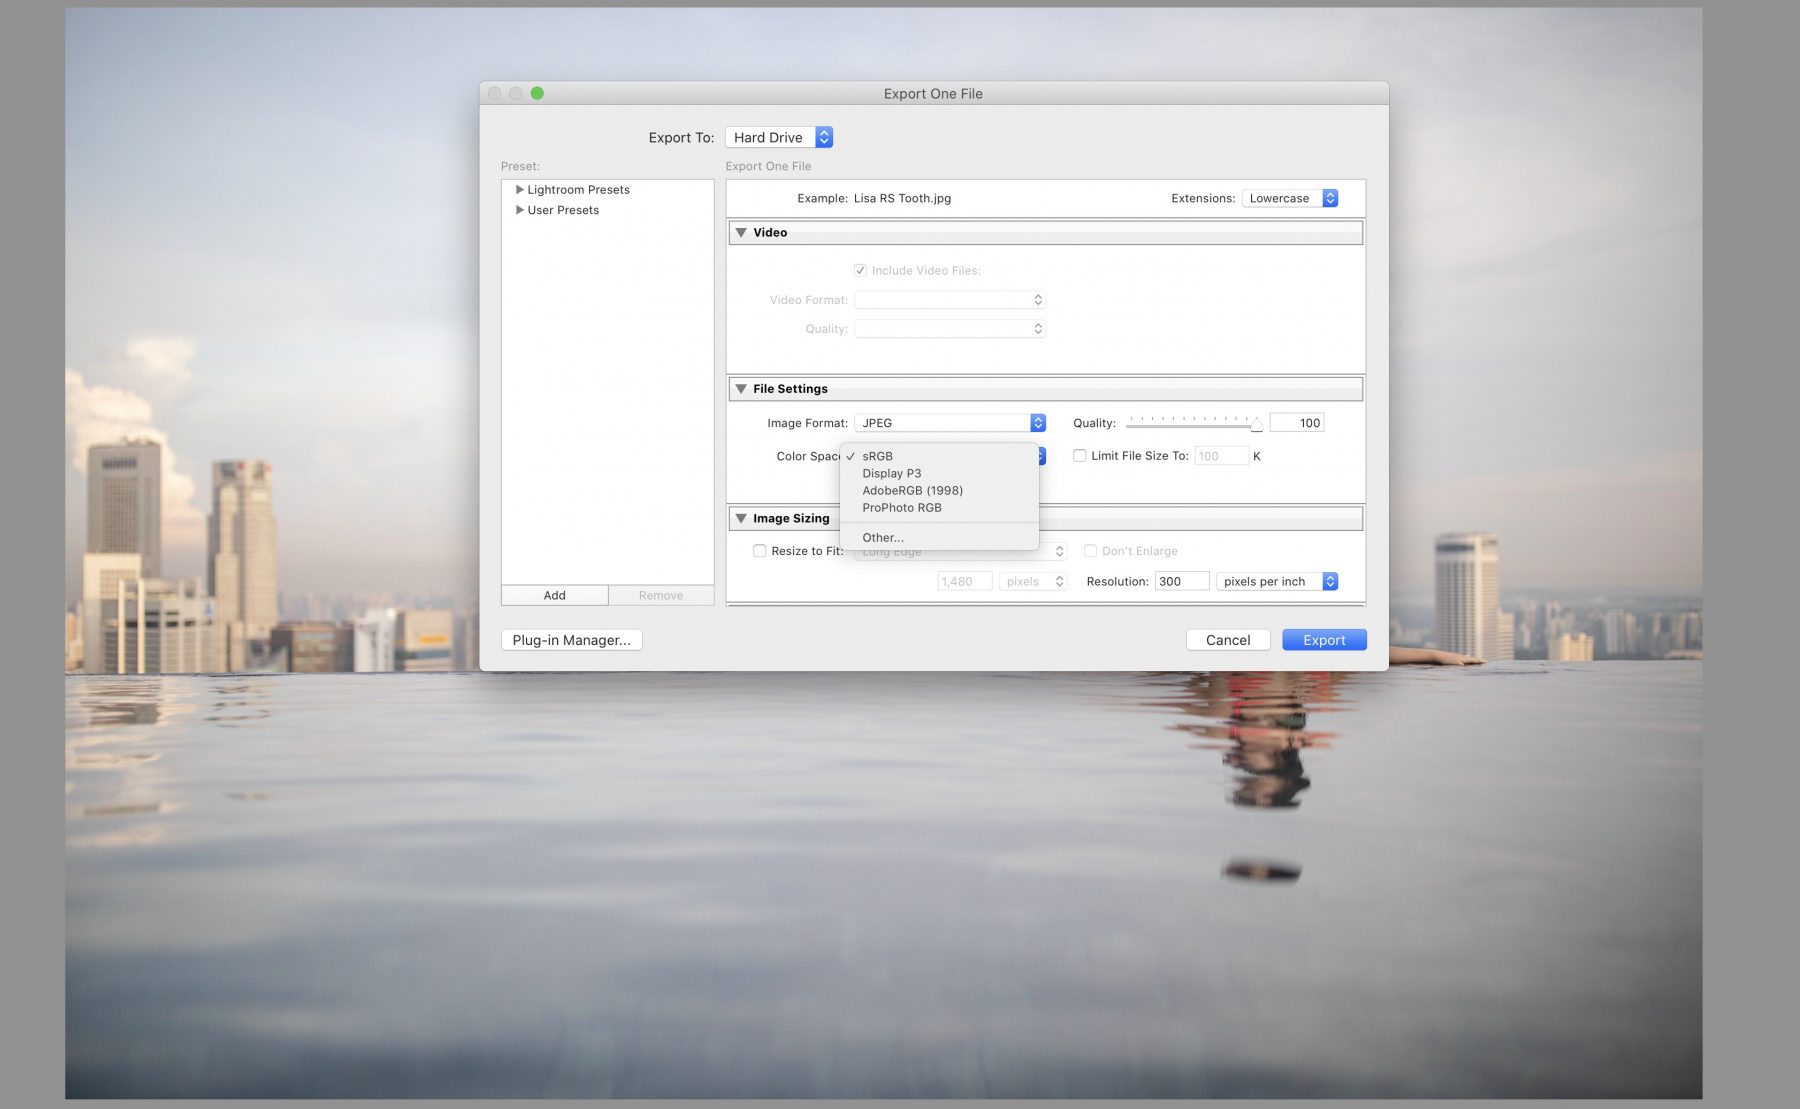
There’s no way to change the standard color space in Lightroom. Instead, what you do is choose the one you want when the time comes to export images from Lightroom.
When you’re ready to create a JPEG file (or whatever file you want), begin the export process. You’ll see a pop-up box that has many settings. Find the “File Settings” part, and you’ll be able to choose the color space. Should there be any other changes you’d like to make, now’s the time. Once everything’s ready, click on Export. At this point, Lightroom creates a file and remembers your color space choice for the next image.
Need to send files from Lightroom to other editing applications? You can assign a color space to the image when you send it. Do so by going to Edit, click on Preferences, and a pop-up box with several tabs will appear. Head to External Editing, and you’ll find Color Space there.
Converting Your Photos from AdobeRGB to sRGB
Aside from choosing color space in post-processing, you can also convert it if you decide to use your photos on the web.
The process is quite simple, but there is one critical thing to note: you can only convert from Adobe RGB to sRGB and not the other way around. If you think you may want or need to have wider color space options, you should always shoot in Adobe RGB or in RAW to preserve that ability.
So how do you convert your AdobeRGB photos to sRGB for digital use?
Adobe Lightroom
If you use Adobe Lightroom, you can complete the conversion process by going to Preferences and clicking on the External Editing tab at the top of the screen. From there, you’ll see a drop-down menu next to Color Space. Click on it, and you’ll see the option to convert your image to sRGB.
If you want to save that image file when you export from Lightroom, follow the steps we outlined above.
Adobe Photoshop
The process in Photoshop is similarly straightforward. All you have to do is go to the Edit section and click on Convert to Profile. Locate the Profile section, and from there, you’ll find a drop-down menu where you can choose to convert the image to sRGB.
Frequently Asked Questions About Color Space
After all this discussion, you might still have some queries about this rather complex topic, which is entirely normal. In this section, we’re going to answer some of the most frequently asked color space questions so you can make the best decision for your photos.
Is Adobe RGB Better than sRGB?
Unfortunately, there’s no cut and dry answer as to whether Adobe RGB is better than sRGB. We touched on this a bit above, but when it comes to the sRGB vs. Adobe debate, both have advantages and disadvantages. The “better” one for you may be the less favorable option for someone else, so the answer to this question is that it depends on your needs.
Which is Better sRGB or ProPhoto RGB?
Now’s the time for a bit of discussion about ProPhoto RGB, the third color space we mentioned previously. ProPhoto RGB is a more modern color space that has a much wider color range than Adobe RGB. It’s one of the widest color ranges available, and it’s fantastic for print.
The problem with ProPhoto RGB is that with great width comes great responsibility. There are many more colors contained in ProPhoto RGB than you can see on any monitor, and it even has theoretical colors that are outside of our eyes’ visible color range. Because of the infinite amount of possibilities, if you’re not one hundred percent sure of what you’re doing, you’re more likely than not to have lots of issues.
So to answer this question, we’re going to have to resort to the oft-used, “it depends.” In this case, it depends not just on your needs, but also your skill level. If you’re a pro with lots of color space experience, go for it. But if you’re someone who just wants to post images on the web, sRGB is more than sufficient.
What Color Space is Best for Printing?
In our opinion, the clear winner here is Adobe RGB, which was created for use in printing. It has a larger gamut than sRGB, and its design mirrors the CMYK color space, which leads to less color loss when printing.
The caveat, however, is that the lab you send your photos to must support this color space. If it doesn’t, and you send them Adobe RGB images, you may be surprised to receive dull prints. Your pictures will convert automatically to sRGB, and this causes problems. We recommend always consulting with the lab about color space before printing your photos.
Still, there are varying opinions on the matter, and you will find plenty of people who defend the use of sRGB in printing, too. While sRGB prints well, it’s true that you may notice a side-by-side difference in sRGB photos if you compare it with an Adobe RGB print. The bottom line? If high-quality prints are a priority for you, go with Adobe.

How Many Colors Are There in Adobe RGB?
Adobe RGB has approximately 16.7 million colors.
Which Color Space Should I Use in Lightroom?
Again, it depends.
What do you want to use the photo for? If you plan to use the image solely on the web, use the sRGB colorspace in Lightroom. If you’re a professional photographer working for demanding clients, using Adobe RGB is a clear choice.
Conclusion
While learning about color space may seem rather tedious and boring, anyone looking to take their photography skills to the next level should have an understanding of this concept. Aside from the color quality differences between Adobe RGB and sRGB, using the incorrect color space can cause you a lot of grief and create a lot more work.
In the end, the color space you use is entirely up to you—we can’t tell you that one is definitely better than the other. There are advantages and disadvantages to both. Our recommendation is to take time to understand each one and make a decision with intention.