
Ever wondered how to light a group photo using flash? It’s easier than you think!
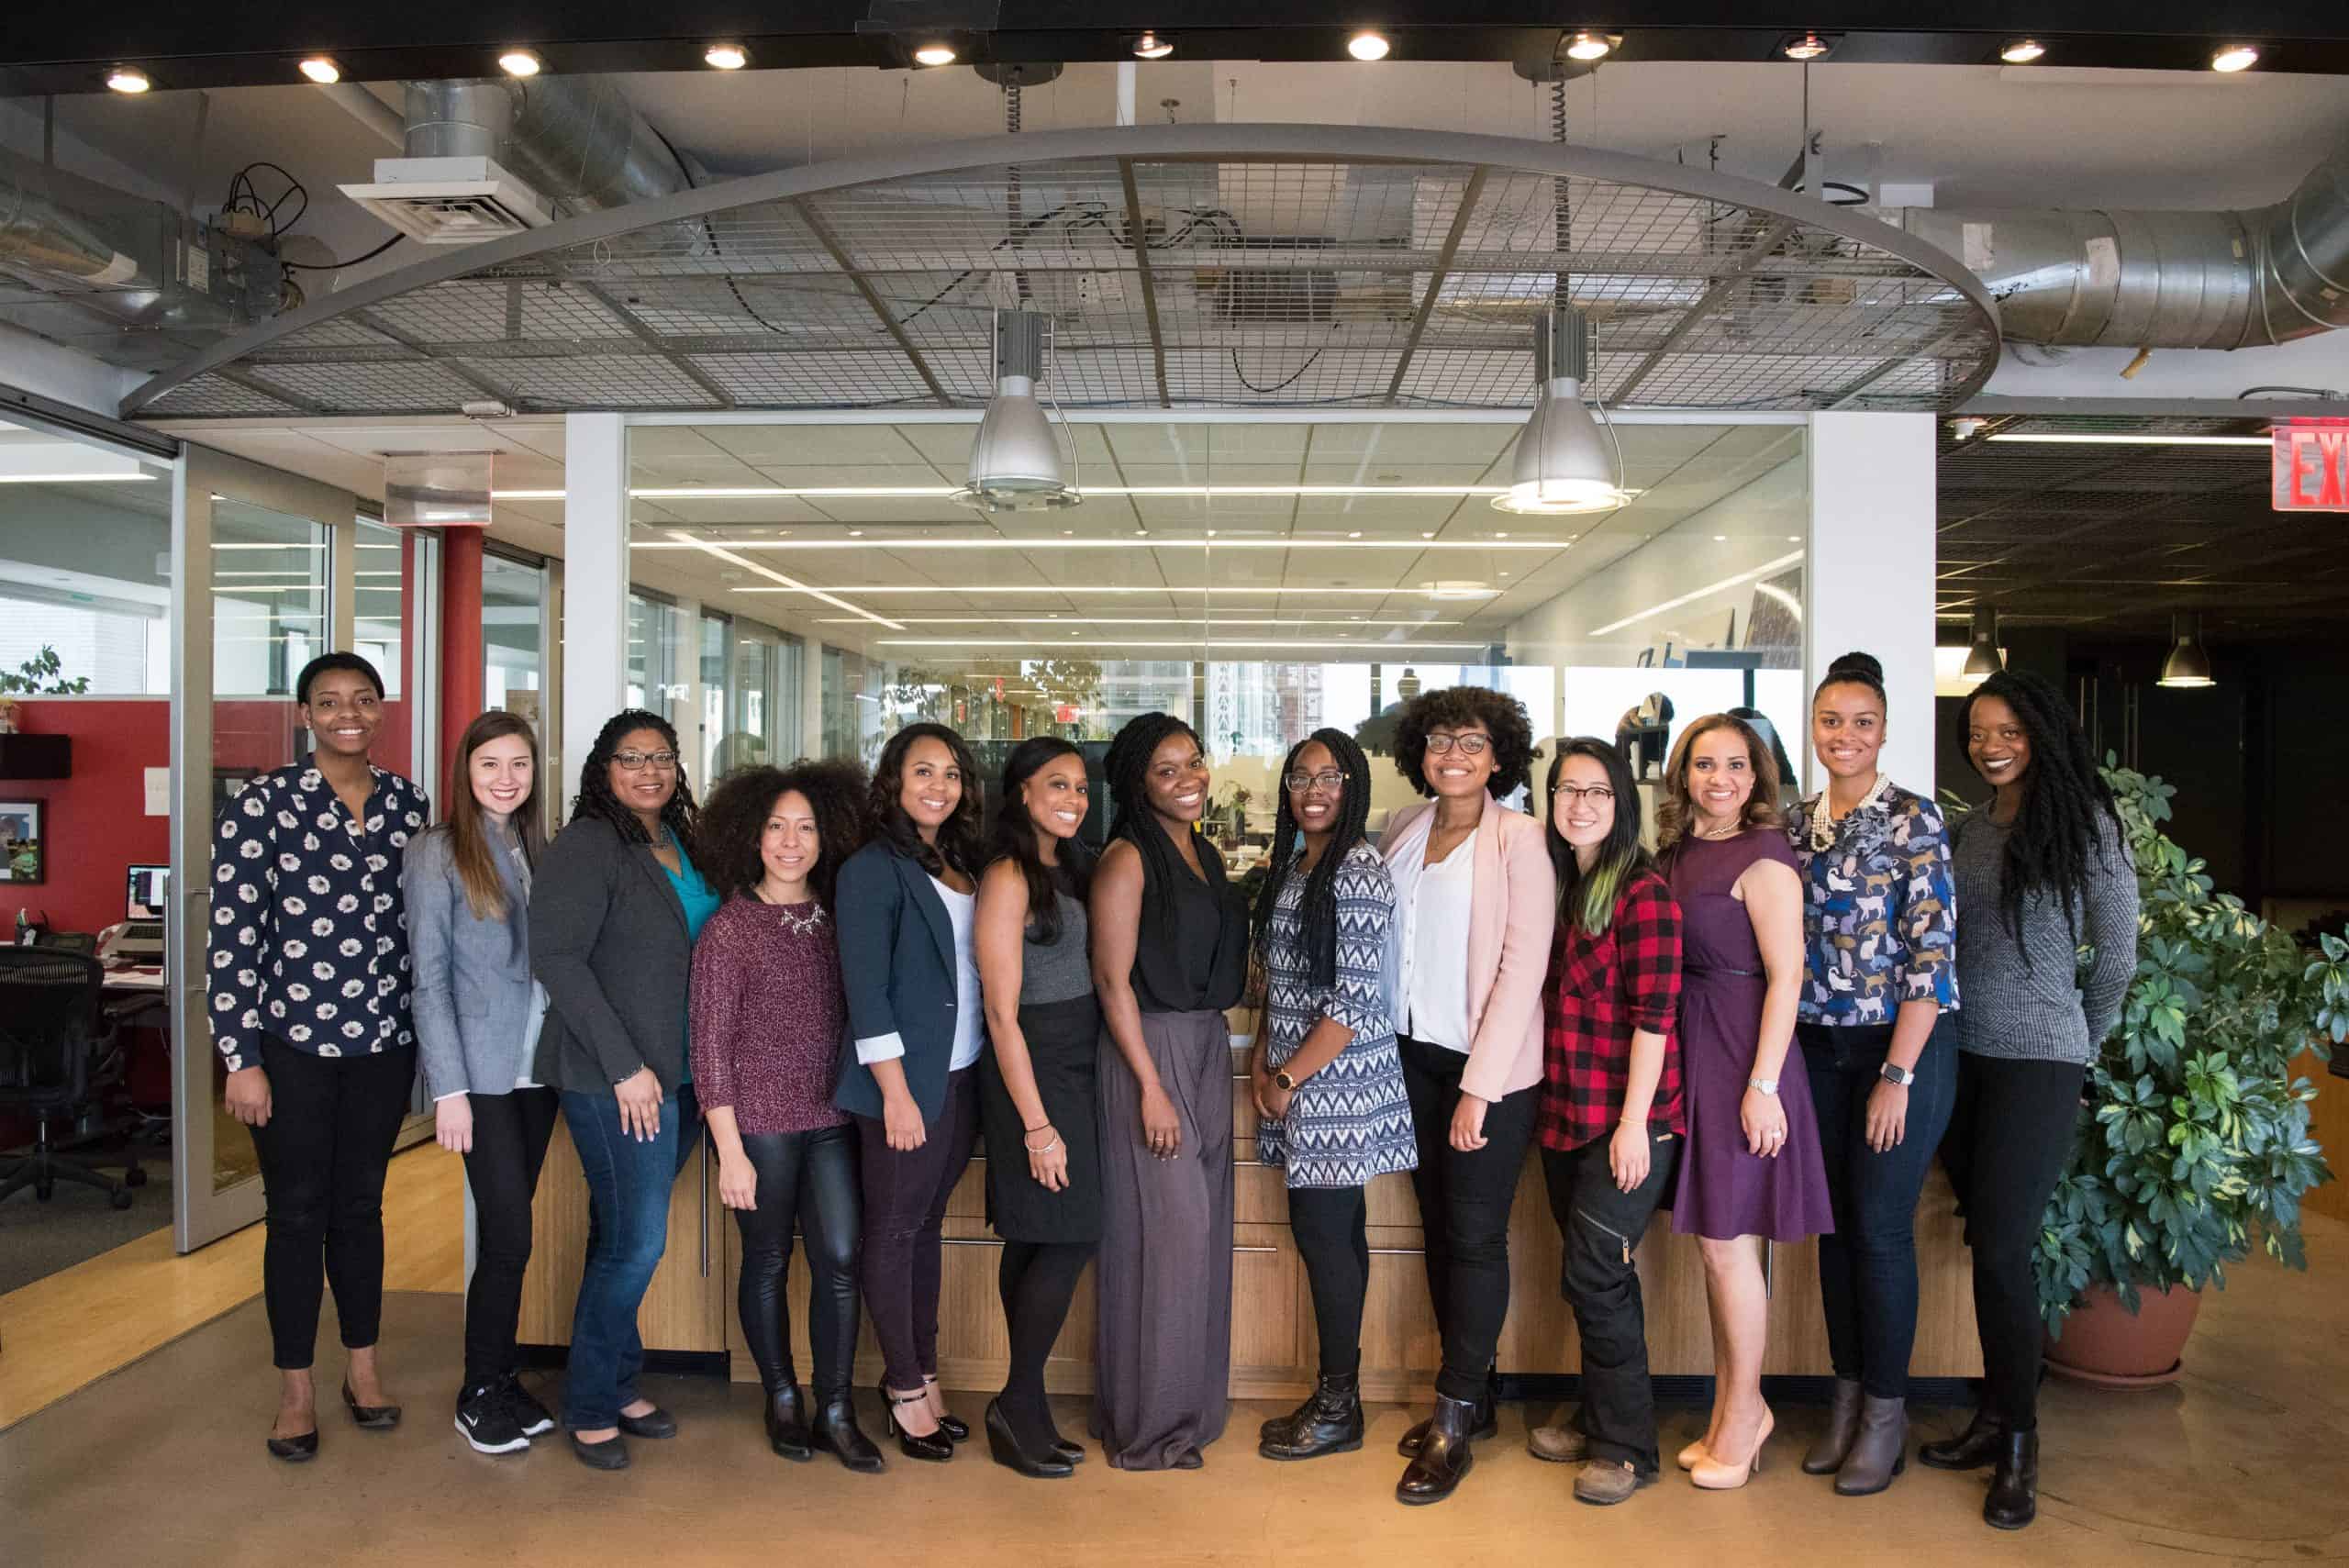
Lighting a large group with flash is a pretty common scenario. You might need to light a wedding party, a group of award recipients, a pee-wee basketball team or just a bunch of friends at a party. And if you’re new to flash photography, lighting a group can seem really complicated and intimidating. Where do you put your lights? How many should you use? What should your settings be? But as you’ll see below, learning how to light a group doesn’t have to be a cause for sweaty palms and racing hearts. I’ll give you my go-to plan for the easiest group lighting setup ever.
Lighting Setup #1 – Single Light, On-Axis with the Camera
When you want to light a group, the easiest and most simple setup is actually pretty great. Use a single light source, up high, on axis with the camera. If you prefer your light to have a little direction, pull it off to the side just a bit, somewhere between zero and 45 degrees. More angling provides more contrast. Less angling provides flatter lighting. It’s all a matter of taste. Just ensure your light is up high, pointing down toward your subjects.
Yes, it really can be that simple. One light source, right above your shooting position, angled down toward your group.
Advantages of one light simple group lighting
When you light a group with a single light source, it gives you a few distinct advantages.
First, it’s simple and quick to get your light setup. It’s perfect for class photos, team photos and last-minute group photos.
Second, it helps eliminate shadows by placing them behind and away from your subjects. That way, the shadow of the person in the front row isn’t covering the face of the person in the second row.
Disadvantages
This light setup can come out a little flat and uninteresting because there are so few shadows and contrast.

Lighting Setup #2 – Two Lights, On Axis with the camera
Sometimes a single light simply isn’t powerful enough to light a big group. If you don’t have a really powerful light, try combining two smaller lights together to make one big light source!
Position your first light as in lighting setup #1 above…on axis with the camera, high overhead and pointing down. But this time, add a second light right next to the first light. The two will work together as a single light source in your image, giving you enough light to power your group.
Again, if you prefer your scene with more contrast, pull your lights to one side, between 0 and 45 degrees from the center of your group. Feather the lights a bit, which means angle them slightly so the edge of the light skims across your subjects. That way, you’re using the edges of the light instead of the full power of the light straight on. This can help eliminate hot spots and give a more subtle transition to your shadows.
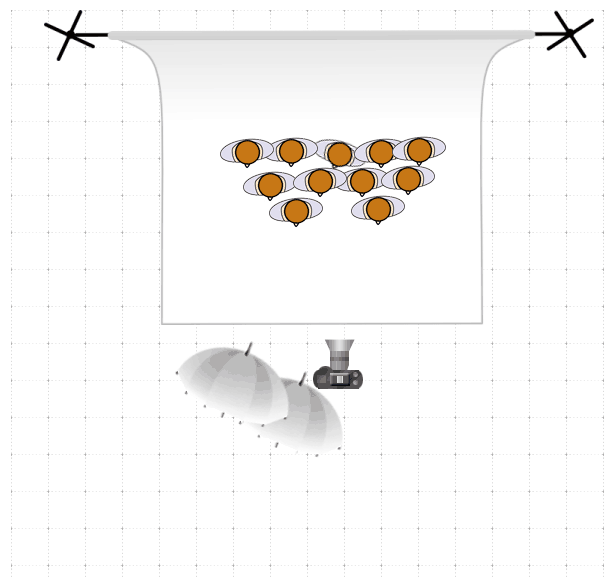
Lighting Setup #3 – Two Lights, main and fill
If you prefer your scene with even more contrast, try a two-light setup using a main light and a fill light. This is my preferred method for small groups of 3-8 people.
Set your first light to one side of your camera, between 0 and 45 degrees from your subject. This is your main light source for the image. Position the second light on-axis with your camera. It’s going to act as a fill light, filling in the shadows where your main light doesn’t reach.
Remember our goal here is more contrast, or a scene with more texture and depth because there are more shadows. So there will need to be a power difference between your main light and your fill light. If both flashes are firing at equal power, your light is going to be flatter and more one-dimensional. I generally set my fill to be underexposed by 1 stop compared to my main light.

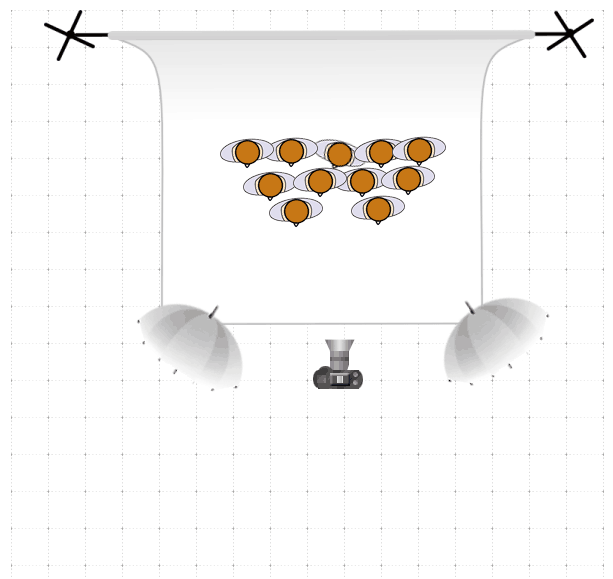
The problem with cross-lighting
If your scene requires two lights to get enough power for a nice, even spread of light, put both lights right next to each other to create one big light source.
Photographers new to flash photography, when using two lights, like to put one light on each side of the image pointing toward the middle. I did it. I see others do it all the time. Why is this our go-to lighting as beginners? I’m not sure. Maybe we feel like if we use lights at the corners, that helps eliminate shadows and makes the group more evenly it.
Actually the opposite is true! Cross lighting an image can create more shadows and promote uneven lighting.
Why? Well, think about it. Each light source creates shadows. So if you are using two light sources from opposite corners, you’re throwing two sets of shadows! Plus, in a group with multiple rows, those shadows are thrown onto the face or body of the person behind them.
By using a single light source, you have one set of shadows. By putting your light on axis with the camera (or close to it!) shadows are thrown directly behind the person instead of behind and to the side of them onto someone else in the group.
Cross lighting can also give you two catchlights or two sets of glare or reflections to deal with.
Lights at the corners aren’t wrong or bad. They just aren’t solving the problem most photographers are trying to solve when attempting to light a group…avoiding shadows on the people in the rows.
What kind of lights and modifiers do I need?
My go-to lights for indoor portraits is a Godox AD200 strobe. I also use it for outdoor group portraits, or my Godox AD600BM strobe when I need something really powerful.
Before you go out and invest in a new light, practice with what you have. Sometimes a single speedlight or two is more than enough to light your group if use your camera settings wisely.
Modifiers are also personal preference. Bare flash isn’t that flattering, so using a modifier can help soften those shadows and provide more pleasing light.
Want a rundown on the basics of the flash itself? Check out our “Meet Your Flash” tutorial!
Here’s a basic breakdown of the types of modifiers you might consider when thinking of how to light a group:
- Umbrellas can throw a lot of light everywhere. If you want to light a big group and don’t really care where your light goes, an umbrella is a great choice. Just don’t try to use them outdoors.
- A softbox will provide great light but is more directional than an umbrella. They can also be girdded if you want maximum control of where the light is falling.
- ULMs, or umbrella light modifiers, is the generic term for a Paul C. Buff product called the PLM. They are basically giant ol’ bounce umbrellas, often with a front cover for extra diffusion. They throw a lot of light everywhere!
- A beauty dish with a front sock (cover) makes a great outdoor modifier. The sock makes the beauty dish function more like a softbox. But because beauty dishes have a smaller profile and weigh more, they perform better in wind than an umbrella or softbox.
- Smaller modifiers, like the Magsphere or the Magbounce will give you a better spread of light. But these modifiers create more contrast in an image compared to a larger softbox or umbrella because of the size of the light is still relatively small.
Which modifier you pick is all about personal preference and accomplishing a specific goal for your image. Practice with a few different ones, if you can, and find the modifier that you like the most.
Want more on modifiers? We have a tutorial for that!
How many lights do I need?
I wish I could give you a straight answer to that. But it depends on your ambient light, how large your group is, what kind of modifier you are using, how powerful your light is and how well your camera can handle ISO. Sometimes, a single speedlight is enough to do the job. Other times, you may need two or three speedlights or a strobe to do the job.
At a minimum, I’d have two speedlights or a single strobe for indoor work. For outdoor work where you need a lot of power to balance the bright ambient light, you’ll want a more powerful strobe, like the Godox AD600 or the Einstein Monolight.
As you do more and more work with groups, you may start feeling more inventive and want additional lights. AWESOME! I love shooting sports with a few rim lights to create separation between my subject and background, for example. And sometimes a wedding party portrait looks really amazing when each individual is lit independently and the entire thing is composited together, as in the video below.
These setups aren’t the ONLY way to light a group by any means. But they are a simple, quick and effective way to get even lighting with minimum setup and post-processing. And when you are just learning flash, simple and easy is the best place to start in my book!
What should my settings be?
I start a session with flash using the same three settings. My settings are 1/160 for shutter speed, f/5.6 for aperture and ISO 100. I do this for a few reasons. First, it eliminates some silly errors like shooting at ISO 4000 when you don’t need to or creating problems with the maximum shutter sync speed. Second, I find if I get a few images into setting exposure and things are crazy, I can always start over at my base settings. Sort of like going back to middle C on a piano. When you get confused and out of sorts, find middle C…1/160, f/5.6 and ISO 100. Then start again from there.
Settings after that will depend on the power of your light, your goals for the image and your personal taste.
Lighting subjects vs. lighting the background
In this tutorial, we are focusing on how to light a group. These setups will ensure your group is lit correctly. But if your light isn’t hitting your background, your background might not be lit correctly. You’ll have to adjust your shutter speed (and dial back your flash power) or light the background separately.
What about lighting groups outside?
Lighting groups outside is the same as lighting groups inside. Just be sure you aren’t underpowered with your lights. Speedlights can work great for fill but won’t be enough to over-power the sun for a group. For that, you’ll likely need a strobe. Also be sure your modifier is safe to use outside and that your light stands is weighted down.
Preparation
Whenever possible (and make it possible!) set up your lighting BEFORE you get your group in place. Have your light stand setup with your modifier and flash and your settings as close to dialed in as you can get it. Nothing makes you feel quite so intimidated as setting up gear and fiddling with odds and ends with a group of 15 twelve-year-old girls starting at you with impatience and frustration.
Learn more about your camera and amplify your photography with our “Photography Fast-Track Course.”
There is no “Right” Way when it comes to lighting
There is no universal right setup or way when it comes to how to light a group. Different, setups and methods and settings can accomplish the same goal. And your preference for shadows, contrast, etc., is likely different than mine. What looks perfect to me is complete rubbish to you. Photography is highly subjective that way.
So experiment with these lighting setups. Try some others. Find what works for you and helps accomplish your goals for that client and image. If you’re new to flash, these lighting setups might be all you need to learn in how to light a group. If you’ve been shooting flash for a while and want something with more subtlety, try experimenting with different angles, modifiers or placement until you create the look you want!