
Anything is possible with Adobe Photoshop software. One of the fantastic capabilities of the program is the ability to make your photos look like paintings. This article will show you how to make an image look similar to a painting in Photoshop. Photoshop contains many built-in filters, effects, and tools that will allow you to convert any portrait look like a quality gallery painting.
Looking to improve your photography? Just enter any questions you have about improving your photography below and hit send and get answers & feedback instantly - for FREE! Submit QuestionsTo achieve the desired painting effect in Photoshop, it all starts with the composition of the photo. You should try your best to position your subject or picture so that the result will look as close to a painting as possible. You want your portraits’ best and favorite features to be highlighted. Focused images of the hands, face, and other details work well for this exercise.
You also need to ensure that your background is not too blurry or busy. It would help if you stuck with a simple and solid background, which will make the subject’s face or other features pop out more. If the background is too busy, it will cloud the painting’s effect. Therefore, the ending result will appear murky or blurred.
What are the things you need?
There are a few things you will need to turn a photo into a painting in photoshop successfully. The first thing is the original version of the image that you would like to transform. We suggest that you utilize a high-resolution image that is at least 300ppi.
The second component you will need is the painting image that you like. You should also decide if you want to turn a photon image nto the process for both versions. If you’re going to get good at this process, you should arrange a collection of pictures and painting with different color schemes and try each one out.
Lastly, you will need Adobe Photoshop software. The best versions to use are CSS and CS6. Here are a few other primary tools in Photoshop that you will need to complete the image transformation:
- Smudge tool
- Brush tool
- Filters and effects
Oil Painting Process
The oil painting process in photoshop is different, but it is also simple and straightforward to understand. The most significant difference between the watercolor and oil painting process is the texture. Because oil paintings have more intense colors than unedited photos, you will need to enhance the color combinations utilizing additional adjustment layers.
Many oil painting photographs are known for having a smoother skin appearance. During the oil painting process, you will want to make sure that you get rid of the original image’s skin texture and make it look like that of an oil painting.
The critical element in this process is Photoshop’s smudge tool. You can blend and combine different sections of the subject’s face to create a smoother, paint-like appearance.
Flatten Texture and Smudge Tool
Once you upload your image into the Photoshop workspace, find the left-hand toolbar, where the smudge tool is located. After you discover the smudge tool, you can begin implementing it to blend the facial skin texture. There is no tried and true process here, but you must consistently apply the smudge with natural contours and curves of the subject’s face.
So, what are the best smudge brush settings for optimal quality? The best combination is usually 20% strength and 0% hardness. If you pursue these blending settings, you will retain the essential characteristics like the smile lines, freckles, and wrinkles.
As you navigate through this process, take your time. The more patient you are in sculpting the face, the more realistic the result will be. You should go back and apply this similar technique to the clothing and hair too. The goal here is to wipe out anything that would look too real to get captured during a painting.
Watercolor Painting Process
Duplicate the Layer
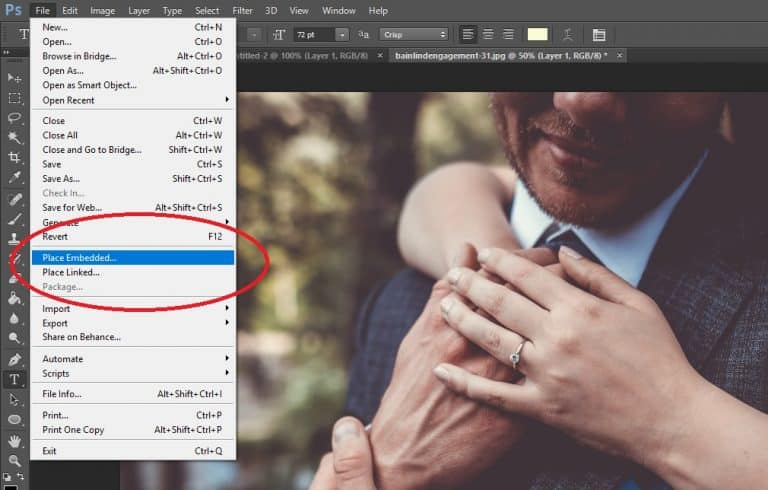
The first step in the watercolor painting process is to duplicate the layer. Start by opening your chosen image, then selecting the layer, and then duplicate layer. You can also complete this task by dragging the individual layer to the Layers panel’s new layer button.
After you have completed the duplication of the layer, you will see two separate image layers within the layers panel. Right-click on the duplicated layer and then select convert to smart object. When you perform this task, it will enable you to apply filters and effects to make the photo look like a watercolor painting.
Filter Application
The next step is to apply the necessary paint filters to enhance the quality of your photo. It would help if you navigated to the filters tab near the top of the window and then clicked the filter gallery. Next, select the artistic tab, and then click the dry brush filter from the dropdown menu. Here are the following settings for your dry brush oil paint filter that will give you optimal results:
- Brush size: 2
- Brush detail: 8
- Texture: 1
After you click OK, then select the filters button, filter gallery, and then cutout. During this step in the process, you will need to try different dialog box values to get the right conditions for your image.
The most effective use of the cutout filter is to distinguish the different areas of your subject’s facial features into dark and light areas. This step is what gives your picture the watercolor paint effect.
Alter the Modes for Filter Blending
If the effects of the cutout filter changes are too overwhelming, you can always adjust the filter’s blending mode by clicking the icon for filter blending modes. This button will be in the layers panel, and it allows you to lighten your photo for a certain percentage opacity. The filter blending change will deliver much more fluid, softer, painting look.
You can also go back to the filters tab, but this time select the blur and smart blur filter buttons. If you want to replicate the brush stroke appearance, you can refine the image edges. To complete this step, you can choose filter, stylize, and find edges.
Your photo might look a little funny at this point. Therefore, you will need to go back and adjust the filter’s blending mode once again. You can edit the find edges filter mode from normal to multiply.
Paper Texture Overlay
As you near the end of the process, you can now apply a watercolor paper texture to the entire photo. You can source many watercolor paper texture photos from online and stock photo websites to complete this step. Once you select the one you like, you can drag it into the Photoshop work area. Here, you will place the watercolor layer of paper to rest on the top of your initial image.
Next, you apply a layer mask to the secondary layer by clicking on layer, layer mask, and apply. You can also complete this by selecting the add vector mask option within the layers panel.
Watercolor Brushing and Painting
Your work is almost done, but now it is time to apply the black paintbrush strokes onto the layer mask utilizing the watercolor brush. As you paint the black paint on the layer mask, it will begin to show the bottom layer’s final image portrait. This step will also require your judgment, so add in as much creativity as possible!