Not everyone may notice poor lighting or overexposure, but most people are going to be able to pick out a photo that’s upside-down. Whether the photo is headed for a client or your social media page, a crooked image shouldn’t make it past the editing stage.
Luckily, if you’re working with Lightroom, rotating or straightening out a photo shouldn’t take you more than a few minutes. Here’s what you need to know about how to rotate an image in Lightroom:
Why Would you Rotate an Image in Lightroom Classic?
It’s obvious that you’ll need to rotate a photo that’s upside-down or mirror image, but even if it’s oriented the right way, there may be other reasons to rotate a photo in Lightroom, flip horizontal, or flip vertical.
For instance, if you aren’t using a tripod, you may accidentally end up tilting the camera right when you take the shot. If you’re on a hill or at the beach, a tilted horizon line will probably be obvious to most people.
Besides a tilted background, you may have intentionally taken the image at the wrong angle, and now need to flip horizontal or rotate right a photo. Some photographers might flip horizontal to avoid objects in the way or create a certain visual effect. When you have the option to edit your photo in post with Lightroom, the exact angle you snap your shot matters less.
Rotate a Photo in Lightroom Classic: Multiple Methods
While rotating your photo shouldn’t take more than a few minutes in Lightroom Classic, there are multiple ways you can go about it. Some methods when you rotate a photo are more drastic than others, so the option you pick often depends on how much you want to turn the image or flip vertical.
How to Rotate a Photo with Keyboard Shortcuts in Lightroom Classic
When you’re working with hundreds of photos, you’ll want to save yourself time where you can, especially if you only need to photo rotate left. Unless you’re rotating to a specific degree or angle, there are a few keyboard shortcuts that can help you achieve a 90-degree rotation even quicker. However, the shortcut will depend on what type of computer you’re using:
- For PC Computers: Use CTRL + [ or CTRL + ]
- For Mac Computers: Use Command + [ or Command + ]
As you might already have guessed, the brackets correspond to the direction that you want to rotate your picture in Lightroom. Your left bracket will let you rotate left, and your right bracket will rotate right. Regardless of how you work with this lightroom classic tool, you’ll always want to make sure you have rights reserved for any photos you deal with, especially a mirror image.
How to Rotate One Image by 90 Degrees in Lightroom Classic
The easiest method for rotating is probably turning a single image by ninety degrees. We’ve broken the process down for how to rotate image in Lightroom step-by-step below:
- When figuring out how to rotate in Lightroom, you’ll need to access the software on your device.
- Once you’ve opened Lightroom, try clicking the Develop tab, which will cause the Develop module to open up.
- Once the develop module opens up, go to the top of the menu, and click on the button that says Photo.
- There should be two different options that pop up from the drop-down menu: Rotate Left and Rotate Right.
- All that’s left is to pick one of those two options to rotate a photo, and your image should turn by 90 degrees in the corresponding direction.
While you have to go through a couple of steps with this method, it shouldn’t be too tricky to navigate once you’ve done it a couple of times.

How to Rotate Multiple Images by 90 Degrees in Lightroom Classic
Although the above technique shouldn’t be too time-consuming for one photo rotate, it can become a hassle if you need to rotate an entire folder or portfolio of images. Luckily, Lightroom gives you another shortcut for dealing with multiple photos. Here’s what that process looks like to photo rotate:
- Once you’re in Lightroom, you’ll want to go to the Thumbnail View, and click on all the photos you want to rotate (keep in mind that every photo you select will rotate the same direction).
- Next, go to Develop, click on Photo, and pick the direction you want to rotate for.
The process doesn’t vary much from rotating a single photo, and you just have to make sure you select everything beforehand.

How to Rotate Photos Less than 90 Degrees in Lightroom Classic
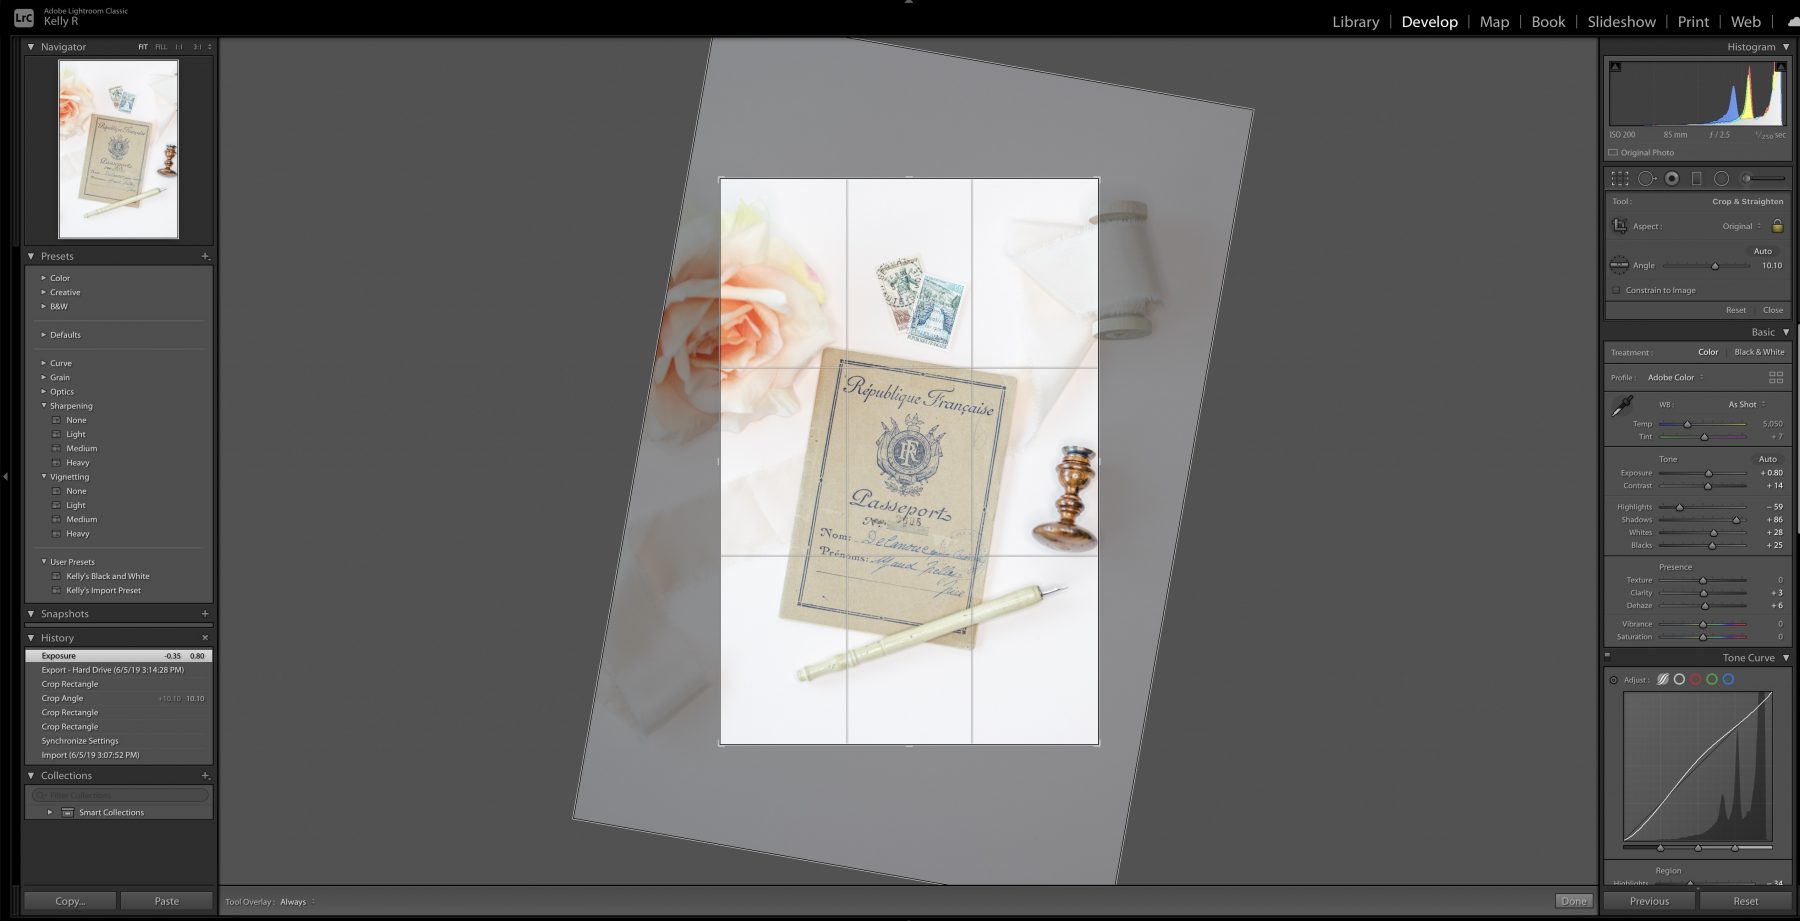
A quick turn might be what you need for one photo, but many photographers appreciate having more control over how they rotate the image. This is why it’s also important to know how to rotate an image in Lightroom less than 90 degrees. To rotate the image this way, you’ll be playing around in the Develop module.
Once you’ve got your photo pulled up, you’ll head to Tools and then Crop to rotate. You’ll notice an Angle slider, which you can slide from left to right when you rotate. The slider’s marker always begins in the middle, regardless of how straight the image may be originally.
To the right of the slider, there should be an indicator that tells you the degree change. If you have a specific degree that you’re trying to hit, this indicator might be useful. Of course, if you want to save yourself the hassle, you can also click on that degree reading, which should allow you to manually input your own numbers.
If you make a mistake with how you rotate the photo, double-clicking on Angle should bring the slider’s marker back to zero so that you can start over.
How to Rotate an Image in Lightroom Classic with the Library Module
If you’re working in the Library module, rotating an image is even easier than it is in the Develop module. Instead of having to open up the Photo tab, all you need to do is look for the Toolbar. If it’s not already open, you can press the T key on your computer, and it should pop up.
From there, you’ll find designated rotation icons on your toolbar. In some cases, the rotation icons might not be there, so you’ll need to add them with the Select Toolbar Content menu.