
As a photographer, specific points of the year are sure to bring in work. Prom is one of them. Snapping pictures of teenagers in formalwear might sound straightforward enough, but it requires careful planning and attention. This guide explains how to take pictures of prom that will preserve the memories of this special occasion.
How to Take Jaw-Dropping Prom Pictures: 9 Steps for Success
The wonderful thing about a prom shoot is that the subjects will be glammed up. Beautiful evening gowns and James Bond-worthy tuxedos look lovely in pictures. But it’s up to the photographer to ensure these looks translate to great prom photos. Here’s how to do it.
1. Decide on Timing
You’re probably wondering how much time you should schedule for a shoot. If you’re only shooting couples and singles, one hour should do. For groups, plan on at least two hours. In general, keep sessions quick to avoid boredom. Time it right. Create your photos during daylight hours, so you don’t have to use the flash.
While you’re in the planning phase, ask the teens if they want anything special. They may have prom picture ideas for what props to use when they pose. Girls may want to pose with a tiara or pose with a corsage in photos, for example.
2. Pick a Place
Determine a concrete time and place for shooting. Favorite photo locations for prom pictures are often urban areas, hiking trails with pretty backdrops, historic buildings, empty warehourse, or modern hotels. Ask your clients for prom pic ideas…they might have some fun locations in mind.
Ask if you can visit the proposed shooting location (likely this will be one of the teen’s homes) in advance. You want to vary the scenery, and this gives you a chance to scout out different spots and get more prom pictures ideas.
For example, maybe there’s a beautiful staircase indoors that would be great for staging group photos, and a nice cluster of flowering bushes that will create a romantic backdrop for couples.
Opt for a clean background when possible. For outdoors, opt for natural settings with flowers, trees, or greenery. For indoors, try for clutter-free environments.
Be prepared to move you prom pictures inside. Spring weather can be unpredictable in many places. Indoor prom pictures can be every bit as stunning as outdoor locations. Hotels, historic buildings, or even classic wood barns make great prom pic places.

3. Set Up the Camera and Lighting
On the day of the actual shoot, arrive early enough to leave time to set up your camera and lighting equipment as needed. As with any project, light is essential. Mind the white balance. Instead of using auto mode, adapt the setting to the predominant light source. For example, if you’re shooting in the shade, select “shade” to maintain natural colors.
Avoid direct sunlight if possible, and know when to use flash. If possible, avoid using flash to keep outfits looking natural. Otherwise, the light can cause a glare when reflecting off sparkly gowns.
4. Position the Subjects
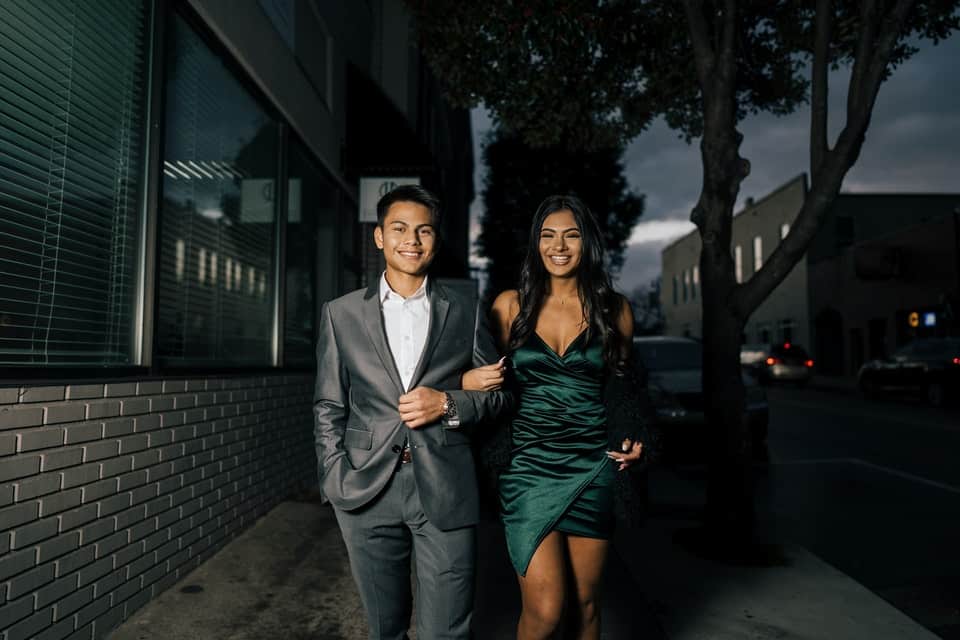
Help your subject pose. For couples, when in doubt, use the “V-Up” pose. It brings the duo together without being too intimate or awkward: Couples stand next to one another so that their bodies make a V facing the camera.
The guy can put his arm around the girl’s waist, or they can hold hands. Tell the couple not to interlock their fingers but to touch hands lightly.
For groups, you have different aspects to consider, such as how to color coordinate the clothing and how to work with different heights. Use stairs, benches, or chairs to accommodate various heights.
This makes for a more dynamic prom photo and lets you pack in more people without looking staged and awkward. Keep the poses natural.
Prom poses for guys look a lot like groomsman poses at a wedding. Give the guy direction on what to do with his hands, such as put them in a pocket, hold their jacket, adjust a watch, etc. When posing groups of guys, know that they are reluctant to touch one another. Stage them with some separation between the next guy instead of a huggy shot you might use for a girl.
Prom poses for girls are a lot easier. Choose poses that accentuate their natural shape. Photograph them to show off the front and back of their dress. Again, draw inspiration from weddings. Poses that look good for brides look fantastic for girls at prom, just keep them age appropriate!
5. Start Snapping
When you start snapping, fall back and zoom. Step back and zoom in to shorten the subjects’ facial features and create more aesthetic images. Vary your angle as you work, focusing on different elements and people in the composition as you go along.
Ask teens and parents to put down their camera phones while you’re photographing. They’re understanably excited by the photo ops, but the subjects need to focus on one camera at a time. Otherwise, you risk having people looking in different directions.
6. Repeat, Repeat, Repeat
You’ll need more than one try to get a great shot. Snap multiple photos for multiple people. This increases the likelihood that you will end up with more pictures that subjects like.
If something isn’t working, don’t be shy about switching up positions or scenery. Keep in mind, you are the professional, and the client wants beautiful photos. The teens are relying on your expertise to craft memory-worthy pictures they will love.

7. Switch Up Between Singles, Couples & Groups
Photograph each person individually in addition to taking couple and group shots. Rotating people around gives subjects a break to loosen up, relax, and enjoy sessions.
To keep things organized, use your scenery as the point of orientation. So if you’re in front of a beautiful tree, capture a series of individual, couple, and group shots. Then move on to the next location.
8. Do Some Quick Edits
Don’t just shoot a bunch of pics blindly. Pause and do some quick edits. Rotate images and consider basics like exposure levels, cropping, contrast, and color saturation. This will help ensure the best shot.
This is also an opportunity to find unique focal points — zone in on the details, like a beautiful corsage. Take a moment to double-check your work and you will make editing easier down the line.
9. Have Fun With It
When shooting, you want teens to be having fun. Keep it simple but mix it up to avoid boredom. Throw in some creative and fun poses. Jump shots are a familiar favorite, for example.
Also, make sure to capture the candids when your subjects aren’t looking at you. These private moments often make for some of the most visually stunning and captivating images!
Prom Photo FAQ
Your clients will have some questions about the prom pictures shooting process. Here are answers to some of the most commonly asked queries.
How Long Do Prom Pictures Take?
You want to capture various combinations of people and poses. Plan at least one hour if you’re shooting only a single or couple pose. If you need to pose a group as well, plan at least two hours for these poses.
You want to give parents a chance to document the event as well, so leave a few minutes for them to take a prom photo with their camera phones.

Where Can You Take Pictures for Prom?
Most teens opt to have the prom photo done at one of their homes since they tend to get ready together. If possible, visit the house before the shoot. This gives you a chance to pinpoint promising locations, such as a pretty flower garden or dramatic staircase.
Teens may also have requests, such as wanting to take photos in front of the limousine they have rented.
How Much Do Prom Photos Cost?
It’s up to you how much you want to charge for prom photos. Pros often charge $100 to $250 per hour.
Keep in mind that there is not only the actual shoot requiring your time but also editing afterward. You also need to charge for prom picture prints.
The Final Word
This guide to how to take jaw-dropping prom pictures helps streamline the process. Advanced planning ensures you have plenty of time to do the job and enjoy the day.
If you do it right, you and the subjects alike will have fun. This helps you get those natural smiles that make for thecool prom photos.