
Did you know about Image Stabilization when you got your first IS capable lens? I sure didn’t!
Confession time…I had a lens with image stabilization for years before I really understood how it worked or when I needed it. I just kind of turned it on and left it on. Why pay more for a lens if you didn’t use it, right?
Looking to improve your photography? Just enter any questions you have about improving your photography below and hit send and get answers & feedback instantly - for FREE! Submit QuestionsIt wasn’t until I was struggling with some weird blur on some moon photos shot on a tripod that I began to truly understand what image stabilization is and how to use it correctly.
So let’s learn from my mistakes. Here are six things I didn’t know about image stabilization when I first started that might just help you be a better photographer and make better decisions about how to shoot and what gear to purchase!
What is image stabilization?
Image stabilization is the technology built into your lens that helps minimize blur caused by camera shake.
Different lens manufacturers call this technology different things. Image stabilization (IS) is Canon’s version. Nikon calls theirs vibration reduction (VR). Tamron calls it vibration control (VC) while Sigma calls their version optical stabilization (OS). Sony and Pentax have a form of image stabilization, but their technology is built into the camera body, not the lens.
The technology has different names, but the principles of how it works, and how it affects your images, is the same. For the purposes of this tutorial, I’m going to call it image stabilization or IS. You can substitute your lens’ version in and the information will hold true.

How does image stabilization work?
Image stabilization in lenses works through the use of a floating lens element. Your camera senses how that floating element is moving inside of your lens. The element is then shifted by the lens’ electronics in the opposite direction of the camera shake.
In-camera stabilization works by actually shifting the sensor slightly to accommodate for camera shake.
There’s not cut and dried answer to which is better, lens-based stabilization or in-camera image stabilization. Each has its pros and cons. But we’ll leave that for another tutorial.
The advantage of image stabilization is that it allows you to capture sharper images of stationary objects at shutter speeds slower than you could without it. Lens manufacturers rate their image stabilization by how many stops slower you can shoot using the image stabilization.
For example, on my Nikon 24-120mm f/4 lens, Nikon rates the vibration reduction capabilities at 4 stops. Without image stabilization, I’d have to shoot static subjects at a shutter speed of at least 1/125 to avoid introducing blur in my images from camera shake (more on this in a minute). With VR turned on on the lens, I can (at least in theory) handhold the lens and shoot at 1/15 of a second!
That’s powerful stuff if you’re shooting stationary subjects in low light or shooting big lenses in low light! Below are two photos, the first one was shot with IS (well, VR because it’s a Nikon lens) and the second was without it. You can clearly see the image stabilization has helped the quality of my image!

Rules of Shutter Speed
Before we get into what you might not know about image stabilization, let’s review some critical concepts when it comes to shutter speed.
First, when shooting handheld, to avoid camera shake, you need to use a shutter speed at least as fast as 1/the length of your lens. So if you’re shooting a 50 mm lens, you’ll want your shutter speed to be 1/50. If you’re shooting a 200mm lens, you’ll need a shutter speed of 1/200, a 40mm lens needs a minimum shutter speed of 1/400, etc. This is what’s known as the reciprocal rule.
Don’t forget to take into account if you’re shooting on a crop body. My Nikon D500 has a crop factor of 1.5. So I need if I want to shoot my 70-200 f/2.8 lens at 200 mm, I need to have a shutter speed of at least 1/300 to eliminate camera shake.
Second, camera shake and motion blur are two different issues. Camera shake is caused by movement of the camera/photographer. Motion blur happens when the subject is moving too fast for the shutter speed. Both will create blur or softness in your images but they are two different issues.
Need more tips on shutter speed? Check out our tutorial!
So here’s what you might NOT know about image stabilization…
#1. IS doesn’t work perfectly every time.
IS isn’t infallible. It won’t nail every single image because every single time. Why? Because the technology is essentially guessing at how to correctly compensate for movement. Many of your images may be sharper, but others will still be slightly blurry.
Why is this important?
Don’t leave your tripod at home thinking image stabilization will work perfectly and nail the shot every single time. If your money or reputation is riding on nailing a shot in low light, you’re better off bringing a tripod or otherwise stabilizing your camera than relying exclusively on IS.
#2. Image stabilization doesn’t freeze motion.
The purpose of IS is to let you shoot static subjects at slower shutter speeds than you could otherwise. It does NOTHING to help freeze the motion of fast-moving subjects. You need to use a fast enough shutter speed to capture the motion of your subject.
Why is this important?
If you are shooting a running dog, you’ll need to use a shutter speed of 1/1000 to stop his motion. Even if you have IS turned on for your lens or camera, you’ll still need to shoot at 1/1000 to stop the dog’s motion.
I see many new photographers shoot family or child portraits at 1/50 or 1/25 of a second and have motion blur from moving subjects because they believed IS lets them shoot 3 or 4 stops below what they normally would. That’s simply not how IS works. The only thing that stops motion blur is a fast enough shutter speed. Image stabilization is completely independent of that.
To demonstrate, here are two images of a moving subject. This little dude likes to hang out on our window sill and dance. He’s not super fast, but he is moving! The first image was taken at 1/30 of a second, which is the same shutter speed as the flower picture above where IS helped. In this close up, you’ll notice motion blur in his body and bird because they are moving. Image stabilization can’t fix motion blur.

In the second image, I turned the image stabilization off but raised my shutter to a speed fast enough to freeze slow motion, 1/200. The noise is increased because I had to raise my ISO but there’s no motion blur.

We’ve got a great introduction on capturing motion for you right here!
#3. Image stabilization doesn’t help your images at faster shutter speeds
I won’t get into the science here, but believe me when I say it’s pretty well-accepted that image stabilization doesn’t help at shutter speeds faster than 1/500. In general, IS works on slower, wider motions, which don’t happen at speeds like 1/1000 of a second.
The purpose of IS is to eliminate camera shake. If you’re shooting a 70-200mm f/2.8 lens at the 200 mm focal length but are shooting basketball pictures at 1/1000 of a second, your shutter speed alone is fast enough to eliminate most blur from camera shake (see Rules of Shutter Speed).
In fact, if you walk the sidelines of most sporting events and look at the lenses of the professional sports shooters, most of them will have IS turned off on their cameras. They know IS isn’t helping at fast shutter speeds (in fact, it may actually hinder your images because the IS is trying to compensate for you tracking subjects).
You can argue that image stabilization helps stabilize the image in your viewfinder. If you have IS or VR enabled on your lens and press your shutter halfway (or use BBF) the stabilization system can help hold the image steadier in your viewfinder, which can help to achieve better focus. But it only engages when you have the shutter pressed halfway down or use BBF.
SPECIAL OFFER – Get Our Photography Fundamentals Guidebook Here for Huge Savings Today – Finally, a VISUAL guide that makes mastering photography as SIMPLE as “A-B-C” so you can confidently shoot in full manual mode, and know which settings to adjust…guaranteed! Click here to learn more.

Why is this important?
First, if you’re buying a lens or camera primarily for action photography, know that IS isn’t going to help you shooting at high shutter speeds to stop action. You might be paying more for a feature you don’t even really need. There’s a .4 pound weight difference and a $450 price difference between the VR and non VR version of the Nikon 24-70 mm lens, for example! Also, IS will drain your battery and might negatively impact your images.
#4. You should consult your lens or camera manual to see what to do about IS when the camera is on a tripod
The old rule of thumb was to always turn off IS when using a tripod. Essentially the IS would try to sense movement and actually create movement even when there wasn’t any. This created a feedback loop that actually introduced camera shake blur into your images (as I talked about with my moon shots).
That’s not necessarily true of current IS and VR technology. Some lens and cameras can now sense when your camera is on a tripod or stabilized and turns the IS off itself. But you should check with your specific lens make and model to see what to do with IS when using a tripod or monopod. Ditto for when you are panning. Sometimes the lens IS mistakes panning as camera shake and tries to correct it and actually ruins your image.
There are also times where your camera is mounted to a tripod but still shaking, such as on a windy day or if the ground is vibrating. In those situations, you might be directed to use IS or a different kind of IS. Check your lens or camera manual.
Why is this important?
You need to know when to use IS and when to shut it off to get the very best images possible.
[ad id=’2′]
#5. Your IS or VR might have different “modes.” The different modes all work differently.
Some cameras and lenses have different types of modes for the image stabilization technology. You need to know what they mean so that you employ the right mode for the right situation.
Normal mode is what’s recommended for most scenes. The lens detects slow and wide camera movement and adjusts accordingly. Most normal modes also include panning detection (but check your manual.)
Active mode is designed for shooting from a moving vehicle or other unstable position. This mode adjusts more than normal mode and helps hold your viewfinder steady for a better shot.
Tripod mode is designed to be used when the camera is on a tripod. Very few lenses have this feature (only the big kahuna super telephotos like the 400 mm, 500mm and 600mm in Nikon.) This mode is specifically designed to be used WITH a tripod, so try it and see what you think!
Sport mode limits vibration reduction to the minimum needed for moving subjects. It’s the mode you want to use if you are shooting on a monopod in most instances. It can also help stabilize the image in your viewfinder even if you don’t need IS to eliminate shake.
Why is this important?
The modes are designed to fix different problems. You’ll want to use the correct mode (or none at all!) to maximize the quality of your images.
#6. IS works great on video!
Image stabilization will definitely help reduce camera shake when you are handholding and shooting video. It can’t replace a tripod or gimbal system, but it will improve the steadiness of your video. I honestly never thought to turn it on for video until a friend gave me this awesome tip!
What is image stabilization good for?
We’ve talked about situations where you don’t need image stabilization or vibration control. But in what scenarios would it actually be beneficial to have a lens with image stabilization?
- You are shooting stationary objects in low light. In this situation, IS can help improve your images because you can lower your shutter speed by two, three or even four stops. This can mean the difference between having enough light to shoot or missing the shot. It can also allow you to adjust your other settings to improve your images, such as closing down your aperture for a greater depth of field or reducing your ISO to reduce noise in your images.
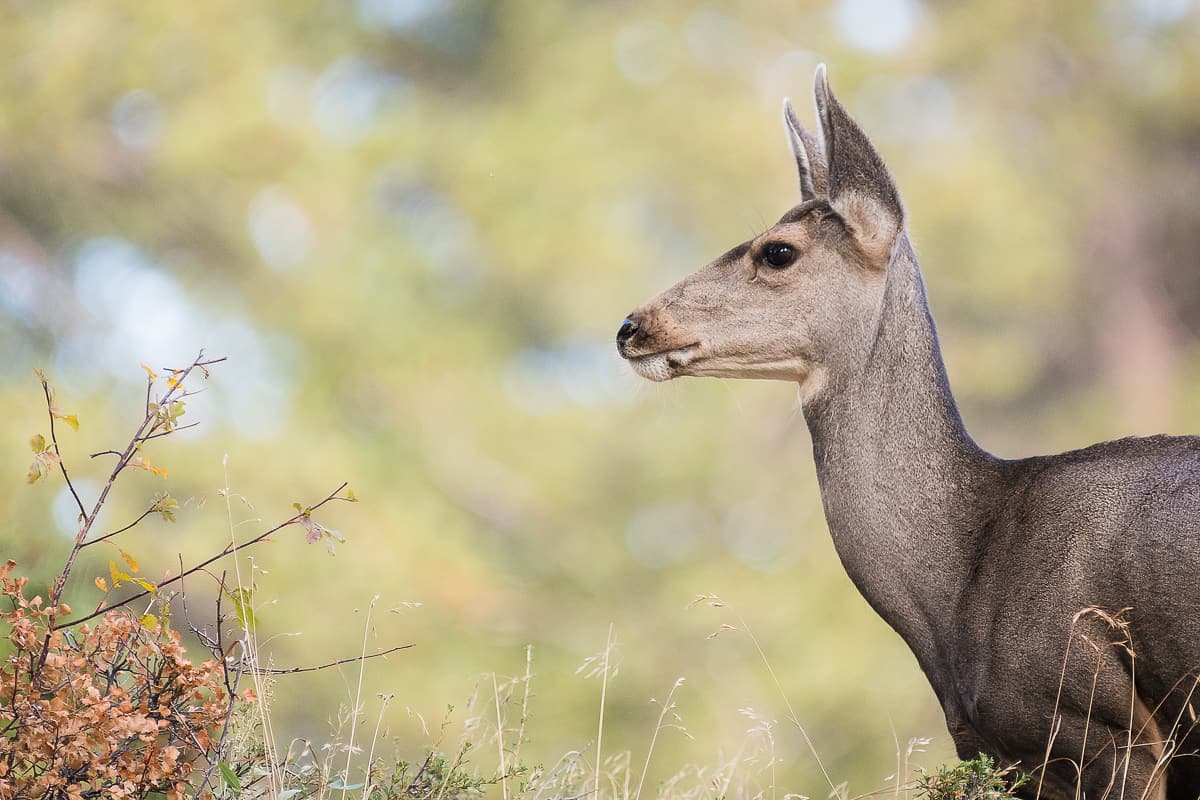
- You are shooting a telephoto or super-telephoto lens but don’t need a fast shutter speed to stop action. Instead of setting shutter speed based on the reciprocal rule, you could lower your shutter speed a few stops (based on your IS abilities) without needing a tripod. The above image of a deer should have needed a shutter speed of 1/800 of a second using the reciprocal rule. But using IS, I was able to shoot it at 1/320 of a second with no motion blur.
- You are shooting in the wind or from a moving or vibrating platform, such as a running vehicle, a rumbling bridge or shaking ground.
- You are shooting a moving subject and need help stabilizing the image in your viewfinder. Depending on your camera’s IS, your image might suffer in quality a little bit. But that might be preferable to missing the shot completely.
- You are shooting video without a tripod or gimbal. You’ll definitely notice an improvement in video quality (though it’s not a good substitute for a tripod or gimbal!)
Wrapping up
There’s no question that image stabilization (or vibration reduction, optical stabilization, etc.) is a useful tool in many situations. But to get the most from your camera and lens you need to understand how and when it works. You’ll also want to fully understand when IS works so you aren’t paying money for a feature on a lens or camera you don’t need.
I personally own three lenses with vibration reduction, but only shoot with it on one of them with any frequency. I’m generally shooting people or action and can’t drop down below 1/200 anyway, so VR doesn’t help me.
But it might be exactly what YOU need. Then again, maybe it was a must-have and now you realize it’s only a nice-to-have. I’m a firm believer that the more you know about your equipment, even the nuances, the better photographer and business owner you’ll be. Now you know six new things about image stabilization and will be better prepared to turn it on (or off!) then next time you’re in the field.