
Need some helping on how to prevent blurry photos? We’ve got the photography tips for you!
Did you just buying an expensive new camera, start taking photos in the house of your dog or your kid, expecting to see a work of art but instead see a bunch of blur…ahhhhhhh!!! Or maybe you’ve been shooting in manual for a while now but your images just aren’t as crisp and clean as you’d like? Don’t fret, you are not alone! One of the most common basic pitfalls when learning photography is taking blurry photos. We have a few photography tips for you on how to prevent blurry photos, as well as a suggestion or two on sharpening up some soft images.
Looking to improve your photography? Just enter any questions you have about improving your photography below and hit send and get answers & feedback instantly - for FREE! Submit QuestionsI’ll explain a bit about how aperture and a camera’s shutter speed work and how you can take control of your camera’s settings and make sure you are getting sharp, not blurry photos.
What causes blurry photos?
Before we get to those photography tips on how to prevent blurry photos, let’s talk about what causes blur to begin win.
Blur in photos is caused by five main factors:
- Shutter speed is too low
- Camera shake or movement
- Aperture is too wide, creating a narrow depth of field
- Missed focus
- Dirty or low quality equipment
How do you fix blurry photos? Photography tips to overcome blur
Below are our best photography tips on how to prevent blurry photos on a case by case basis.
Problem #1 – Shutter speed is too slow for the action
Your shutter speed is what “stops” the action in a photograph. On your camera, shutter speed is expressed as a fraction of a second, or in full seconds. So 1/1000 is 1/1000th of a second, while 5 means 5 seconds. So the higher that bottom number, the faster your shutter speed. You need to have a fast enough shutter speed that the shutter opens and closes so fast as to “stop” the action.
If we let our shutter speed get too slow, our subjects move before our shutter is done closing. That causes the blur you see in an image.
In general, the faster the shutter speed the faster the motion you can stop in its tracks. Here are a few general guidelines concerning how fast your shutter needs to be:
- 1/2000 to 1/4000 – Very fast subjects like race cars or small birds in flight
- 1/1000 – Sports, cars, motorcycles, big animals running
- 1/500 – Slow sports, bikes, slow moving cars
- 1/200 or 1/250 – Slow moving people, animals or objects
- 1/60-1/125 – Stationary objects shooting handheld (more on this below).
If you’re shooting your son playing soccer, for example, and your shutter speed is 1/125 of a second, your photos are going to come out blurry. Or maybe you were shooting a portrait at 1/50 of a second and your subject moved ever so slightly. That movement was caught on the image, making it blurry.
Blurry photos often occur on auto settings because the camera doesn’t understand what you’re shooting. It simply takes in the available light and makes the best guess it can to decide what aperture and shutter to use. So if the camera picks a narrow aperture, like f/8, it will slow the shutter speed down too much and cause blur. Smart phone camera photos often have blur in them for this reason.
The best photography tips we can give you to prevent blurry photos is to understand how shutter speed affects “stopping motion” and know how fast that shutter needs to be to capture the action!
Want to know more about the action stopping power of shutter speed for sports? We can help!
Problem #2 – Camera shake
Maybe you haven’t been shooting moving subjects at all. Maybe you’re just trying to take a rockin’ photo of your dessert but it’s still blurry. The dessert hasn’t moved. Why are my pictures blurry?
This is another case of shutter speed being too slow. But it’s not your subject that’s moving and causing blur, it’s you! We cannot hold our bodies still enough to eliminate camera shake at certain shutter speeds. The small tremors in our hands, arms, or even the ground we stand on cause just enough movement that it’s recorded in the scene and comes out as blur. It can also be caused by wind and poor shooting technique. We call that blur camera shake.
If you aren’t using a tripod, shooting hand-held. Camera shake can occur if your shutter speed isn’t fast enough. One good rule of thumb to remember is you need to set your shutter to be at least as fast as 1/focal length of your lens. So if you’re shooting a 50 mm lens, your shutter speed would need to be at least 1/100 to avoid recording camera shake in your image. A 200 mm lens would require a minimum shutter speed of 1/400. Remember that won’t necessarily eliminate motion blur from your subject. For that you need to shoot at speeds like those recommended above!
If you want to use slow shutter speeds for a specific reason, like creating light trails or smoothing water, you’ll need to use a tripod. The tripod stabilizes your camera to eliminate camera shake.
What about vibration reduction or image stabilization?
Some lenses come with built-in technology that can actually help eliminate camera shake! Each camera manufacturer calls it something different. Nikon calls it Vibration reduction. Canon calls it image stabilization. Tamron’s is Vibration Compensation and Sigma’s is Optical Stabilizer. Each does the same thing. Sensors detect motion and send it to the camera which uses its onboard software to make the corrections. Witchcraft? Perhaps. But this technology can let you shoot two, three or four stops faster than you can without it! That means you can use slower shutter speeds than you could otherwise.
Be sure to turn vibration reduction off when using a tripod! It can actually trick itself into creating camera shake.
Problem #3 – Depth-of-field is too narrow for your intended focus
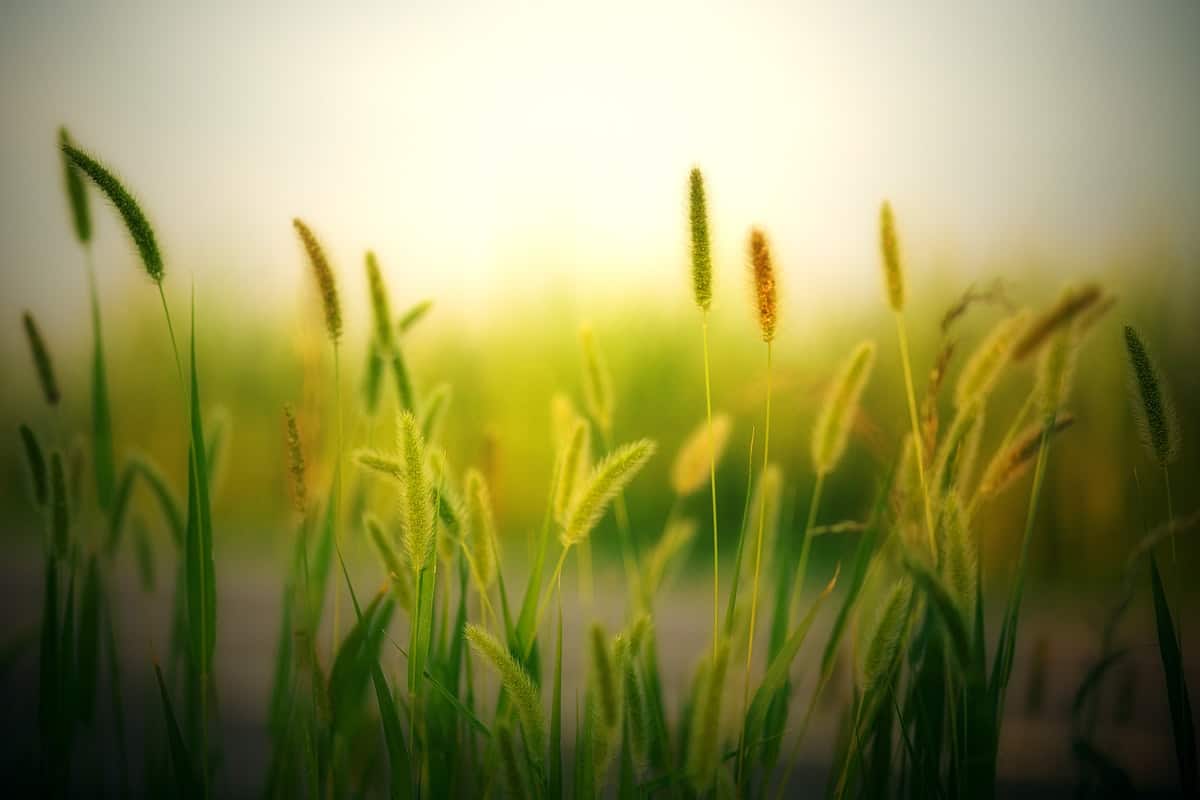
Let’s step back from shutter speed for a minute and talk about blurry images and photography tips for aperture. Aperture is the opening in your camera that controls how much light passes through to your sensor. It also dictates depth-of-field, or the range of your image from front to back that is in focus.
Shooting at very wide apertures (f/1.4, f/1.8, f/2.8) can give you a very small depth-of-field, sometimes as small as just a few inches. So if part of your image is in focus but other parts around it aren’t, you might have shot with too wide of an aperture. For example, in this image I used an aperture of 2.8. My front subject is nice and sharp, but the subject toward the rear is blurry. My depth-of-field was simply too small to make sure both dogs were in focus.
We see this a lot in group photos with lots of rows. The aperture is too wide, causing the depth of field to be too narrow to get everyone in focus!
For more in-depth explanation of depth-of-field, read this tutorial!
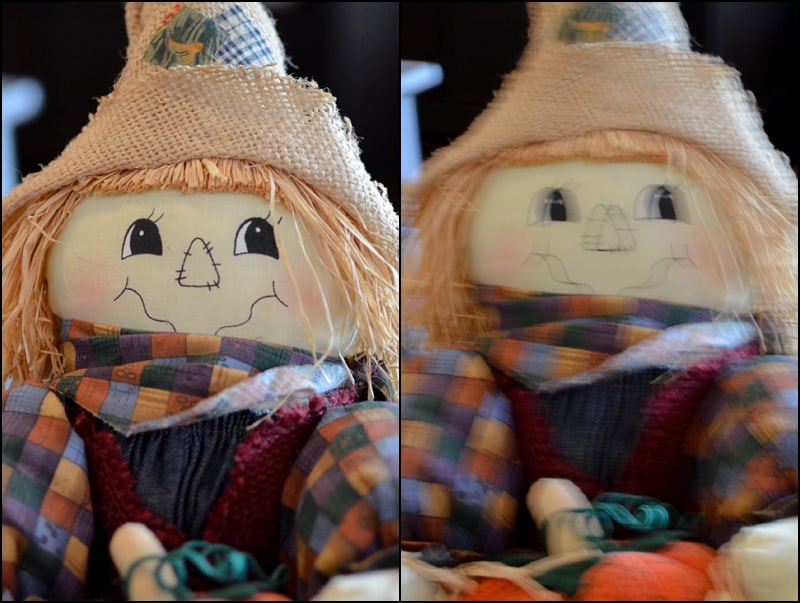
Problem #4 – Missed focus
Sometimes we use all the right settings and still get blurry photos. SO FRUSTRATING! In these instances, you might have just simply missed focus. Your subject might have moved too fast for the autofocus to keep up, you might have rushed clicking the shutter, or your focus point might have been just enough off so focus fell on something else. Our best photography tips to prevent blurry photos from missed focus is to slow down and use the correct focusing mode for your situation.
One technique that can be incredibly helpful is back-button focusing. Check out our tutorial on BBF and why it might help!
Problem #5 – Dirty or damaged equipment
Occasionally dirty or low-quality equipment will cause your photos to look blurry. Smudges on your filters or lenses can give your photos a blurry look. Fungus on your lens, caused by trapped moisture can also cause a blurry quality for your images.
Some lenses are sharper than others. Lens manufacturer’s use different elements in different lenses which can affect the quality and sharpness of an image. Sometimes low-quality equipment or even lower-cost lenses don’t produce super sharp images. Most bluriness is operator induced, but sometimes a lens simple isn’t made with high enough quality materials to achieve the sharpness we’d like.
Can I fix blurry photos after I take them?
If an image is simply out of focus, there’s not much you can do in post-production. Adobe Lightroom and Photoshop do offer some tools that might help though, if you experienced camera shake or if your images are just a little soft.
In Lightroom, try adjusting the Clarity or Sharpening slider in the Basic adjustment box. Often a small adjustment is enough to fix light blur. You can sharpen the entire photo using a universal adjustment. You can also increase sharpness on just certain areas of your photo by using the radial filter or adjustment brush.
For more extensive sharpening, you’ll need to use Photoshop. Photoshop offers a filter for fixing camera shake and for sharpening other elements of your image. For step by step directions on using these tools, visit the Adobe Photoshop Guide site here!

Blur as a stylistic choice
Sometimes we WANT blur in our photos. We want to smooth out water or clouds or use blur to convey motion. Or you want to eliminate the distraction of a busy background and use a wide-open aperture to introduce background blur into your image. That is a stylistic choice that you as the artist can make! Knowing how to prevent blurry photos can actually help you create it when you want to!
Understand shutter speed, depth-of-field, and focus and keep your equipment in top shape and you’ll be prepared to prevent blurry photos the next time you’re out in the field.
I really hope you enjoyed this tutorial, if so, make sure to sign up for our mailing list to get your free copy of the Ultimate Photography Guide – The Fast Track to Creating Stunning Imagery!
Thanks,
Cole
https://www.youtube.com/watch?v=6oZgq0Jn4hQ