Ever wonder what happens when good Photoshop goes bad? Check out how to keep your photo editing in check and on the right track!
You wake to find an e-mail in your inbox titled “Photoshop: When photo editing goes bad.” As these things are always amusing, you click on it only to find it is YOUR IMAGES people are mocking. Your beautiful works of art went viral in the very worst way and now you feel like a laughing stock.
Looking to improve your photography? Just enter any questions you have about improving your photography below and hit send and get answers & feedback instantly - for FREE! Submit QuestionsThis is the nightmarish stuff that keeps us photographers up at night.
Don’t believe me? For a quick peek at some really heinous but hilarious family photos, check out this article from the USA Today. It’s the story of what I lovingly call the “ham family.” The photographer, an Adobe Photoshop photo editing software novice, did such a poor job in the editing room the family looks like a cross between ghosts and people with slices of ham wrapped around their faces. This story has a happy ending, but editing in Photoshop can be a slippery slope from WOW to WHAT?!? Before you fall off the cliff, read on below for some basic advice on keeping your edits true to life and flattering to your clients.
Tip #1 – Catch it in Camera and You Won’t Need Photoshop
“I hate my arms. You can just Photoshop those out, right?”
If you take the time to listen, most clients will clue you in on their insecurities without any prompting. Men will ask about eliminating their double chin, women will ask about hiding their booty. Listen to what your clients are telling you and pose them with that in mind. Learn what poses make men appear more masculine and what poses to avoid for women who want to downplay their curves. Strong posing that flatters a client’s natural form should be your go-to, not the liquefy tool.
Still Need Help? See these 5 Go to Posing Tips to Empower Women
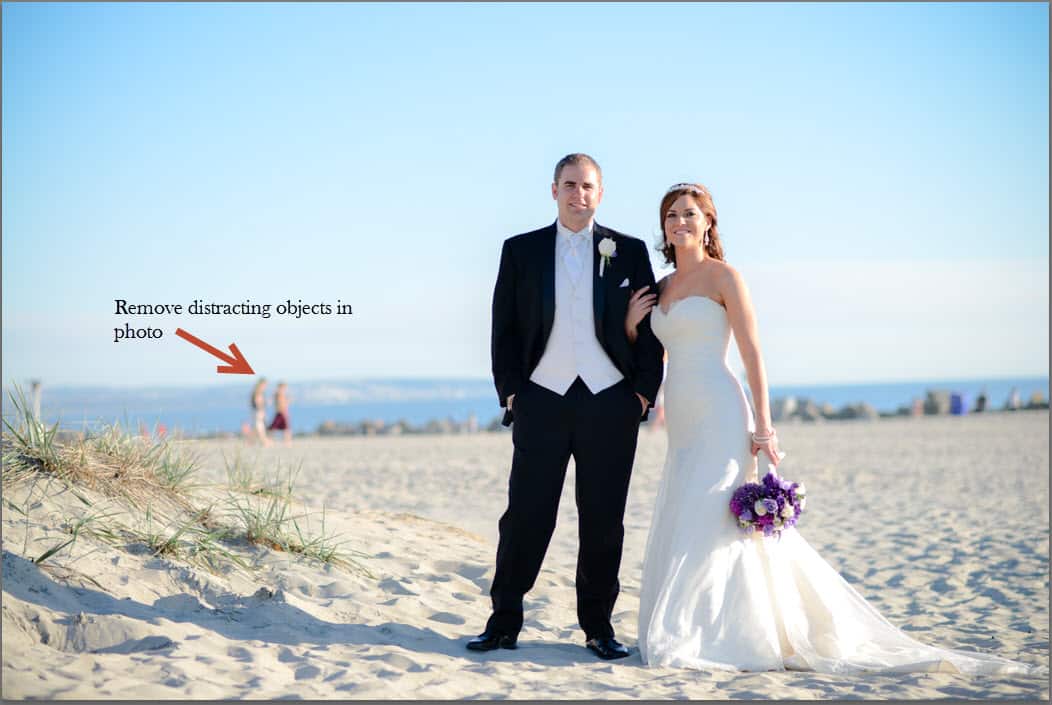
Awkward posing isn’t the only thing that can have you spending hours editing photos that would be better spent hanging out with your family or binge-watching Netflix. Take a few minutes to really study your location and notice what’s going on in the background. Is there a different angle you can shoot from to clean up the background? Can you use this location for tighter shots and a less cluttered area for pullbacks that include the environment?
Here are the things that often trip me up:
- Powerlines and telephone poles
- Passing cars or pedestrians
- Horizon lines
- Branches running in odd places
There is a lot to think about any time you are shooting. But solid posing and an eye for details can save you hours in the editing room later.
Tip #2 – Clear It With Your Client: Discuss What You Will and Won’t Edit in Photoshop
This is probably the most important piece of advice there is when it comes to using Photoshop. Clarify the expectations of what you will and won’t do in post-production with your clients before you ever start shooting.
Most clients will have at least heard of Photoshop. Many will believe that through the magic of PS, you can make them 10 years younger or 20 pounds lighter. And those are the more reasonable requests! I once had a client ask if I could give her pants in all her photos because she didn’t like how her legs looked in the shorts she wore to our shoot. While clients talk about Photoshop, few actually understand the time and skill it really takes to complete complicated requests.
How much post-session retouching you do is entirely a personal decision. I know photogs who do no retouching and some who strive for total perfection. My personal style falls somewhere in between. I often retouch that which is temporary: acne, eye bags, wild hairs, stains, a weird pucker in a shirt, etc. If it won’t be around in a week and was out of the client’s control, I’ll fix it in post-production. But beyond fixing facial blemishes and sharpening eyes, I leave well enough alone.
Whatever your philosophy is, discuss it with your client BEFORE your session. If something comes up in the editing room you haven’t discussed already, call your client BEFORE you begin editing. No matter how awkward it might feel talking about it beforehand, it is A LOT less painful than being chewed out by your client afterward. Scars, freckles, birthmarks, moles, bruises, stretch marks, fat lips…what you consider a flaw might be your client’s badge of honor. Have an honest convo with your client about what and how much retouching your provide. You’ll save some heartache and a bad review.


Tip #3 – Less is Often More: How Do I Edit Photos Correctly
Even when you get the go-ahead from your client, proceed with caution. Techniques like sharpening, face smoothing, teeth whitening or body shaping with the liquefy tool are easily overdone. The idea is to enhance your images, not manipulate them into a false reality.
Here are a few quick giveaways that tell a viewer the image has been manipulated:
- Puckered corners or wavy lines (Liquefy tool)
- Lack of shadows or reflections (clone and heal tool, digital backgrounds)
- Skin with no visible texture (too much smoothing)
- Mega-white teeth (too much whitening)
- Zombie eyes (too much brightening, sharpening or added color)
Once you have the image retouched to your liking, do a side-by-side comparison with the original. Check to see if anything stands out at you and if the retouched image is an enhanced version or looks too over-the-top.
In the example above of my headshot, when an edited version is placed side by side with the original photo, it’s easy to spot bad Photoshop. On the left is the unedited version. On the right is a more youthful but unrealistic version of me. My eyes look too bright, my face is too smooth (I’m 40, I’m supposed to have wrinkles) and my teeth are so white planes could land in the night by their light.
It seems silly, but these are just a few of the ways photo editing goes bad using Photoshop.
Tip #4 – Count the Limbs
It sounds crazy, but it happens. A little clone here, some copying of layers there and you wind up with someone missing a hand. Or you eliminate a bystander’s head in the background, only to ignore their feet and your groom looks like he has an extra appendage.
Whenever you do any extensive editing, a great final step to take before flattening those layers is to count the limbs. For every subject in your image, ensure they have the accurate number of eyes, ears, arms, legs, fingers, and toes. Then make sure that all limbs that appear in the image match up with a subject.
I once completed an extraction for an athlete for a sports poster and somehow left off his ear. I caught it as I was creating my print order. It looked like this football player had spent some time in the ring with Mike Tyson. I was going for a tough, gritty look sure, but missing appendages screams Photoshop Fail, Epic Level!
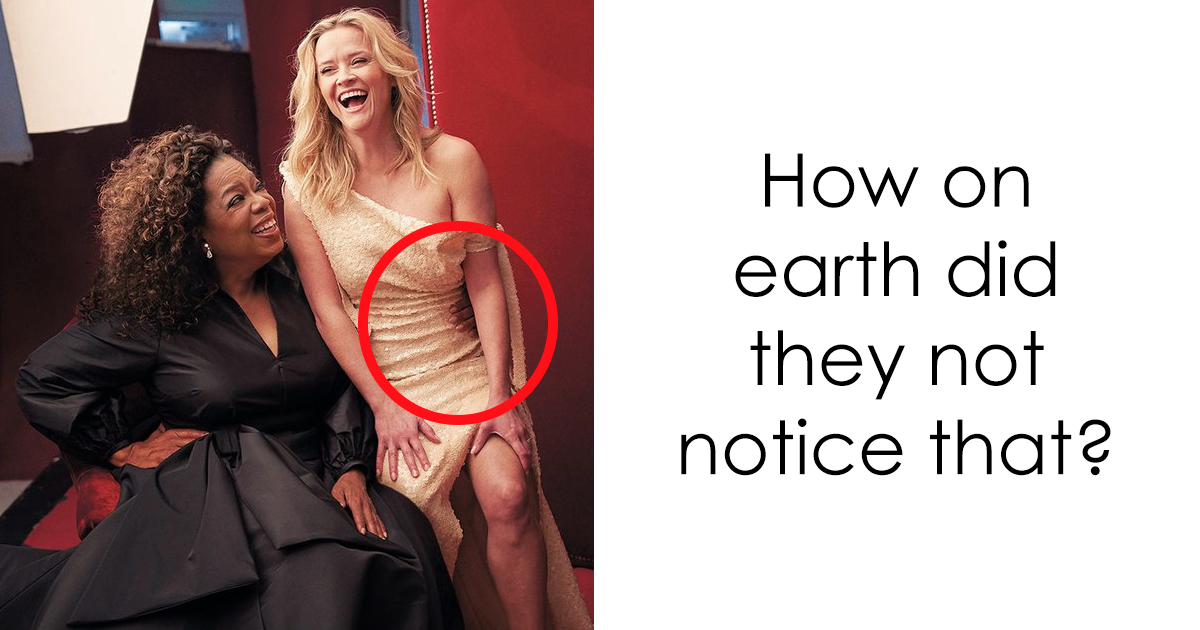
The photo above proves that even high-end magazines sometimes fail at Photoshop. This photo, taken from an inside page of Vanity Fair, has a 3-handed Oprah. Oops.
Need to Fix a Frumpy Face? Learn How to do a simple head swap in Photoshop

Tip #5 – Quality Photoshop Composites are Tough to Do Correctly
Taking different elements from different photos and blending them into one seamless scene is called compositing. Scroll through social media these days and you don’t have to go far to find some seriously amazing composites, like the above ad from Nike. Little girls kissing unicorns, a newborn in a pirate ship on the ocean, a young boy leading a tiger on a string in the jungle. Newborn photographers often make use of composites to achieve those adorable poses while keeping baby safe. A well-executed composite is nothing short of a beautiful, amazing work of art.
A composite also requires some advanced Photoshop skills, is incredibly time-consuming and is not easy to master.
Some composites are fairly straightforward, such as using an overlay to fix a washed out sky or head swapping. Both of those techniques use compositing to take an element from one image and add it to another. Adding a digital background is another example of a composite. And some photographers take it to the max and use five or six or even seven photos!
The challenge with compositing is that most of the time each photograph varies wildly from the next. Different lighting, different light temperature, different direction of light, different size of scale, different depth-of-field, different levels of noise. Each element must be masked out of its original photo with a deft hand, then edited to make the complete scene seamless and believable. Well, as believable as a little girl riding a polar bear can be. But you know what I mean.
The key to composites is practice and feedback. Practice on simple composites like head swaps and sky overlays. Then move on to using digital backgrounds. Get feedback from fellow photographers on your progress. Only when you feel like you really have the process down solid should you ever offer it as a service to your client. Never over promise unless you are confident you can also over deliver.
[ad id=’5′]
So what is Photoshop Good For?
If you’ve made it this far, you might be thinking if Photoshop is so bad, why even use it at all? Isn’t Adobe Lightroom Enough?
Having a working understanding of this very powerful software can be a huge asset to your business. Knowing how to touch up faces, enhance eyes and clone out unwanted elements of the background can make a good image great. More advanced skills that let you put a 10-year-old soccer player in the middle of the World Cup Finals or a baby on a lilypad kissing a frog can allow you to create a premium service that can command premium prices.
Confused about Lightroom vs. Photoshop? Read This!
The secret to keep good Photoshop from going horribly wrong is to start with the best RAW image possible and practice your technique until it looks like you were never there at all.