Curious about how to achieve those fantastic sunset silhouette photos? Here are some tips to to help you capture the art of sunset silhouettes and become a professional photographer!
Who doesn’t love a GREAT sunset silhouette photo? Have you ever wanted to create that artsy sunset silhouette shot with your kids jumping against a sunset?
There is something magical about getting that amazing sunset with a crisp silhouette of your subjects in front of it in your photos. This type of photos gives you a nice variety of silhouette photos where a face isn’t the main focus of the image.
Beautiful sunset silhouette photos can become a piece of art when enlarged and put onto a canvas in your favorite part of the house. Here is our guide to achieving those beautiful sunset silhouette shots!
Looking to improve your photography? Just enter any questions you have about improving your photography below and hit send and get answers & feedback instantly - for FREE! Submit Questions
How to Shoot Sunset Silhouettes
Shooting sunset silhouette pictures requires knowledge of camera modes and settings, lighting techniques, and composition to get the right exposure in your photos. Let’s get you started with the important things you can practice to create the best sunset silhouette photos.
Find the Best Subject to Shoot
You can shoot sunset silhouette pictures out of anything as long as the subject is in shadow. If you need help with well-defined shapes and lines in your photos, you can start practicing using people, trees, and the skyline.
Shooting Sunset Silhouettes Using Manual Mode
First, every camera has an auto option, and this setting is usually not entirely adequate for sunset silhouettes. A full manual mode allows you to control the exposure of your photos. If you are shooting photos towards the sun, your device will change its settings for the exposure of the sky.
Now what you have to do is put a subject in front of the sky so that they are blocking the sun and try taking a shot or several photos.
Auto-mode in this instance is trying to calculate the light in the entire frame for the photos, especially if you’re using evaluative metering. SO, in most cases, you’ll definitely want to be using manual mode in these photos!
You usually want to lower your ISO significantly, this usually means around ISO 100-200. In this case, you WANT your photo to be darker.
You still want to avoid motion blur in your silhouette photos, so you want to use a reasonably fast shutter speed.
Your f-stop can be bumped a bit higher, roughly f/5 so you get the outline of your subject and the surrounding scenery.
Use a fast shutter speed if you’re shooting handheld, so that you can minimize camera shake.
Using Aperture Priority Mode
At this point, you can set your exposure by using Aperture Priority or the A setting or AP on most camera’s dials. These settings are on the top portion of the camera body.
If you point your device towards the sky and press the shutter halfway down, you can see your light meter and set your aperture. I prefer it to be somewhere around f 11.
If you are comfortable, you can also shoot in manual mode. Set both your aperture and shutter speed to have more control over your exposure in manual mode. You can also balance the shutter speed and ISO to go along with the aperture to create the right exposure for the background.

Placing Your Subject in the Right Position for Sunset Silhouettes
Sometimes the way you place your subject can help you get a more crisp sunset silhouette as well. Ensure that whatever part of your subjects you would like silhouetted are above the horizon line. If you want to get an entire body silhouetted, you will most likely have to lower your body and angle your device up.
You can use a wide-angle lens to capture more of the scene ( when you want to include a pier or something like that), or a zoom lens to silhouette just the subjects.
If there are exciting parts of the environment, such as a tree or long grasses or even other people, it is better to move farther away or use a wider angle lens.
Most cameras come with an 18-55 mm lens, and this would work correctly when zoomed out all the way to capture the entire scene. For a more dramatic effect, put your focus on faces with the sun setting in between them. Read this great tutorial for more tips on posing! 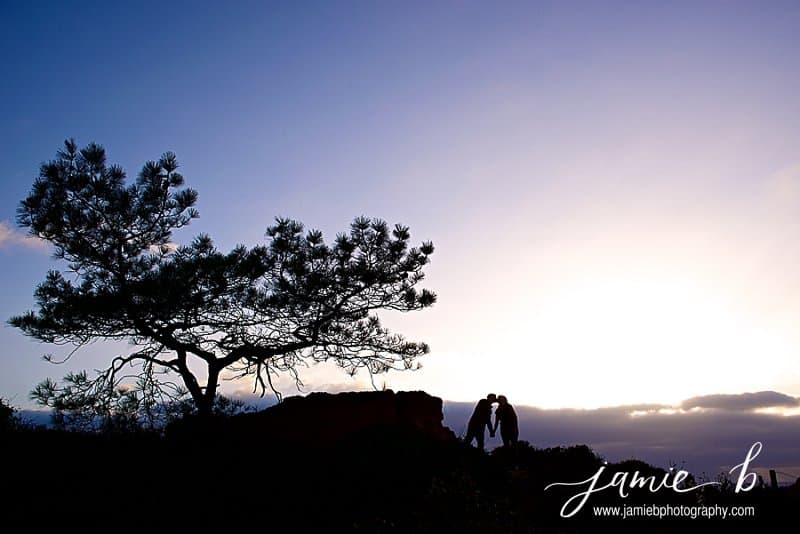
Move Around the Subject or Person
When shooting sunset silhouette images of people, there’s a chance the subject will end up looking like shadowy blobs because there’s no distinction between the limbs.
To shoot the best sunset silhouette, you want clean edges, and you can achieve this just by the way you angle your subjects.
- You can face couples towards one another to see their profiles instead of just the backs of their heads.
- If you’d like, position a mom to be with her belly to the side, or ask your subjects to jump so their entire bodies are off the ground and you get a full-body silhouette.
Sometimes, this can take a couple of tries, so don’t get discouraged. However many attempts it takes, that shot is always worth it. For a comprehensive posing guide, click here!

Wait for the Right Time
Make sure you are shooting either early in the morning, or right before sunset. You want to prepare, so get there about 30 minutes before the sun dips down behind the horizon line. You don’t want to rush yourself or your clients!
Know What to Do With the Available Light
Shooting silhouette photos let you take advantage of natural light coming from the sunrise, sunset, the moon, as well as car lights and street lights.
You can create a silhouette shot as long as the subject is in front of the light source, and the background is brighter than the subject.
Also, ditch the flash. You don’t need it because you are not trying to illuminate your clients. Using manual mode allows you to expose the background so you don’t need flash to take over.
Experiment with Compositions and Framing
Try to frame your subject(s), but eliminate the distractions if you can. We want as much focus on our clients as possible! The key is to practice!
Ask a friend to venture out on a photoshoot and experiment with different compositions and settings. This will take the pressure off, and allow you to see what works best for you!
Focus on the Subject
The challenge of shooting sunset silhouette images is that you may struggle with focusing for the photo. Make sure the subject remains sharp instead of the entire scene behind. Use manual focus if you’re struggling with autofocus because of low light in a photo.
If you need extra help, use a tripod, switch to live view mode, and then adjust the manual focus ring to get a better focus on your subject in the photo.
Final Reminders in Creating Beautiful Sunset Silhouette Photos
- Make sure your subject is focused! We want the best sunset silhouette outline!
- Intentionally pose your subject so that they are clearly defined in your photo. When people are just lumped together, you can’t tell where one person starts, and the other begins!
- SHOOT IN RAW. This allows you to make the most out of your editing.
Editing Sunset Silhouette Photos
Don’t get discouraged if the colors in your sky aren’t as vibrant as you had hoped. You still need to make those colors pop to really add depth to the sunset silhouette image.
Here are a few things you can do to really get the best out of your sunset silhouette photos.
- Darken the blacks.
- Increase saturation and vibrance.
- Play with your white balance, which in this case can really change the color of the sky!
Conclusion
Remember that sunset silhouettes take practice. Don’t get discouraged if you don’t nail your silhouette photos the first right away. Under these lighting conditions, we need to change things up a bit and unlearn what we know about daytime photography.
If you’re struggling with this type of photography, or with any other photography-related questions, join our supportive Facebook page where fellow photographers can help answer your questions.
Chat soon!
Jaime
https://youtu.be/_r95CHdJ_uU