Capturing the motion of a beautiful waterfall requires the understanding of long exposure photography, one of the coolest techniques you can use as a photographer. With a good location, the right light, and a little luck, you can capture some extremely interesting images that will most likely leave others with a sense of wonder.
LIGHT
There are a lot of factors that need to be taken into consideration when setting up for a long exposure shot, but the most important…light. I wanted to use this tutorial to give a basic understanding of not only what long exposure photography is, but also how to do it. I will try to keep things simple and as basic as I can, but I’m also assuming that anyone reading this article has at least a general understanding of how to use their camera. Everything in photography has to do with light, and this technique is no different. To better understand why light is the most important factor with long exposure photography, you first need to have a basic understanding of how the shutter of a camera works…and what shutter speed is.

SHUTTER SPEED
The shutter of a camera opens and closes to take a single exposure…or image. That’s where the term shutter speed comes into play. The shutter speed is simply just as it sounds, the speed at which the camera opens and closes its shutter to take each image, and its usually measured in seconds. With digital photography, the image sensor begins recording data for the image when the shutter opens and then stops when the shutter closes. You can look at it like opening and closing your eyes. If you open and close your eyes real quick, the image you in front of you during that brief time your eyes were open would make one image. Now if you open your eyes, move your head from left to right, then close your eyes, try to picture what that would look like if you were to make a picture of what you seen in that time frame. Everything moved and most likely was a blur.
The image sensor of your camera does pretty much the same thing. The longer your shutter is held open, the data is all being recorded by the image sensor and combined to make a single image. The faster the shutter can open and close, the more crisp an image is since there isn’t any time for there to be any movement, which is what you would want if you were shooting sports or any fast moving objects. So what is shutter speed again?
Shutter speed is the amount of time the camera opens its shutter until it closes it to make a single image or photograph.
LIGHT
So what does this all have to do with light? To help answer that question, I want you to picture the image sensor of your camera as a vacuum. A strong vacuum that sucks in light, and sucks the entire time that the shutter is open. It so strong that it evens sucks in light that we can’t see or don’t even realize is there, which is how photos can be taken at night in the pitch dark. The image sensor is extremely sensitive to light, which is why the body of a camera is built like a fortress made to block out any light other than through the shutter. Even the viewfinder that you look through, on most cameras, has a sliding door that you can close during long exposure shots, so that you can prevent any unwanted light from sneaking in.

APERTURE
Shutter speed is obviously the big player in long exposure photography, and is the setting we are most concerned with, but what about the other settings? There are still two other settings that we need to always be concerned with, and those are Aperture and ISO. Without going too deep into what aperture is, or the F#, I will explain just what you need to know for long exposure photography and how it comes into play. Unlike shutter speed, aperture is a setting that has to do with the lens. Its the part of a lens that opens and closes to control the amount of light coming in, but more importantly for this technique, controls the focal plane, or depth. The lower the F# the less there is in focus, the higher the number the more there will be in focus. When using a long exposure, you are usually trying to get as much as you can of the image in focus, so you want to set this number higher than you would for a portrait. The only thing you don’t want to do it set the F# as high as it will go because of something called diffraction, where the image will lose some of its sharpness.
The best thing to do is set the aperture to a high number, a few stops below its highest setting, I usually shoot for somewhere between f/8 and f/13 to play it safe.
ISO
With long exposure photography this is the one setting that you can relax and not worry too much about. Without explaining what ISO is, you can think of it as how sensitive the sensor is to light and also the amount of noise in your image, or grain with film. The lower the ISO the less noise, the higher the ISO, the more noise. With a digital camera, the ISO is a setting that you can raise to add light to a photograph by , but along with the extra light comes extra noise. This is easy because with long exposure photography you generally want a nice and sharp image, with as little noise in the image as possible, so you will set this at its lowest setting and leave it there. Most likely 100 or 200.

WHAT IS LONG EXPOSURE PHOTOGRAPHY USED FOR?
Now that hopefully you understand a little better what the shutter does, what shutter speed is, and how aperture and ISO come into play with long exposure photography, I can start to explain to you what the long exposure technique is used for. The use of a slow shutter speed, or long exposure, serves two purposes which you can figure out from what I have already explained. Its used to capture motion in an image, and also used to allow more light to hit your camera’s sensor when there isn’t any. Those are the two main reasons photographers will use a long exposure. The only problem is that you need to keep both of these reasons in mind each and every time you use this technique, because they go hand in hand. If you try to capture motion in a photo by making the shutter speed slow, and its a bright sunny day, you will get a blown out white image from the sensor sucking in too much light. On the other hand, if you are trying to take a picture in a dark room and want to use a slow shutter speed to brighten the image, any movement during the time the shutter is open will be captured, even the tiniest movement of the camera itself will be captured.
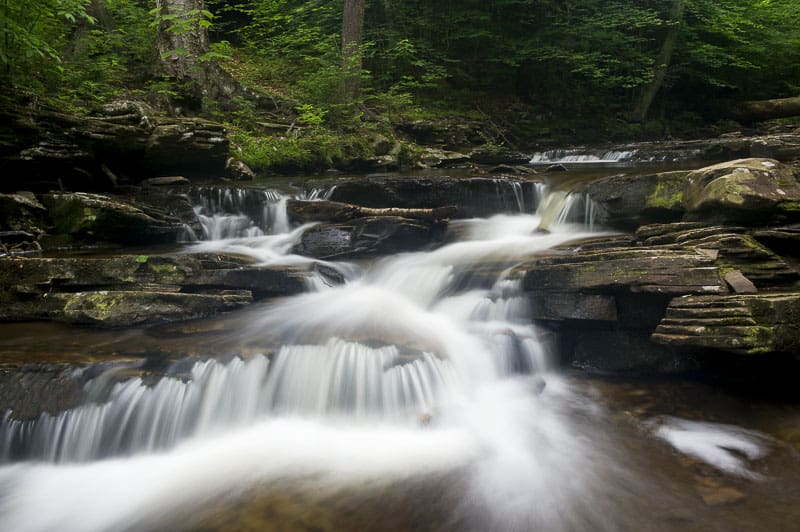
All of this needs to be taken into consideration when using this technique, but once you get a good grip on it and learn its benefits as well as its limitations, you can create some really cool images with some practice. This is the technique that’s used for making ocean water look flat as glass, making waterfalls look silky smooth, turning the car lights on a highway into streaking lines like they were made with a magic marker, or simply spelling your name with a flash light. Its also the technique that’s used to capture the stars in the sky when its pitch black outside, or the milky way as it moves across the sky. The shutter speed can be set to stay open for a few seconds, a few minutes, to even a few hours…the entire time capturing data and sucking in light.
EQUIPMENT NEEDED
So, what do you need to successfully make this technique work? You need a camera that has a manual mode, giving you the ability to change the shutter speed first off. Then you will need a tripod to put the camera on so that there is no movement of the camera. Since even the slightest movement will be picked up, including when the camera is on the tripod and you click the shutter release button to take the picture, I recommend a type of remote or cable trigger. The cool thing is if you don’t have one, you can use the camera’s timer feature if it has one. You can set the timer so that the camera will trigger the shutter release button on its own after the 10 or so seconds that you have the timer set for. That is all you need to take a long exposure image, in the right conditions. There is only one other piece of equipment you may need, and it’s a big one if you plan on using a shutter speed that longer than a few seconds during the day, and that’s Neutral Density…or ND Filter.
THE ND FILTER
The ND filter is a filter that’s placed on the end of the lens, usually screwed on or held in front somehow, to stop light from getting in. It’s used to block the sensor from sucking in as much light, making the sensor almost believe that it’s a lot darker than what it really is. Some ND Filters are just a shade darker than being clear, like sunglasses, while others are so dark that you can’t see through them, each obviously used for different purposes. An ND filter can be used anytime you need to cut the light down so you can take a longer exposure. They can be a lot of fun, and in some cases a must have if trying to take anything longer than a few seconds during daylight hours with the sun out.
EXECUTION
Since the setup and actual execution of a long exposure shot is different with each camera, and each scenario, I’ll keep the setup extremely basic and general, so that you can hopefully take it and make your own changes as you feel necessary.
1. Setup your camera and tripod at the height you need it, so that its sturdy and won’t be able to move if the wind picks up or water hits it.
2. Keep your camera settings how you normally have them and take a couple practice shots to find a composition that you like.
3. Place your camera in manual mode, set your aperture to somewhere between f/8 and f/13, and your ISO to its lowest setting.
4. Now you can set your shutter speed to a slower setting to either capture some type of motion, such as water or light, or to bring more light into an image in a dark area.
5. Pay attention to your exposure meter, as you slow your shutter speed, your allowing more light in and your images will get brighter. This is where you will need to adjust your aperture a little higher, or add a filter to allow less light in. On a sunny day, its difficult to slow your shutter speed down that much without having to add a filter.
If you don’t have any shutter release triggers or ND filters and want an easy and cheap solution, you can cheaply rent this gear from Lumoid which is where I rent any gear that I don’t have. Also a special thank you to my good friend Ray Henessy who let me showcase some of his photos from our waterfall photo excursion for this post, Ray’s nature work is stunning.
That’s it. Give it a try and let me know how your waterfall photos turned out!
Enjoy!
Happy shooting!
Jay

