Have you ever been frustrated to find lens flares in your photo? Maybe it’s covering your subject’s face, or distracting from your image’s aesthetic. The good news is you can prevent this!
You are in control of your camera, so you control if your image shows a lens flare. The lens flares don’t control you!
Looking to improve your photography? Just enter any questions you have about improving your photography below and hit send and get answers & feedback instantly - for FREE! Submit QuestionsWhat causes lens flare?
In the most basic terms, lens flares are caused by light entering your lens then getting reflected and scattered within the lens body. The result is light spots on your image in the shape of a hexagon, octagon or even a circle. Flare can also appear as a haze across parts of your image with decreased contrast and color saturation.
Are lens flares bad?

That question must be answered by you first. Some photographers think lens flares are bad and distracting, while others think that they are good when used deliberately and sparingly. Some photographers deliberately shoot to create a lens flare for artistic effect. The location of the lens flare in your image in relation to your subject is important as well. You may not want a lens flare appearing on your subject’s face in an image. So the angle at which you turn will affect where in your image you see a lens flare. It’s all about your style of photography and whether or not you like that look.
When you train yourself to look, you’ll start noticing lens flares used purposely in a variety of television shows, movies, video and computer games. These days game developers are trying to make their games look more and more like real world environments. In these circumstances, lens flares are used to convey a sense of drama, or the feeling of this footage being filmed in real life and unedited. Lens flares were one of the first special effects created for computer and video games.
How can a lens flare be prevented?

Knowing that lens flares are caused by a bright light source (aka the sun) entering your camera’s front lens at an inopportune angle, there are two things you can do to prevent them. The first is to change the angle you are shooting at. Perhaps instead of shooting into the sun, you can shoot facing the opposite direction so that the sun is at your back.
The second thing you can do is block the sunlight from entering your lens. Depending on where the sun is, you can block the direct light from reaching your lens with your hand, a sheet of paper, a leaf or anything you can pick up and move. Camera stores will sell lens hoods, which attach to the front of your lens and create a barrier from the sunlight. Lens hoods only prevent light from specific angles from entering your lens.
You can also make slight changes to camera angles. You can hold your camera slightly above your head and tilt the camera down at your subject without stepping anywhere or turning your body. During early morning and late afternoon when the sun is low use your environment for items to block the sun. Preventing sun flares could be as simple as taking a few steps to your left until you’re standing in the shadow of a tree trunk. You can block the sun from hitting your lens with your subject’s body as well. Duck down until the shadow cast by their body falls across your camera.
Everything you ever wanted to know about lens hoods explained here.
Understanding lens flare

A camera lens is actually made of multiple lenses, called lens elements, some of which are fixed in place and others which slide inside the length of your lens body. When a bright, direct source of light enters your camera’s outermost lens, it scatters between the different lens elements inside.
The more your camera lens is able to zoom, the more lens elements it has, and therefore the greater severity of the lens flare in your final image. Complex zoom lenses can have more than thirty lens elements, however the most common entry level zoom lenses will not have this many elements.
Camera manufacturers will apply special chemical coatings to their lenses made up of mineral and metallic components that reduce light scattering. There are various quality of coatings so, not surprisingly, cheaper coatings will be used on cheaper lenses. More expensive lens coatings will do a greater job of reducing light scattering in your lens. However this should not be a factor in deciding which lens to purchase. As shown in the previous section, lens flares are easy to prevent.
Another item closely related to, and sometimes mistaken for, lens flares is a diffraction artifact. This is caused by direct light diffracts off your image sensor. It creates a small rainbow in your image, however it is not visible through your camera eyepiece like a lens flare is.
As a side note, lens elements of DSLR lenses are constructed of glass, which is why we are so careful with our lenses. If you accidentally drop a lens, you chance breaking or shattering one or more lens element inside the lens. If this happens the lens is no longer usable, and you will have to replace it.
What are the best lenses for portrait photography?
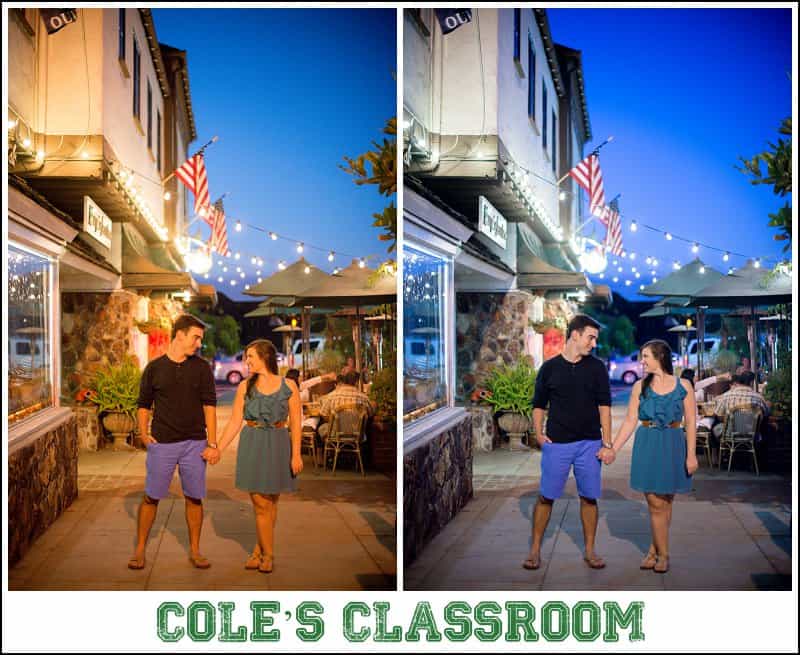
How to add a lens flare in your photos

For this you need to do the opposite of the steps taken to reduce lens flares. This means you need to shoot into the sunlight. This will be easier to create when the sun is lower in the sky, so early mornings and evenings. Next, you can take off your lens hoods so there is nothing blocking the lens, and finally place yourself in relation to your subjects so that no people, trees or buildings are blocking the sun.
You can also add a lens flare to your photo through editing. This can be done both through Adobe Photoshop and Lightroom which are what most photographers use. Since there are so many other editing programs, you’ll have to search the internet for instructions to add a lens flare with your chosen editing program. Lens flares can be created in Photoshop by:
- Add a transparent layer
- Fill the layer with black
- Apply a lens flare filter (Filter > Render > Lens Flare)
- Change the blend mode from normal to screen
- Optional: apply a Gaussian blur to the flare (Filter > Blur > Gaussian Blur)
If you’re working in Lightroom, follow these steps to add a lens flare (the haze kind):
- Open radial filter
- Draw a large circle across your image
- Feather the brush to 100%
- Increase exposure and temperature of radial filter
- Decrease clarity and dehaze of radial filter
Perfect shooting during golden hour with these tips.
Follow your own aesthetic
Sun flares can make or break your image, so use them wisely. When used properly they can evoke thoughts of warm summer evenings. Making them in camera during a photo shoot is as simple as the right camera angle, and making them during editing takes a few minutes. If you’re not a fan of lens flares, know your images will be just as beautiful without a lens flare. Its all about your personal aesthetic.