
Photoshop is a great image editing tool that allows you to create perfect images. One awesome Photoshop fill tool you have at your disposal with Photoshop CC 2020 is the Content Aware Fill Photoshop command. This nifty tool makes it simple to remove unwanted items from your images.
You can even replace the old item with something new from the image with tools like the clone stamp. We’ve created this how-to guide to teach you everything you need to know about using the Content-Aware Fill photoshop command.
Simple Steps for Mastering Content-Aware Fill in Photoshop CC 2020
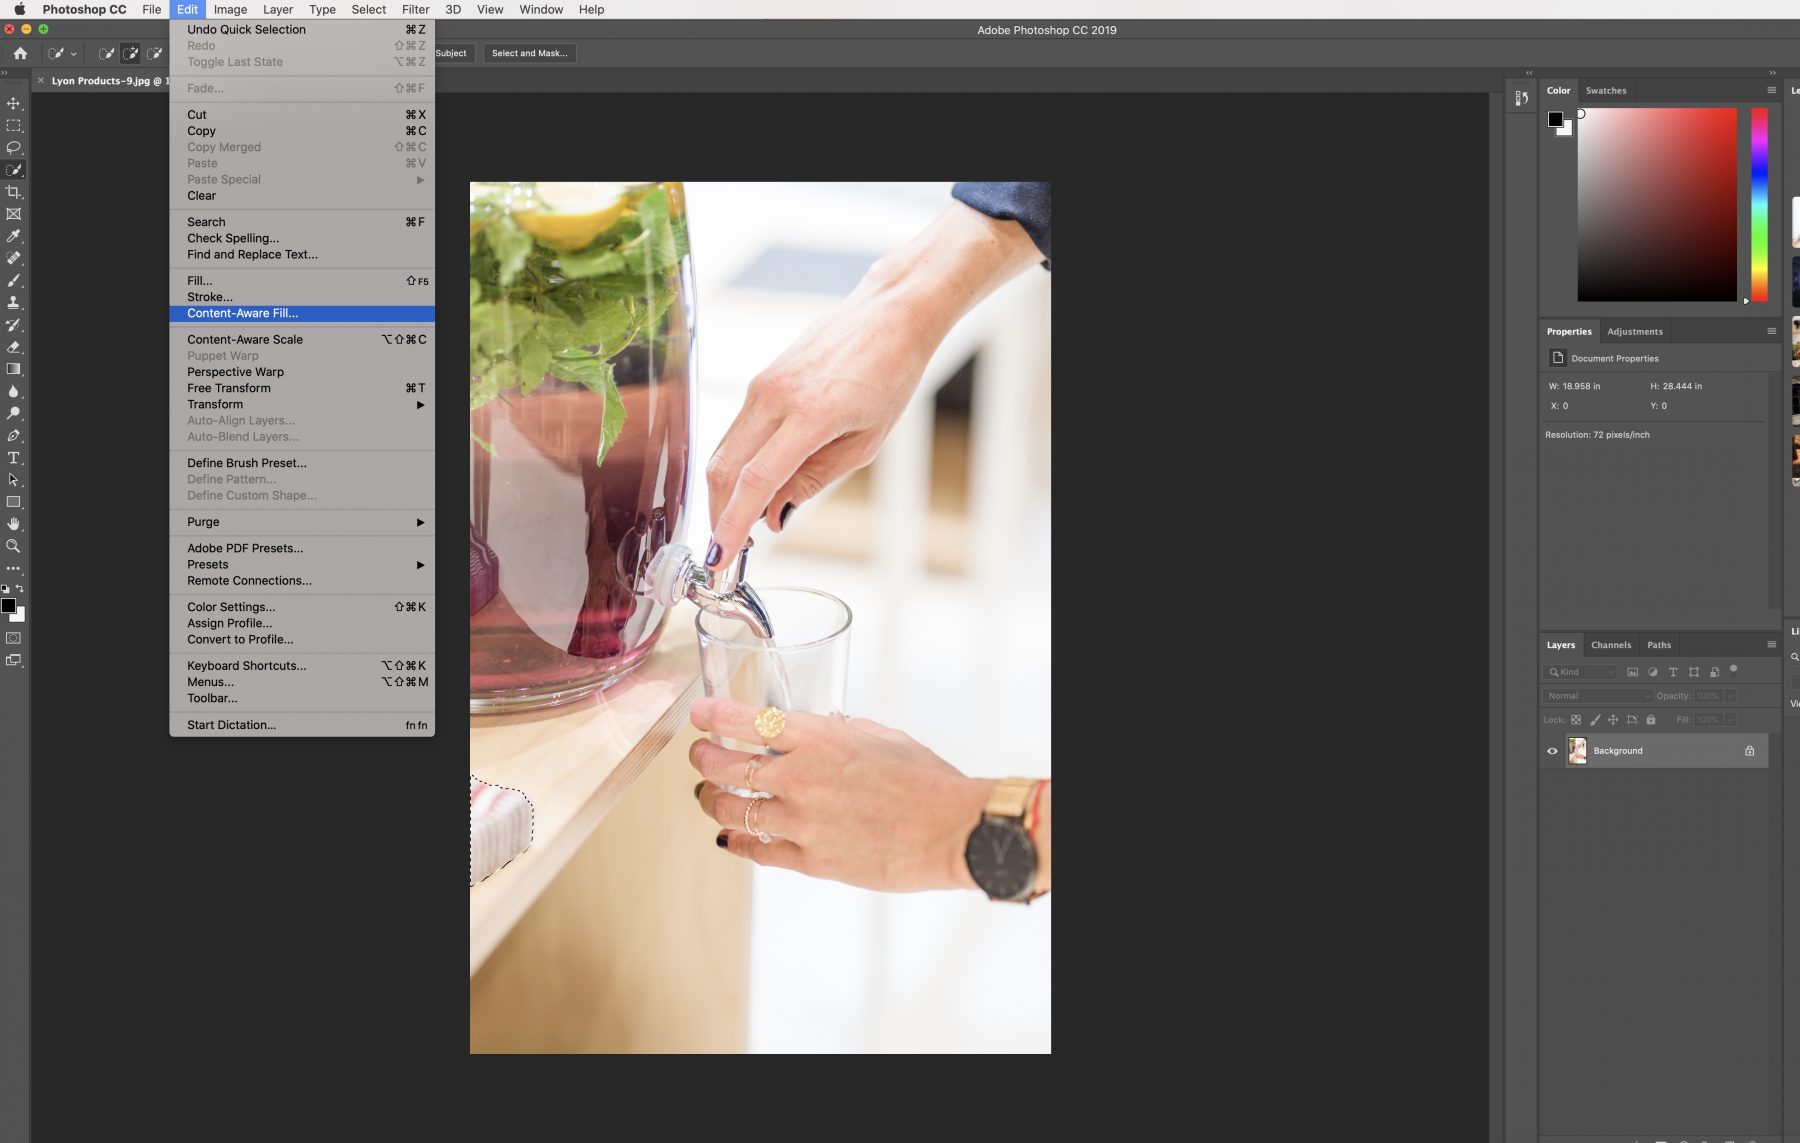
Before you learn how to use Photoshop Content Aware Fill in Photoshop CC, the first thing you’ll need is an image to use. You’ll need to be on the background layer. Next, mark a selection around the area you want to be removed from your image. Now, move your mouse up to the toolbar and click on Edit. Scroll down and choose Content-Aware Fill.
This brings up the Photoshop Content-Aware Fill workspace, which we’ll cover in-depth in this article. You’ll learn how to use this area while you’re working on your image. There’s a ton of cool features hidden in this fill dialog area. And with Photoshop CS 2020 you can choose Content-Aware Fill here are new options to explore that haven’t been offered in previous versions.
Special Photoshop Features
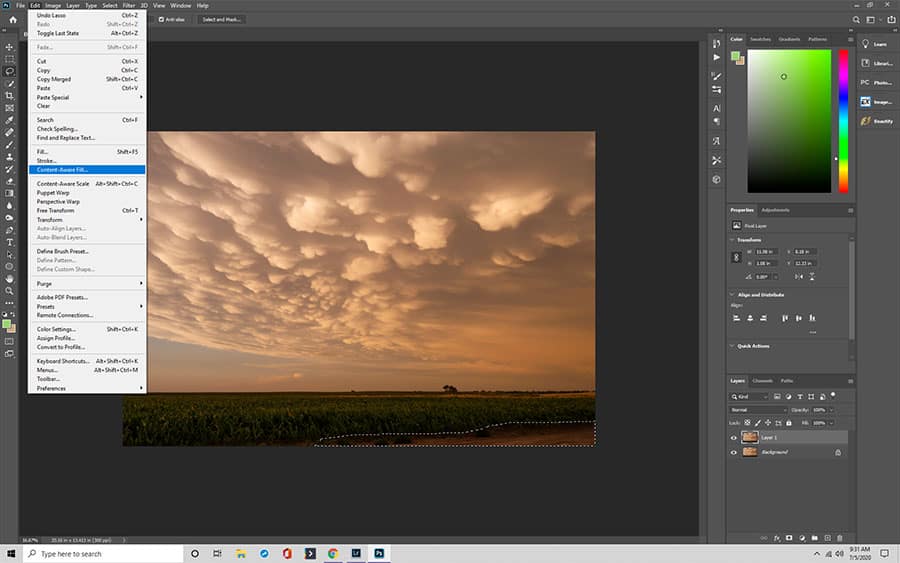
Photoshop CS5 is an older version, but it still has tons of awesome features, including the ability to use photoshop fill Content-Aware. To access the content-aware fill dialog option in Photoshop CS5, start by using the lasso or paintbrush tool to select the image or select around the area that you want to be removed from your image.
Now, click on the edit menu and go down to Fill. A shortcut to access the Photoshop Content-Aware Fill option is to press Shift + F5. A dialog box will come up with different options. If you want to stick with the default Photoshop settings, simply click OK. Or you could fiddle and mark a selection around with the various Content-Aware Fill options in the fill dialog box and see what happens.
How to Get Rid of Distracting Objects with Content-Aware Fill in Photoshop
Photoshop Content-Aware Fill makes it super easy to add a selection to remove objects from your picture without leaving a trace behind. Your new images will look like originals without any distortions or inaccuracies. Once you’ve got your image chosen, use one of your tools to draw a selection around the area you’re going to remove from the photo.
How to Find and Open Content-Aware Fill in Photoshop
After you’ve got your selection highlighted, navigate up to your toolbar, and click on Edit – Content-Aware Fill. Don’t be alarmed by all the different Content-Aware Fill selections Photoshop offers. We’re going to provide a detailed explanation of what each of these Content-Aware Fill selections do, including features new to Photoshop CC 2020.
A word of advice, It always helps to use a new layer when making changes in Photoshop so you don’t mess up your original copy.
The Content-Aware Fill Workspace
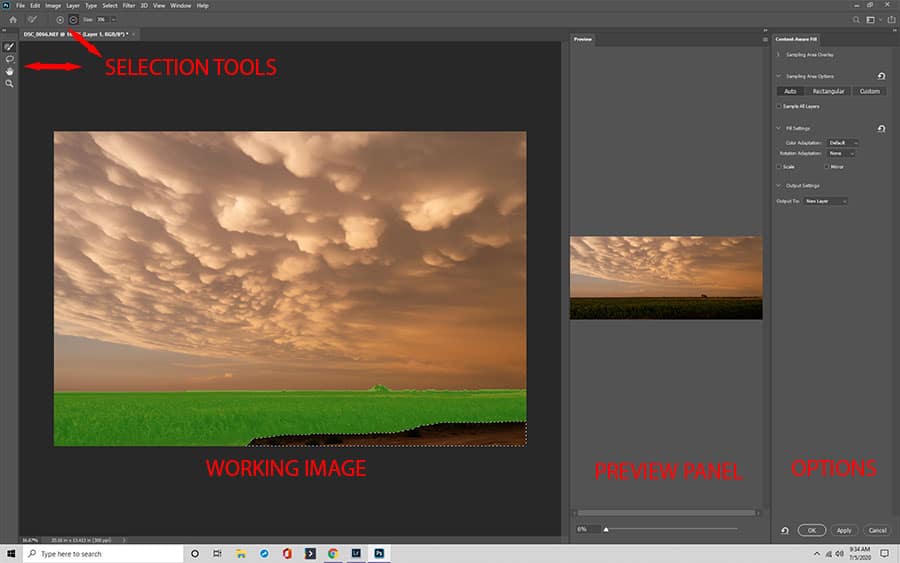
When you open the Photoshop Content-Aware Fill workspace with a new layer, you’ll see that this new Content-Aware Fill workspace has two screens. On your left, you have your work area. The right shows the preview panel.
You make changes to your image in the workspace, such as removing unwanted images and setting what you want to use as a replacement for the removed parts.
The Photoshop Content-Aware Fill or content aware preview panel allows you to view your changes before you commit them, in case you need to make alterations.
A Deatiled Look at the Work Area and Your Preview Panel
When you’re using the Photoshop workspace, you’ll notice a green overlay around most of your photograph. This is the area you are not removing. It’s also where you can select what you want to use in place of the image you’ve removed. The clone stamp works great in these instances.
The green screen is considered a sampling area overlay. Adjusting this selection is how you get better results using the content-aware fill option.
To adjust the size of the windows, simply pull the left panel to the right until you’ve got your ideal size.
Photoshop Content-Aware Fill Tools and Toolbar
The Photoshop Content-Aware Fill area has its own toolbar on the left so you can do customizations to your images. There are four tools, plus a tool that you might not see at first.
The four tools found in the toolbar are the sampling brush, lasso, hand, and zoom.
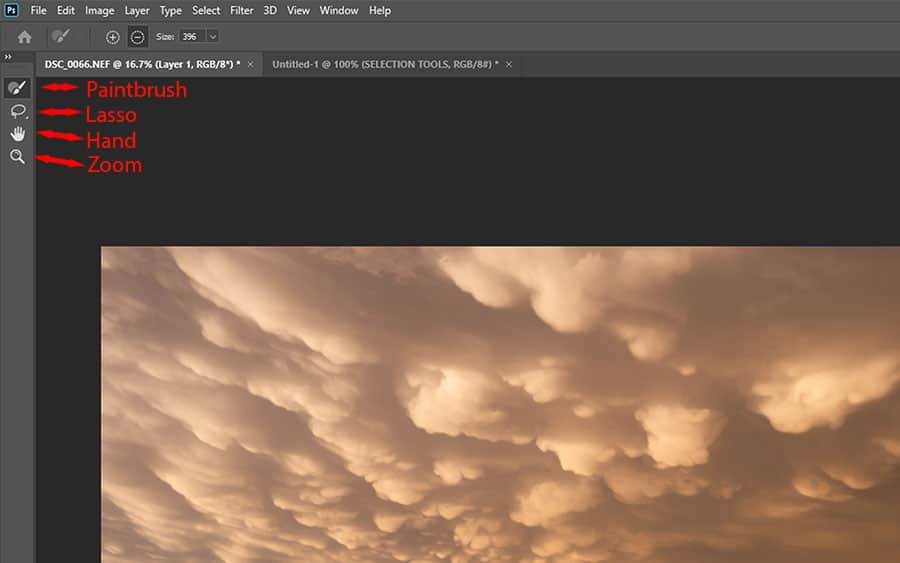
Sampling Brush: Selecting an Area
The first tool at the beginning of the taskbar is the sampling brush tool. You’ll click the circle and paintbrush icon. You’ll use this to make a selection for your sampling area, which turns green.
The paintbrush allows you to expand the sampling area, so you cut out less of the image. Or to have a selection of different objects you want to remove.
The Lasso Tool: Select Items to Remove
Next, you’ll see the lasso tool, which looks like a rope. You’ll also notice a small arrow at the right-hand bottom corner of this selection tool, which allows you to access the polygonal lasso tool.
You use these tools to make a selection of the things you want to remove. You can use the lasso tool to select multiple objects at once or to customize the original item further.
Hand Tool and Zoom Tool
You’ll use the hand tool to move the image around when it’s zoomed in. The zoom tool – you guessed it – lets you zoom in so you can make sure you’ve put a selection around the right areas.
These selection tools work in the preview side and the Photoshop workspace.
Controlling Your Settings with the Option Bar
Located above the toolbar is your options bar. Here, you’ll be able to control the settings that go with each selection tool. You’ll see an options bar for whichever selection tool you have active at the time.
The Four Options of the Content-Aware Fill Panel
You’ll also frequently use the Photoshop Content-Aware Fill panel, which you’ll find on the right side of the preview panel. This area has four selections. One of these is a new feature in Photoshop CC 2020.
The four areas are:
- Sampling area overlay
- Sampling area options
- Fill settings
- Output settings
Each of these options has various settings you can play with, which we’ll explain next.

Sampling Area Overlay Options
The top area is the sampling area overlay selection, which expands by clicking the arrow beside the name. You’ll use these options to work with the sampling area overlay. Some things this area will affect are:
Flip the overlay off and on. Click the checkbox labeled “Show sampling area”. Change the opacity, which is default set at 50%. Move the opacity slider to alter. Alter the overlay color, which is default to green using the color swatch button.
The “indicates” selection allows you to choose if the overlay covers the sample area – the default setting – or only the area you’ll be removing.
Photoshop CC 2020 comes with default settings and many users like to stick with these choices for most image changes, as you usually get the best results. But don’t be afraid to tweak the options, just to see what happens. You can always go back to your previous image if it doesn’t work.
To close this dialog box, simply click the arrow, which is pointing down when the area is expanded. The arrow points towards the word when it’s collapsed. Use this method with each of the selection options in the Photoshop Content-Aware Fill panel.
How to Sample Area Options
The Sampling Area Options is new, featured only in Photoshop CC 2020. This area affects how the sampling area is chosen. You can play with the different settings to customize how you like it.
In this area, you’ll find:
Auto: Default setting. When this is active, Photoshop chooses the sampling area rather than you. It often has the best results.
Rectangular: the sample area is selected in a rectangular section
Custom: You start without anything chosen. You use the sampling brush tool to cover the parts of the image you want as the sampling area
Sample All Layers: another new feature with Photoshop CC 2020. For images that have multiple layers, this option lets you view and select details in each new layer.
Change Results with Fill Settings
The fill settings option is a great way to change the results of your final image. Here, you’ll find these options:
Color adaptation: controls the contrast and brightness of the fill area. It allows you to make the area blend together for a smoother look. It’s already default set, so you don’t have to make changes unless you choose.
Rotation adaptation: lets Photoshop move the content around, so it matches up with the rest of the image.
Scale: adjusts the content size when removing items
Mirror: flips contents horizontally.
The scale and mirror selections are both checkboxes. Photoshop leaves these boxes unchecked by default. If you want to reverse the changes you’ve done, click the arrow in the upper right corner of the dialog box.
Output Settings
The output settings option allows you to decide how your final image will be produced. There are three selections.
New layer: this is your default setting. This option outputs only the fill area in a separate layer.
Duplicate layer: this option copies the whole image and the fill, onto a new layer.
Current layer: the image will be placed on the current layer that you’re editing. This option usually doesn’t have good results.
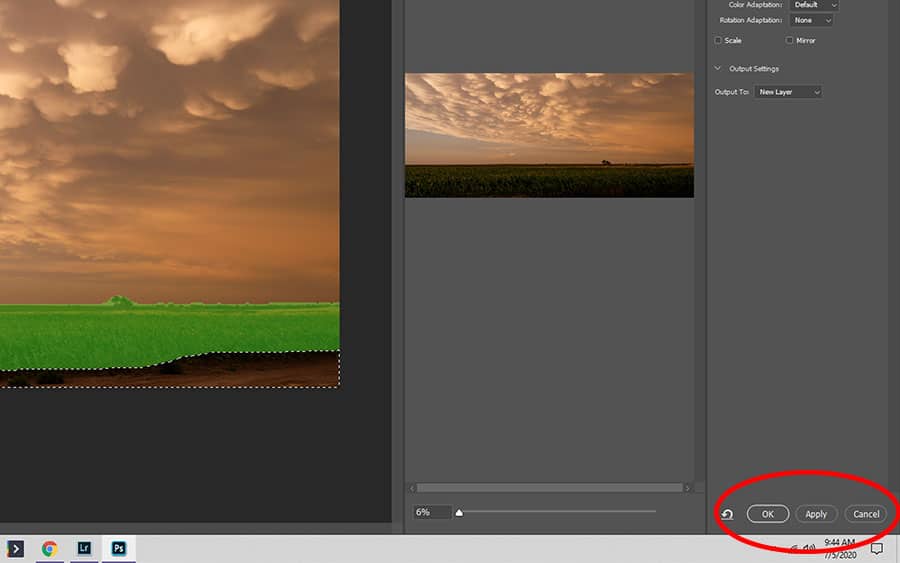
Important Functions: The Cancel, Apply and OK Options
On the right at the bottom of the Photoshop workspace, you’ll see the options to click OK, cancel, or apply. If you pick cancel, it closes Content-Aware Fill. You’ll lose all your work.
Apply is new to Photoshop CC 2020 and allows you to use the current options you’ve set for your fill. You can keep working on the same image after you’ve used Apply.
When you click OK, it saves your work and closes the workspace.
Using Content-Aware Fill to Make Removing Unwanted Images Easy
We’ve explained the entire layout of the Photoshop Fill Content-Aware command so you can feel confident navigating Photoshop CC 2020 to remove unwanted objects from your images.
We’ve broken down all the features so you can be sure of what each option does before you dabble with it. Now that you’re informed, go get productive!