
Making a contact sheet isn’t complicated, but whether you’re going through Windows or using options like Contact Sheet II through Adobe Photoshop, creating contact sheets does require a few steps. Here’s your step-by-step guide to how to make contact sheets.

Photo by rpavich licensed under CC BY 2.0
How To Make A Contact Sheet
Here’s how to make a contact sheet on the three most common platforms: Windows, Photoshop, and Lightroom.
Windows
1) From “My Computer,” Highlight The Photos You Want To Print
If you want to make this easier, put all of the pictures you want to print in one folder. That way, you can highlight everything for your contact sheet instead of having to pick them out of the folder.
2) With The Photos Selected, Right Click, and Click “Print”
Having multiple photos selected is the real trick here because it tells Windows that you’re trying to print multiple images.
3) Customize Your Contact Sheet Settings
Now that you’re in the printing control panel, select the printer, paper size and type, and the number of copies you want to print
4) Select “Contact Sheet” In The List Of Print Sizes
This step tells Windows that you’re trying to create a contact sheet, so it automates most of the process for creating your contact sheet. It’s not as elaborate as what you can do in Photoshop or Lightroom, but it’s easy, and it more than suffices when all you need is a basic contact sheet.
5) Click “Print” To Start Printing
You’re almost done readying your contact sheet! However, there’s one more thing to toggle before you’re done.
6) Set The Printer Option To PDF, And Hit Print
Since the goal is to keep your contact sheet for use later, you should set your printer option to PDF instead of the regular printer. You can then print the PDF normally or share your contact sheet online.
Photoshop
Making contact sheets in Photoshop is a little more involved than doing it straight through Windows. Here’s the process for how to make a contact sheet in Photoshop.
1) Create A Folder Of The Photos You Want
This step is optional for Windows, but it’s significantly easier to do it this way when you’re using Adobe Photoshop. Make sure you put the folder somewhere that’s easily accessible in case you need it later.
2) Click on Adobe Photoshop and Press File > Automate > Contact Sheet II
This tells Photoshop that you’re trying to create a contact sheet using their Contact Sheet II setup. It also starts loading the data for your contact sheet template, but we have one step to go through before we see that.
For curious readers, Photoshop calls it Contact Sheet II mainly to differentiate it from other ways of creating contact sheets. The original contact sheet involved placing photograph negatives onto photo paper, thus literally making contact with the sheet. Today, however, this process is almost always digitized.
3) Select The Folder
This is why we put all the images into one folder earlier. Photoshop strongly prefers making contact sheets out of an entire folder, so pre-sorting your images into a folder you can select makes it significantly easier to create a contact sheet.
4) Customize Your Contact Sheet Settings
Now that you’ve selected your folder, it’s time to start customizing your contact sheets. You can set the pixel/cm width and height for your images on this page, and you can also get thumbnail columns and rows for the sheet. This helps control the number of images you’ll see on the contact sheet.
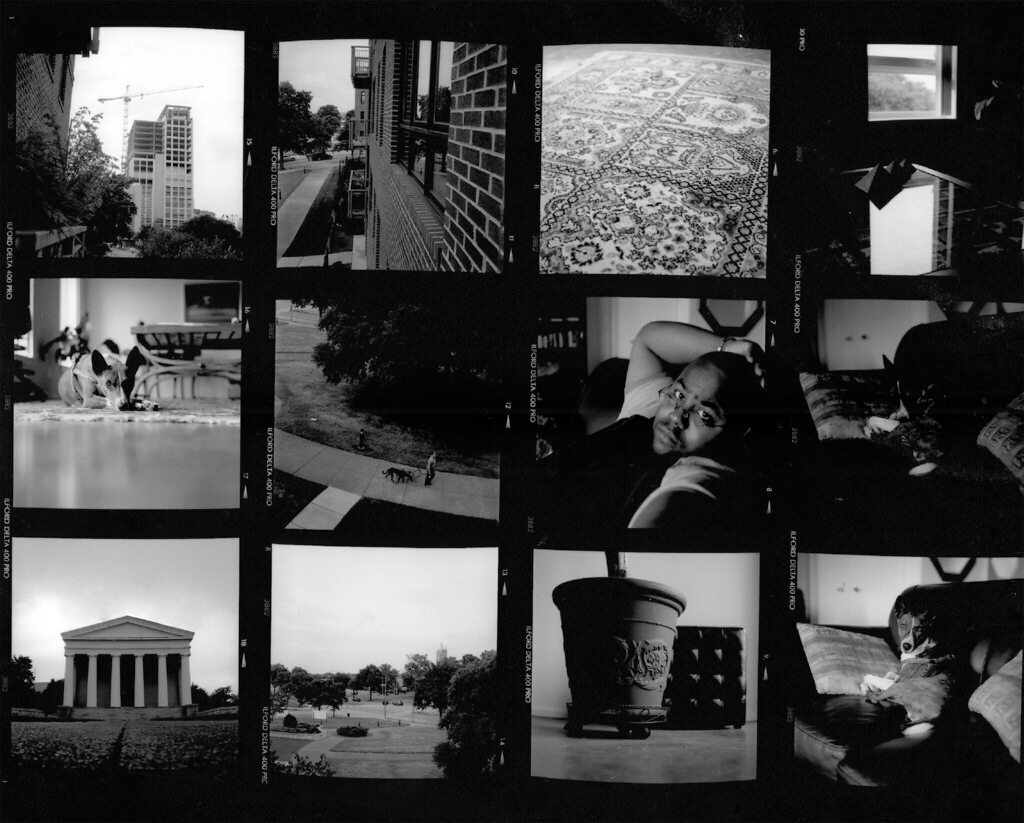
Photo by Arnett Gill licensed under CC BY-ND 2.0
5) Press “Okay”
Once you’re satisfied with how your contact sheet looks, press the “Okay” button to move into the last step of this process.
6) Save The Contact Sheets As A JPEG Or PDF File
As with making contact sheets in Windows, we want to save them to the computer before printing. The Windows method works best if you save to PDF, but you can make contact sheets in either JPEG or PDF when you’re using Photoshop. Be sure to select the correct file path for saving the sheet before you finalize it.
Lightroom
Lightroom offers the most robust way to create a contact sheet. However, since there are so many more options, it may take a little practice to get good at it. Here are the steps to follow.
1) In The Library Module, Navigate To The Photos You Want To Use
Lightroom offers several ways for you to select the photos you want to use. While you can use a collection within Lightroom, you can also create a folder (like what we did to choose photos for Photoshop, above), or you can use smart criteria to sort images.
This makes Lightroom the best option if you want to create many different contact sheets by selecting other groups of images.
2) Switch From The Library Module To The Print Module
After selecting your pictures, move over to the Print Module. We’re not going to be printing the contact sheet quite yet, but this is where you can change all of the important things. You can get to the Print Module by selecting the button from the menu in the top right or by pressing ALT-CTRL-6 (Windows) or ALT-CMD-6 (Macintosh).
3) Choose Your Template
Next, it’s time to select your template. Unless you’re moving things around, this should be on the far left side of the page. It might be minimized, so if it is, click the small triangle button next to it to expand your list of options.
Scroll through the templates in Lightroom until you find the contact sheets, then select the one you want to use.
Important: The layout options you’ll see for these contact sheets do not refer to either the paper size or the aspect ratio of the contact sheet. Many people make this mistake and assume they’re laying things out for printing when they aren’t.
Rather, these numbers refer to how many columns and rows you’ll have on the contact sheet. For example, 5×8 Contact Sheet means it will have five rows and eight columns. You can customize this later, so don’t worry if you don’t see the layout you want.
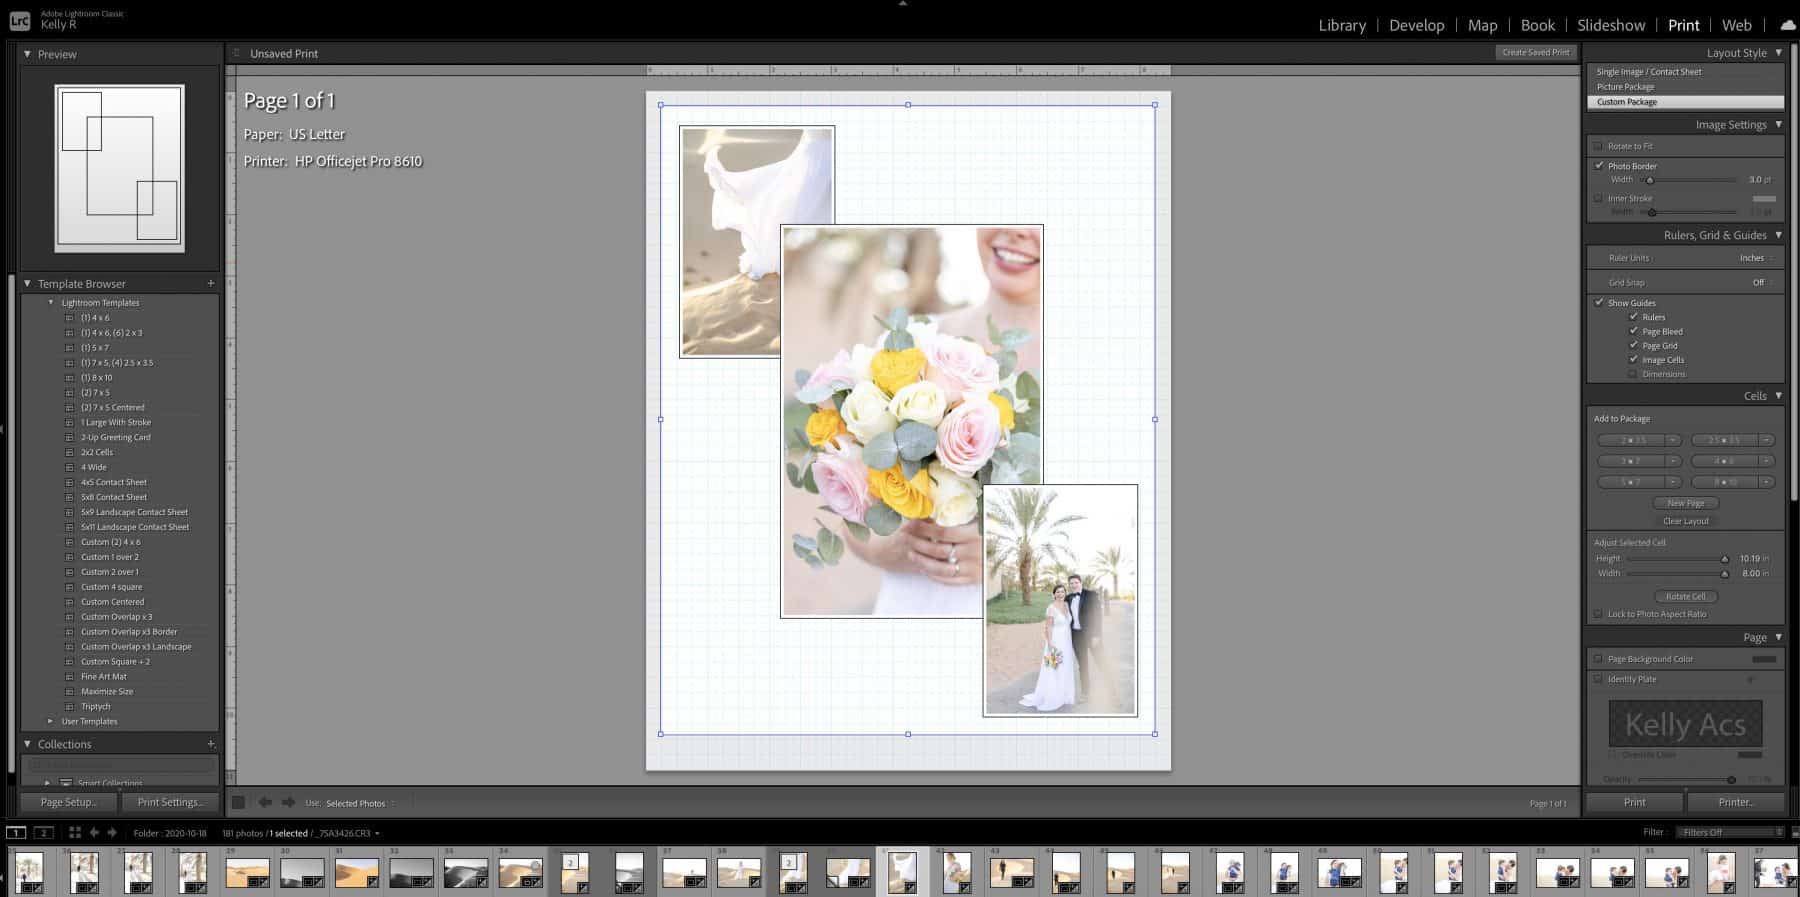
4) Customize Your Contact Sheet Settings
Now that you have your basic contact sheet ready, it’s time to select all of the settings. This is the most complex part of making a sheet in Lightroom, but it’s not hard as long as you follow this process.
Layout Style
The first customization panel you see gives a few options for making your sheets. We want the first one, Single Image / Contact Sheet. The other layout styles are for different processes.
Image Settings
The next panel gives you several options depending on how you’re laying things out. Here’s how they work.
Zoom to Fill
This zooms the pictures in to fill as much space as possible, depending on the type of grid boxes you’re using. Notably, this will also crop longer dimensions on images to make each thumbnail square and ensure the best fit.
Rotate to Fit
Landscape-style templates can use this option to rotate vertical images so they align with the template. This doesn’t usually do much for portrait layouts unless your images were already rotated.
Repeat One Photo per Page
In most cases, you don’t need to select this option. It’s mainly for cases where you want to have a lot of small duplicates of the same image, such as for art or stamp books.
Stroke Border
This option puts a border around each thumbnail (not the grid box, mind you). While not always necessary, it can help create a more consistent, polished look for images that have many different colors along their edges. You can choose both the color and the thickness of the lines.
Layout
The next step of creating a contact sheet file is the layout. This gives you significantly more control over the exact structure of your sheet. If you want to duplicate this file type in the future, you may want to save or write down the settings. That will make it much easier to create a file with the same settings in the future.
Margins
This setting controls the margins to the edge of the paper, but not between each thumbnail. This can help you maximize the number of pictures per page. In most cases, 0.25 inches is enough, but you may want to adjust this for special printing situations.
Page Grid
These sliders allow you to change how many rows and columns your file has. The numbers are self-explanatory, but make sure to watch the changes to see how modifying these affect the final result. Try to have as few empty spaces as possible because those look bad on contact sheets.
Photo by Bruce_of_Oz licensed under CC PDM 1.0
Cell Spacing
These sliders control the space between each thumbnail. As with the page grid settings, these can let you fit more images on one page if you need to. Equal spacing typically looks the best, but you can also set these so they’re proportional to your page size. Any layouts besides these usually look strange, so try to avoid that unless you have a good reason to use it.
Cell Size
Finally, this option controls the size of the cells themselves, rather than the spaces between them. Most people should keep the cells square, but if you’re trying to display a lot of landscape or portrait photos, you may want to adjust these accordingly. Consider playing around a little to see what looks best for your file.
Guides
Guides are a Lightroom-only component of the layout process. These can add things like rulers, image cells, margins, and information on the dimensions of the contact page. None of these show up when you print your file. They’re exclusively for getting more precise measurements within Lightroom.
The truth is that most people don’t need to worry too much about these, but they can be useful if you need to fit particularly exact dimensions with your contact sheet.
Page
This tab is the final area to adjust your contact sheet file before you create the final version. It focuses on elements for printing.
Page Color
This lets you create a different background color for your canvas area (not any margins). However, there are two things to keep in mind here. First, it will adjust any text below the thumbnails to be readable. Second, it assumes you’re printing on white paper. If you’re printing on colored paper, you may need to create and print a few sample pages.
Identity Plate
The identity plate section lets you apply logos or branding information to your images. You need to set this up elsewhere in Lightroom, but it’s particularly helpful if you want to share copies of these images as advertising. Making an identity plate is beyond the scope of this particular guide.
Watermarking
The watermarking allows you to place watermarks on each of the thumbnail images on your contact page. This is useful if you want to stop others from using the images for any reason, and particularly if you’re sharing the images digitally.
Page Options
The page options section allows you to add things like a page number to the bottom right of a contact sheet. This is useful when you want to print several sheets together. Other options, such as crop markings, aren’t as useful as having page numbers. You can safely ignore those options.
Page Info
While you may not always want to print page info alongside the page number, Lightroom allows you to add significant amounts of information for each page. You can display information like the date, the equipment, the original size of the image, or even custom text. You can also provide customized information.
This is useful mainly for marketing (by applying names to the photos) or professional work (by including relevant image data). However, if people want copies of the photos, make sure you have a way to find the image again.

Photo byTORLEY licensed under CC BY-SA 2.0
5) Set The “Print To” Option To Printer, And Hit Print
When you’re done editing all the information on your page, press the Print To button.
6) Save the contact sheets as a JPEG or PDF file
Finally, save your contact sheets as a JPEG or PDF, and you’re ready to go! As before, make sure you save your file in the right place instead of accepting the default. If you save it in the wrong place, you might not be able to find it again when you need it.