


A stop of light is to photography what a cup of flour is to a bakery. Learn what it means and why understanding it makes you a better photographer.
I’m honestly not sure how I ever got an A in my college photography class. Looking back some twenty years later, I had absolutely no real idea what the heck I was doing. I didn’t understand how to use a flash or meter correctly and I darn sure didn’t understand what a stop of light actually was.
Looking to improve your photography? Just enter any questions you have about improving your photography below and hit send and get answers & feedback instantly - for FREE! Submit QuestionsIt’s sort of embarrassing, really. I took three college photography courses, got As and thought I was pretty hot stuff as a photographer. But I didn’t understand one of the fundamental concepts of photography. You can be a great photographer without understanding about a stop of light. But if you learn the concept early on, it makes other concepts like the exposure triangle and flash so much easier to learn. Why? Because a stop of light is how all of them relate.
A baker can bake without understanding how all the different measurements like teaspoons and tablespoons and cups relate. But they can’t double or halve a recipe or create their own masterpieces from scratch. So should you know about stops. Understanding a stop of light let you compare and swap different elements of exposure to create the image YOU want.
 What is a stop of light?
Before we get started, I’m going to assume you understand the basics of how ISO, aperture and shutter speed work. You don’t have to know the nuances, but you will need to understand how each affects your image. If you need a good primer on that, check out our tutuorials here!
Other units of measurement are easy to picture in your mind. You know what a dozen eggs looks like, or a cup of flour. You can picture a yard of fabric or a pint of Guinness.
But even if we can’t really “see” an amount of light, we can still measure it. That measurement, in photography, is called a stop of light.
A stop is the standard unit of measurement for photography and how we ensure that aperture, shutter speed and ISO are roughly the same from camera to camera, lens to lens, flash to flash and
If it’s easier to give yourself a visual, think of it as a cup of light. Need more light in your scene? Add a cup (a stop!). Scene too bright? Reduce your light by a cup (a stop).
How much light is a stop?
A stop is simply a doubling or halving of the amount of light in a scene. It’s not a fixed amount, like a cup or a yard. Rather, it’s a relative measure that tells you the difference in brightness in an image.
If I increase the brightness of my image by one stop of light, I effectively double the amount of light in a scene. If I decrease the brightness of light in my scene by one stop, I cut my available light in half.
Here’s why it’s important to understand the concept of a stop of light…
The three fundamental elements of any image, aperture, shutter speed and ISO, are all based on, or measure, in stops of light.
So you can add a stop of light (double the light) to your image by increasing your ISO, decreasing your shutter speed or opening up your aperture. You can remove a stop of light (decrease it by half) by decreasing your ISO, raising your shutter speed or closing down your aperture. A stop is universal when it comes to exposure!
Different numbers, same stops
Numerically, each is expressed differently. But those numbers (f/2.8, 1/100 or ISO 100) are ALL based on stops. And changing your settings by a stop of light results in doubling or halving of the light in your scene, right?
Let’s look at the graphic below you’ll see how this doubling/halving idea is also represented numerically. Start at the bottom with ISO. Do you notice as you move from left to right, the numbers double in size? That’s because moving from ISO 100 to ISO 200 is adding a full stop of light to your scene! If you move from right to left, moving from ISO 500 to ISO 250 for example, the number to the left is half the size of the one before it. And what is half the amount of light? A stop!

Now move up to shutter speed. (Just remember as we talk about this, we’re talking about fractions of a second…if you remember your elementary school math, as the bottom number gets bigger, the entire fraction gets smaller). We start at 1/30 of a second and move to 1/60 of a second. Remembering that fraction math, 1/30 is twice as big, or double, 1/60. And what is a doubling of light? A stop!
Are you with me so far? Here’s a quick quiz for you. If I change my ISO from ISO 1600 to ISO 400, how many stops of light did I lose? Two!
If I change my shutter speed from 1/500 to 1/60 of a second, how many stops of light have I added to my scene? Three!
Now, what if I change my shutter speed from 1/60 to 1/30 AND adjust my ISO from ISO 100 to ISO 200? How much light have I added to my scene? None! I decreased my shutter speed by 1 stop but increased my ISO by 1 stop so the light in my scene remains the same.
Aperture is the bugger of it.
Aperture, or the size of the opening of the hole in the lens, is expressed as an f-stop.
An f-stop is not the same as a stop of light. An f-stop is just another way of saying the size of the aperture. F-stops relate to true stops of light, but they aren’t the same thing, exactly.
We use numbers like f/1.8, f/2, f/16. These numbers come from an equation. (You don’t need to know it, but if you’re a science nerd, it’s F-stop=Lens focal length ÷ diameter of the aperture size.) So the number expressed in the f-stop designation isn’t doubling of halving, but the size of the opening is!
This was the part that always threw me. I wanted f/8 to have twice as much light as f/16 because that would make it so much easier! But one stop more of light than f/16 is actually f/11.
If you want to memorize anything about all of this stop business, memorize the chart of full increments of light. Starting at f/1.4, full stops are as follows:
- f/1.4
- f/2
- f/2.8
- f/5.6
- f/8
- f/11
- f/16
- f/22
If you know those numbers and understand how they represent stops, you can correlate them to stops in ISO and shutter speed or flash power.
Need more help with aperture? We have three simple steps to help!
Putting it all together
Let’s see that in practice. Say I have a scene that I’m shooting. I take a test shot and I like how the exposure looks with the settings of ISO 100, f/4 and 1/250. But I’m shooting kids playing soccer and I know I want my shutter speed to be 1/1000 to stop the action. If I change from 1/250 to 1/1000, I’ve lost two full stops of light in my scene. I need to add 2 stops of light back into my scene using ISO or aperture to keep my exposure the same. So I could raise my ISO to 400. Or I could widen my aperture to f/2. Or I could raise my ISO to 200 AND widen my aperture to f/2.8.
Here’s another example. I take a test shot and like how the light looks at f/2.8, 1/500 and ISO 400. But I’m shooting a group of nine people in three rows and want to have a greater depth of field so I decide to use an aperture of f/8 to get everyone in focus. How many stops of light have I lost? Three full stops. So to gain add three full stops of light back into the scene, what could I do?
A. Increase ISO to 3200
B. Slow my shutter to 1/60
C. Increase ISO to 1600 and slow shutter to 1/250
D. Increase ISO to 800 and slow shutter to 1/125
Any of these answers will get you the same exposure, or brightness, as you had before. But which is right? It depends on your camera and your preferences! But any of those answers gets you three stops of light back into your scene. And you can make all those decisions without looking at your light meter after your initial metering.
1/3 Increments
To give photographers a little more finesse and control, ISO shutter speed and aperture is actually broken down further into 1/3 stop increments. So you can adjust your camera (and some flashes) in 1/3 stop increments. But 1/3 of a stop change in ISO is the same as a 1/3 stop change in aperture or shutter speed. Those 1/3 stop changes happen with single clicks on your scroll wheel. So sometimes you’ll hear other photographers say things like “adjust your exposure up a click or two,” meaning increase your exposure by 1/3 or 2/3s of a stop.
I find counting clicks to be helpful if when I’m trying to change settings on the fly. If I open up my aperture to change my depth of field but don’t want to change the overall exposure, I simply count clicks as I roll my wheel. A three-click change in aperture can be compensated quickly by three clicks in shutter speed to let that light back in.
A Stop of Light and Your Light Meter and Histogram
There are a few other places where you’ll see a stop of light represented, including your light meter and your histogram. Look at your light meter and you’ll see the zero in the middle and a series of bars sort of like a ruler. Each longer hash mark represents 1 stop of light, and each smaller hash mark represents 1/3 stop of light.
Now look at your histogram in your camera (or in Lightroom for that matter!) You’ll see a series of vertical bars evenly spaced across your histogram. Each of those bars represents a stop of light!
Learn how and why to use your histogram. You’ll love it!
What about flash?
Flashes also use stops of light! Your flash power is expressed as a fraction. If your flash is on full power, the display on your screen will read 1/1. If you turn it down to ½ power, you’ve reduced the light by half. And what’s a halving of light? A stop! Conversely, if you start with your flash at 1/64 power and increase your power to 1/32, you’ve doubled your flash power, or light, in your scene. A doubling of is what again? A stop!
Why is this important? There are times where you’ll want to add flash to your scene but need to adjust the settings to create the image you want. For example, you have your settings set to f/4, 1/160, ISO 100 and your flash power is set at 1/8 power. You like the exposure (and it’s a correct exposure as measured by your gray card) but you want to widen your aperture to get a more shallow depth of field. If you change the aperture by two stops to f/2, you could add more light into your scene by raising your flash power two stops to ½ power.
[ad id=’5′]
What does stopping down mean?
Have you ever had another photographer tell you to stop down? That’s his way of telling you close down, or narrow your aperture so that less light is coming in. Some photographers use the term stopping down to mean letting in less light generally, but it’s usually in reference to your aperture.
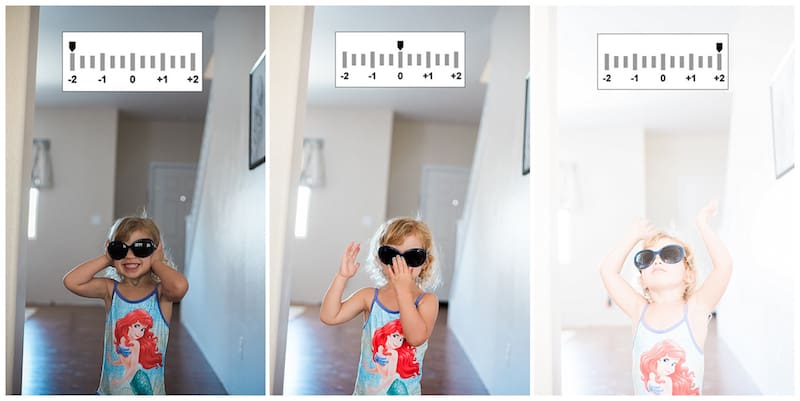
What does overexposing by a stop mean?
You might have also heard someone say they intentionally overexpose by a stop. That means they are intentionally making their scene brighter than what the light meter recommends. If you are underexposed by a stop, it means your image is darker than it should be.
What is a T stop?
A T stop is most often used in videography. It’s the f-stop value from the lens combined with the light transmission value of the lens. It’s not really important in photography, but if you start getting into photography, you’ll hear the term used frequently. T stop values allow videograpers to ensure complete consistency in exposure between cameras and lenses and from shot to shot.
STOP! In the name of learning
Understanding a stop of light can be a tough thing to wrap your brain around. Not only can you not really hold a stop of light in your hand, you can’t really see it represented in visual form. But it is a critical component of photography. Spending a few minutes now and getting the concept straight can pay huge dividends down the road. Understanding a stop of light and how it’s the universal language of exposure makes it easier to nail exposure, use flash and read a histogram, among other photography skills.
If you STILL don’t understand stops, don’t worry. You aren’t alone. But don’t give up. Read this article again. And again. Or watch the video below. Or read a different article on it…sometimes having something explained in a different way makes all the difference.
Once it clicks, you’ll love knowing what a stop is and what it means. And you can go on to mastering your camera and your photography in new and exciting ways!

![Portrait Camera Settings: Getting Great Shots Consistently [2020 Update]](https://colesclassroom.com/wp-content/uploads/2018/01/Port1-1-of-3-768x440.jpg)

