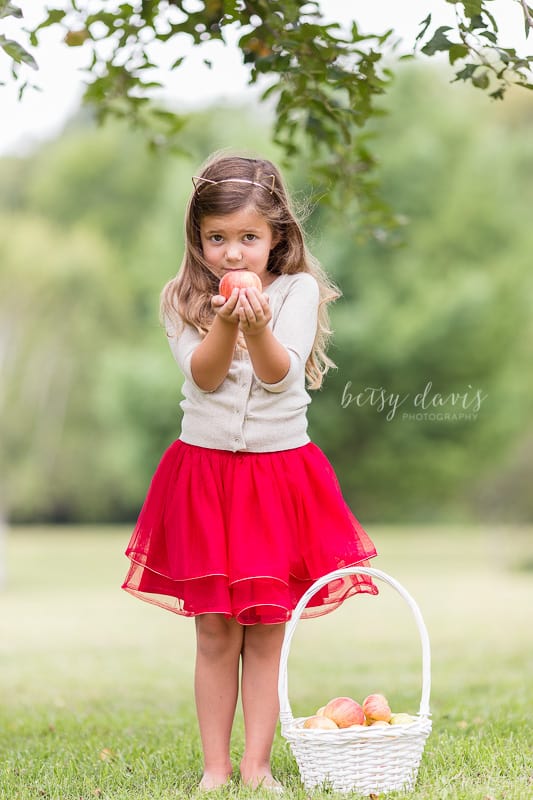
Have you ever wondered how photographers get those gorgeous glowing outdoor portraits of their clients? You know – the ones that evoke thoughts of happy days and lazy summer evenings, using only backlight photography.

After diffused light aka cloudy days, backlight photography is one of an outdoor photographer’s best kinds of lighting. Soon you’ll know all the right camera settings and physical conditions to replicate those stunning portraits!
Why is backlighting used?
Natural light photographers are not always blessed with ideal lighting conditions. A soft diffused light is usually what photographers look for in cloudy days and golden hour. However, as you well know, you hardly have control over the weather. More often than not, your clients’ schedules might not allow for golden hour photography. So you need to learn how to work with the light you’ve got. If you’re lucky enough to be shooting in a location with plentiful trees, you can move your subject into the shade for more even lighting. When the trees are non existent or you just want the pretty glowing look to your photos then backlighting becomes your new best friend.
The last thing you want to have dark shady circles around your client’s eyes while some or all of the rest of their face is in sunlight. And you certainly don’t want your client squinting in their photos. This leaves you with no other option but to turn your subject’s back to the sun. Hence the term backlight photography.
How do you take pictures against the light? How do you take a picture of backlighting?

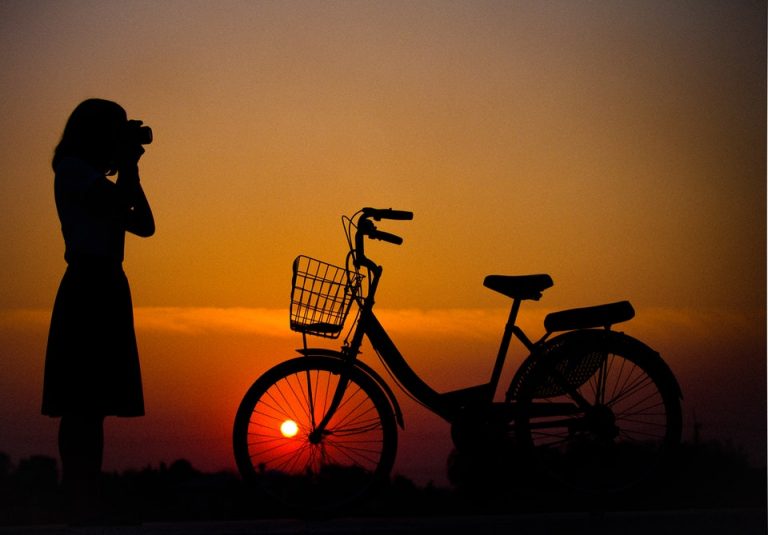
So now that we all know the lighting direction is key for beautiful portraits, we can follow a couple of tips to master backlight photography. First and foremost, the lower the sun is in the sky the better. While technically you can get backlighting at 2pm in the afternoon, the effect won’t be as pretty as when the sun is much lower in the sky. Backlight photography isn’t limited to sunset either, you can still get nice backlighting 2 hours prior to sunset. This is especially helpful when you live in a part of the world when the sun doesn’t set until 10pm in the summer!
Perfect your golden hour photography with these tips
Once you have the light low enough, you do risk getting sun flares in your image due to some rays of light directly hitting your sensor. Try adjusting your position to avoid sun flares. Move into the shade of the grass, or a tree trunk to block out those direct rays. Sometimes, if the sun is slightly higher than sunset, a lens hood may block out that excess light. If you have none of those things, try using your subject’s shadow to block the direct light from hitting your lens. With all that said, don’t be afraid of sun flares, sometimes they add a little something extra to your image. Used sparingly, sun flares are beautiful additions.
Just because the sun is behind your subject, it doesn’t mean that you have to be facing the sun directly. If you position yourself a little to the side of your subject and point your camera slightly away from the sun, you can still achieve beautiful backlighting. Put in another way, position yourself so the sun enters your scene from the left or right corners of your image rather than smack dab in the middle.
How do you expose for backlit subjects?
In backlight photography, when exposing your light properly for your subject, you might end up slightly overexposing your light source. You’re telling your camera to make sure your subject isn’t too dark, and not worry about the resulting brighter highlights. The exact camera setting will vary by location background, the position of the sun, and what mood you’re aiming for (light and airy vs dark and moody). The easiest way to determine your settings is to choose an aperture, use the lowest possible ISO, and then adjust the shutter speed from there. DLRs these days all come with light meters, a built in sensor that also tells your camera what it thinks your settings should be for a good photo. The light meter is a good starting point, but don’t let it dictate your settings. If your photo doesn’t look right then change the settings slightly.
Having trouble understanding all the photography terms? Check out this post.
To help exposure your subject’s face a little better in backlight photography, try positioning your subject around natural reflectors. Light sand and light pavement are excellent environmental reflectors. You can also bring along an actual reflector to be on the safe side. Prop it up using a shrub, tree trunk, or even your camera bag if you don’t have an assistant.
Alternatively you can bring your external flash to use for fill lighting on your subject if you’re not loving the light on your subject’s face. When fill lighting is done right it looks so natural that no one would know a fill light was used. Don’t mount your flash on your camera for this as you don’t want to point it directly at your subjects. Instead, point your flash at your subjects from one side and even from a slightly higher angle. You’re trying to brighten the shadows in their faces, so angle accordingly.
Learn more about how to adjust your camera settings for proper exposure
You’re ready to try for yourself!
We hope after reading this you’re feeling motivated to go out and give backlight photography a try. It truly does create beautiful portraits! Backlight photography also isn’t limited to outdoor settings. It can be done by a big window letting in the golden hour light, or early morning and late afternoon light. Backlight photography can also be done with artificial lighting in studio, is that is more your photography style. Backlight photography really isn’t a complicated method to shooting. If nothing else, just remember to place your subject’s back to the sun and to angle yourself and your camera to minimize lens flares and the haze associated with too much light entering your lens. The rest you can take one step at a time and improve with practice!